You are using an out of date browser. It may not display this or other websites correctly.
You should upgrade or use an alternative browser.
You should upgrade or use an alternative browser.
Festool Parallel Guides Setup
- Thread starter Just F Me
- Start date
Brent Taylor
Member
- Joined
- Aug 5, 2014
- Messages
- 471
KISS
tazprime38
Member
- Joined
- Dec 27, 2008
- Messages
- 268
Brilliant! Never would have thought of that. This solves one of the main problems of getting both guides exactly the same.
GOT8SPD said:I believe if you look at his youtube videos, that's the only video he's made regarding Festool products. Because of this video, I went out and purchased the parallel guides set from Bob Marino today.
FYI, check out Ron Paulks video about modifying the stops on the parallel guides. I did it and it helps a lot, especially on long cuts.
starting around 2min 30 seconds.
With that method, you have to take the parallel guides off the guide rail every time you want to change the cut length dimension.
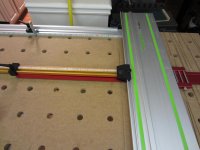
Here's another way to set both stops on the parallel guides to exactly the same length using a Woodpecker woodworking rule and rule stop. The only limitation is the length of your rule. You could even use the rule stop with a much longer piece of aluminum from a home center.
Also, my method eliminates any inaccuracy that could be introduced by a variance from end to end of the guide rail or guide rail cut strip.
Edited to add:
If you use the Woodpecker rule and rule stop to get your measurements and then use it to setup your tool, you are using one measuring device for everything and thus eliminating any variance associated with using a tape measure to get your dimension and then using the scale on whatever tool you are using to setup that dimension. Using the same measuring device for measuring and setup eliminates or greatly reduces errors.
Attachments
RLJ-Atl said:With that method, you have to take the parallel guides off the guide rail every time you want to change the cut length dimension.
Here's another way to set the stops on the parallel guides to exactly the same length using a Woodpecker woodworking rule and rule stop. The only limitation is the length of your rule. You could even use the rule stop with a much longer piece of aluminum from a home center.
Also, my method eliminates any inaccuracy that could be introduced by a variance from end to end of the guide rail or guide rail cut strip.
This makes much more sense, Good idea.
Don't all these methods really rely on the splinter strip being in good shape? I cut different thicknesses often so accounting for that micro inch is something to think about. Not crucial but you know the feeling when you stack all your parts together and feel for error kind of thinking.
oneinch said:That's my YouTube video. I glad someone found it useful.
Thanks for making the video! Because of your video, I went out and supported our economy which supported the German economy...LOL [big grin]
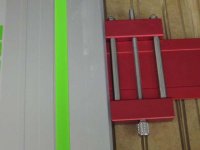
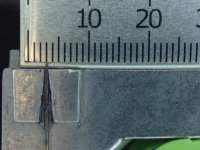
That video is excellent for two points - 1) initial matching set-up is key, and 2) using a reference (in this case the guides reference each other) is better than measuring. However, is is a bit of a problem to disconnect the guides from the rails for every setting change. I used another option to help get the guides equal - and aid my aging eyes. Just like in the video, you must calibrate the guides to each other. In this case you much match the millimeter rules with the initial adjustments. I then broke off the tip of a sewing needle and place it into the "v" grove on each stop and added a few drops of medium CA glue. Now it's much easier to make sure I have matching settings.
Here I was cutting 3mm strips with the PG extensions. The needle doesn't interfere with the travel of the stops, and it's about as visually accurate as I can imagine. Works fine in the guides without the extensions as well.
Here I was cutting 3mm strips with the PG extensions. The needle doesn't interfere with the travel of the stops, and it's about as visually accurate as I can imagine. Works fine in the guides without the extensions as well.
Attachments

Sparktrician
Member
- Joined
- Dec 4, 2009
- Messages
- 4,608
RichardZ said:That video is excellent for two points - 1) initial matching set-up is key, and 2) using a reference (in this case the guides reference each other) is better than measuring. However, is is a bit of a problem to disconnect the guides from the rails for every setting change. I used another option to help get the guides equal - and aid my aging eyes. Just like in the video, you must calibrate the guides to each other. In this case you much match the millimeter rules with the initial adjustments. I then broke off the tip of a sewing needle and place it into the "v" grove on each stop and added a few drops of medium CA glue. Now it's much easier to make sure I have matching settings.
Here I was cutting 3mm strips with the PG extensions. The needle doesn't interfere with the travel of the stops, and it's about as visually accurate as I can imagine. Works fine in the guides without the extensions as well.
Great idea!!! I think I'll try to paint the needle Sweet Pea, though...
[smile]
- Joined
- Nov 14, 2013
- Messages
- 3,575
Sparktrician said:RichardZ said:That video is excellent for two points - 1) initial matching set-up is key, and 2) using a reference (in this case the guides reference each other) is better than measuring. However, is is a bit of a problem to disconnect the guides from the rails for every setting change. I used another option to help get the guides equal - and aid my aging eyes. Just like in the video, you must calibrate the guides to each other. In this case you much match the millimeter rules with the initial adjustments. I then broke off the tip of a sewing needle and place it into the "v" grove on each stop and added a few drops of medium CA glue. Now it's much easier to make sure I have matching settings.
Here I was cutting 3mm strips with the PG extensions. The needle doesn't interfere with the travel of the stops, and it's about as visually accurate as I can imagine. Works fine in the guides without the extensions as well.
Great idea!!! I think I'll try to paint the needle Sweet Pea, though...
[smile]
I wonder if you could get a needle anodized? I might have to check into that just for grins and giggles...
Similar threads
- Replies
- 18
- Views
- 11K
- Replies
- 45
- Views
- 29K
- Replies
- 0
- Views
- 188
- Replies
- 0
- Views
- 66