Festool Track Saw + MFT equals great crosscuts and accuracy

air19

Member
Joined
Dec 25, 2015
Messages
43
My first post as a new Festool owner.  In the last two months I have purchased the Festool TS55, the CT 36, the 1400 router, and the MFT/3.  I have been woodworking for about 15 years, and I haven't smiled so much about using tools in a long time.  Each Festool product has surprised me.  Today I used the Tracksaw with the MFT for the first time and I accomplished something I have never done before. 

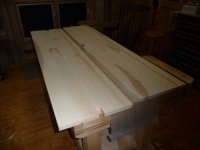
I am working on a platform bed and today I tackled the 28" by 62" headboard.  I glued up the boards in sections until I got to two 14" sections with oversized boards that I needed to square up. 

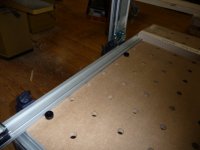
Thanks to many suggestions from this forum and Paul Marcel's videos I went through a great process to setup my MFT.  I bought an extra clamp for the back rail and used two clamps instead of the big protractor.  With my precision dogs I set up the back rail and then set up the track at 90 degrees using another pair of dogs.  Didn't even need a square with this method.  I put the slop stop in the rail also.  Then I did half a dozen test cuts to prove that I was getting true 90 degree cuts.  Everything worked great. 

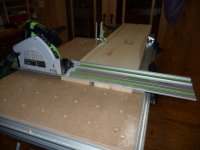
My cross cut capacity on the MFT the way I had it set up was 27.5", so without making any modifications I decided to cut the two 14" sections individually.  I marked lines on each board where I wanted to square them off.  Then I accomplished something I haven't been able to do before - I cross cut a big board perfectly.  I have used sleds before on my table saw and I always struggle keeping bigger boards square to the sled fence.  Today with the board on the MFT against the fence and one clamp, probably not necessary, I made a perfect square cut.  For those of you with tracksaws and the MFT that have done this hundreds of times I'm sure this is old hat.  But today doing it for the first time I was just amazed how easy and accurate this was. 

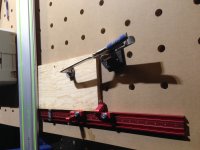
Then things got interesting.  When I finished cutting the second board, another 14" by 62" section, my length was long by 1/32" since I was going off my pencil lines.  I put it back on the MFT and tried to take off 1/32".  I took my time setting the board up just proud of the clear splinter guard and then made my cut.  Comparing this second board to the first board, I hadn't cut enough off.  I had cut about 1/64".  Back to the MFT for a second cut, and this time I got it.  Twice I shaved about 1/64" off a 14" wide board with perfect 90 degree accuracy.  I was blown away.  This opens up a level of precision I never could have achieved before.  With a good sled on the table saw I have to work hard to take off 1/16" and with a board this big and I usually can't make a straight cut.

Another big smile today that I just had to share. 


Attachments

  • 2016-02-01 16.05.42.jpg
    2016-02-01 16.05.42.jpg
    166.5 KB · Views: 996
  • 2016-02-01 16.06.31.jpg
    2016-02-01 16.06.31.jpg
    156.2 KB · Views: 1,282
  • 2016-02-01 16.09.22.jpg
    2016-02-01 16.09.22.jpg
    156.2 KB · Views: 1,650
  • 2016-02-01 16.07.54.jpg
    2016-02-01 16.07.54.jpg
    156.8 KB · Views: 902
Pretty cool, isn't it? I'm still very new to Festool but am loving  the tools and the results I get. The tools make it possible for me to get results I was never able to achieve before without a lot more trouble if at all.
 
Great report.

You will be even more thrilled with the Domino machine and the Festool drills.
 
air19 said:
... With my precision dogs I set up the back rail and then set up the track at 90 degrees using another pair of dogs.  Didn't even need a square with this method.  I put the slop stop in the rail also.  Then I did half a dozen test cuts to prove that I was getting true 90 degree cuts.

Now, try that without using the dogs (ie, the MFT/3 table itself but not the aftermarket parts' performance) and report back please. Why did you use the SlopStop? Did your MFT/3 table was delivered with already worn out alignment tab?
 
Thanks for your encouragement everyone.

Birdhunter - I've been thinking alot about the Domino.  I built a horizontal router setup with a table that moves in 3 dimensions so I can do all my slot mortising on it.  But there are times, like I'm learning with the track saw, where it is much easier to set the wood down in place and bring the tool to it, especially in working with large wood pieces.  Hence the interest in the Domino. 

Ruhia - By using the dogs I am leveraging the most reliable part of the MFT table - the perfect alignment of the dog holes based on the way the top is manufactured.  Maybe the back rail is aligned with the horizontal dog holes, but there is a chance it might not be.  When the mdf top is placed in the table there might be a bit of play before it is tighted down.  Did the person who put it in make sure it was perfectly aligned with the back - I don't know.  The clamps that I use with the rail have some movement before they are fully tighted down.  But the dog holes are perfect and 4 dogs cost me only $26 so that's what I did and it will work every time I use the table.

There is a lot to learn about fully leveraging the MFT and I also got the dogs to encourage myself to use them as often as possible to get more out of the table than I originally thought, so just more motivation. 

I bought the slop stop for about $20 again for cheap insurance that my first cut and every cut after that would be based on a tight connection between the track and the front track support.  I was going to be making a cut into the headboard for an expensive bed that I already had put about 20 hours into.  Is the slop stop really needed?  I don't know.  But I do rely on the opinions of many in this forum who have traveled before me. 

 
091f3385e91e67fe99bba80ffb562daf.jpg


Just got mine about a week ago. Love it!
 
Congrats air19, it's a good feeling  [big grin]

I have a custom made larger MFT style table and rail dogs.  I put the wood up against bench dogs and the rail dogs hold the track at 90 degrees to the piece.  To avoid the track sagging before and after the cut I use spare bits of the same thickness wood or height adjusting spacers.

I'm sure there's something the real MFT and fixed rail does better but can someone tell me what it achieves I can't already?
 
Air19,

I resisted buying a Domino for a long time due to the cost and not understanding what the tool could do.

I can honestly say that the Domino has made a major change in my woodworking methods. It is an amazing machine. The Festool drills, saws, sanders, etc are great tools; but the Domino is truly a game changer.

Now, I have and use both Dominos.
 
RuhiA said:
air19 said:
... With my precision dogs I set up the back rail and then set up the track at 90 degrees using another pair of dogs.  Didn't even need a square with this method.  I put the slop stop in the rail also.  Then I did half a dozen test cuts to prove that I was getting true 90 degree cuts.

Now, try that without using the dogs (ie, the MFT/3 table itself but not the aftermarket parts' performance) and report back please. Why did you use the SlopStop? Did your MFT/3 table was delivered with already worn out alignment tab?

It is not the alignment tab that wears.  It is the slot the tab guzinta that wears.  The rail is much softer metal than the tab and before I got that plastic gizmo, i was wearing little notches into the rail slot.  Once i installed a Slop Stop, the wear has not occurred in either the rail slot OR the Slop Stop.  It is the best insurance the OP could have installed.  He is way ahead of his game now.
Tinker
 
turnpike said:
I'm sure there's something the real MFT and fixed rail does better but can someone tell me what it achieves I can't already?
Infinite angles!

On the other hand I can rip 49" on my holey table, but it only works at 90* and 45* (can't cut as wide at 45*).
 
Peter_C said:
turnpike said:
I'm sure there's something the real MFT and fixed rail does better but can someone tell me what it achieves I can't already?
Infinite angles!

On the other hand I can rip 49" on my holey table, but it only works at 90* and 45* (can't cut as wide at 45*).

I have ripped 8 footers on my MFT/3.  I lay the guid rail on top of the board with clamps under each end and cut way.  If cutting a board narrower that suitable for the rail, I use a couple of RMW guides and with an extra board clamped to get ether with to piece being ripped and clamps holding the rail to the clamped boards, I rip away.
Tinker
 
turnpike said:
I'm sure there's something the real MFT and fixed rail does better but can someone tell me what it achieves I can't already?

Thats exactly my set up.
I think the MFT and all the extras help speed up a few things like setting up each cut and certainly setting up repeat sized cuts. Also Angles are easier with the accessories. The bench allows clamping to the sides in an easy and more versatile manner than most. There are more add ons and accessories  . . . .

I'd love one, but the cost vs size/usability hasn't swayed me yet. I could bolt two together but that's even more ££. For the moment I'm happy with my home made MFT bench and my Dogs & Clamps.
 
Tinker said:
I have ripped 8 footers on my MFT/3.  I lay the guid rail on top of the board with clamps under each end and cut way.  If cutting a board narrower that suitable for the rail, I use a couple of RMW guides and with an extra board clamped to get ether with to piece being ripped and clamps holding the rail to the clamped boards, I rip away.
Tinker
I meant I can rip 49" between the rail dogs. I have Woodpeckers PGS and decided to play a little today. Thinking a fence mounted with rail dogs would allow me to use stops. Plus with the PGS I can cut narrow strips with some accuracy. This idea needs to be expanded on with a t-track mounted under the rail, zero the PGS, then cut the t-track using the track saw. If the far side needs to be squared dogs could be used, and the PGS's narrow stock ripping guides could still be utilized. Anyone have a home brew fence system with stops that works well?

[attachimg=1]
 

Attachments

  • IMG_0092.JPG
    IMG_0092.JPG
    1.8 MB · Views: 13,550
I've been using a track saw and MFT table I recently bought, which has been an amazing asset. 

One thing I've had trouble with is knowing the depth to plunge cut boards with saw without going too deep into the table.  Any tips/tricks (other than simply trying to measure, which I've been doing but usually end up too shallow)?
 
Tiger26 said:
I've been using a track saw and MFT table I recently bought, which has been an amazing asset. 

One thing I've had trouble with is knowing the depth to plunge cut boards with saw without going too deep into the table.  Any tips/tricks (other than simply trying to measure, which I've been doing but usually end up too shallow)?

[member=60055]Tiger26[/member]
I am running a red saw on a Bosch rail attached to the MFT, but I believe that the theory still applies as it also does accurate cuts.

Assuming that the depth of cut is accurate, both on the rail and off the rail, then I usually set the depth to 2-mm greater than the thickness of the wood I am cutting... however 1-mm should be fine too.

If you are cutting rips on a bowed card table, then you want 2-mm or 3 more than the thickness of the wood.

The only chin scratcher is 45 degree cuts.
I usually set the 45 then plunge with the saw off until the blade touches the bench, then move the depth of cut adjuster back till it stops.
( It should be 1.414 x the thickness of the wood, when the saw touches on the waste side, if you prefer math(s). )
And if the depth is right you will end up with a notch on the side of the wood under the fence.
So I then usually use a chisel to sideways-slice off the small 45 degree notch, rather than go deeper into the MFT. This is discovered by accident, but the chisel method works well.
 
Tiger26 said:
I've been using a track saw and MFT table I recently bought, which has been an amazing asset. 

One thing I've had trouble with is knowing the depth to plunge cut boards with saw without going too deep into the table.  Any tips/tricks (other than simply trying to measure, which I've been doing but usually end up too shallow)?

I just use a sacrificial 1" foam board underneath whatever material I'm cutting - then just add a few mm to the depth of cut. Works great.
 
I believe you loose 5mm of cutting capacity when the track saw is set up on a track.  So I take the material I'm going to cut and put the saw on it and lower the blade until it just gets through that material.  Then I add 5mm to the depth of cut on the track saw to get my final depth before I move the setup over to the track.

 
The red saw has the depth guide rotate for on-track and off track.
Festool's method is shown at ~235 in the video:=155

[member=59771]air19[/member]
Add 1-2 mm (or 1/16th") to the thickness of your wood. Use either the LHS (Left Hand Side) or the RHS if it is on/off the rail/track.
 
Back
Top