Heathwarren
Member
- Joined
- Dec 12, 2022
- Messages
- 16
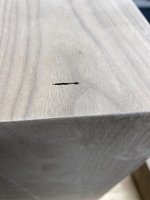
I built some mitered boxes, but my lumber was thinner than I wanted (17mm) and my 5mm domino - 45 degree mitered cut barely cut through the other side. Just enough to notice. I need to fill it in, but not sure the best way to do it. What are some recommendations on products that you have had success with in situations like this? The wood in question is walnut. I plan to finish it with a gel polyurethane or Rubio Monocoat. I haven’t decided which one yet. Thanks