Finally did it...

smorgasbord

Member
Joined
Jan 7, 2022
Messages
1,059
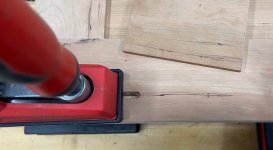
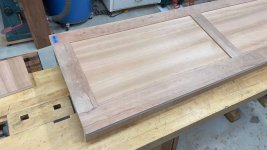
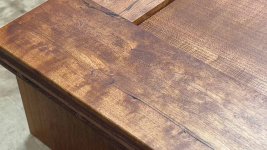
Blew it, that is. I've seen other people do it, but I've been lucky/careful until today when I dominoed too deep and went through my piece:

[attachimg=1]

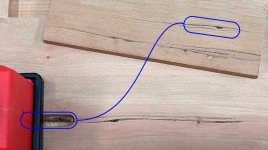
Decided to glue up anyway and then decide how to address. So, I think my options are:

1) Glue a contrasting wood in place. This piece is all cherry so that's out.

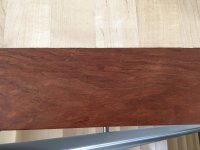
2) Glue a piece from the same board (pictured, even has the same grain) in. Then I'll need to think about the best way to mill the piece I need. I'm thinking using my CNC to cut a tapered wall plug that I'll hammer in with glue.

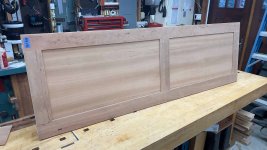
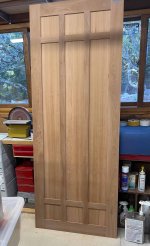
3) This is a fake frame and panel (a headboard). The "frame" is really just a ¼" thick piece of wood glued onto a sheet of plywood. I could try to cut away the entire "frame" piece with tablesaw and router and make and glue a replacement. But, that seems like a ton of work, and I'd have to be good to get the three joints (there's a crosspiece in the middle) tight again. This is probably the "right" way to fix this.

4) I could rip a groove the entire length of the frame and the width of the domino (6mm) and glue a contrasting wood in. At least way it's not a plug, it's an inlay.

5) I could rip away that inch or so of the "frame" so the domino hole is gone and glue another long piece in. That way it would look like the "frame" itself was a glue-up. Not the best look, but most non-woodworkers wouldn't notice or care. I could even make this piece an ⅛" or 3/16" thicker so it would look like I wanted to beef up the frame at the edge (this is at the bottom of the headboard, which is about 64" wide and 22" tall).

Any other ideas or a vote on these?
TIA


Attachments

  • blewit.jpg
    blewit.jpg
    124.2 KB · Views: 759
I cannot visualize the whole assembly, so any suggestion might fly in the face of logic.  More information might get you a more logical response.

But here I go (flying blind):

Add a decorative molding.

Add decorative shapes (star, heart, letters, dots, etc.)

Beyond decorative aspects are not forthcoming from me until I understand what this is, what it looks like, how it functions.  In other words, some context.
 
I'd definitely go the CNC route. If you pick the grain color carefully and match the grain direction/flow carefully, from any more than 2 feet away you'll not notice it. Put a slight back draft on the plug so you can hammer it home and get a line-to-line fit.

Besides, if this is the bottom of the head board maybe a couple of bed pillows will help hide the bad luck.  [big grin]

In this Jatoba floor edging, there are a couple of matched grain Jatoba plugs hiding screws that hold it to the sub floor. I took this photo about 2' or so away from the Brazilian cherry.

[attachimg=1]
 

Attachments

  • 5277_S.jpg
    5277_S.jpg
    281.3 KB · Views: 662
At the bottom of the headboard?

Get some light-weight leather and attach it to the base.

I find mixing leather with wood almost always looks good.  There are several ways to do this.  If you choose this route, I can outline a few.  Pretty easy.  Not too expensive.

Adding leather to woodworking projects is a good skill to own. 

If this is not going to touch any bedding, then cane panels (traditionally applied, not IKEA-style) can make a nice contrast.  Not hard to do, but there is a learning curve.
 
I've done it too, I think we all have [unsure]
As a somewhat educated guess....I would say that you are using 6 x 40 Dominos in 3/4" material, 15mm into the face and 25mm into the end grain? All it takes it to plunge a face at the wrong depth....out the other side you go. That's how I did it.
This is the primary reason that most guys use 5 x 30 Dominos, in this situation. 15mm into each side, somewhat foolproof.
 
I have done repairs like that with my shaper origin.  With careful wood selection, it was almost invisible.

Bob

 
It's a headboard for my never-ending Murphy bed project.
Here's the full headboard:
[attachimg=1]

Here's one of the panels that'll be the front when the bed is closed (and the headboard hidden inside):
[attachimg=2]

And here's an image pulled from the interwebs that shows an open bed with a headboard:
[attachimg=3]

I made the bed deeper than standard, so there's actually a shelf just below the top of the headboard, so that we could stack pillows above it in order to close the bed.
 

Attachments

  • IMG_5476.jpg
    IMG_5476.jpg
    150.8 KB · Views: 594
  • IMG_5478.jpg
    IMG_5478.jpg
    175.9 KB · Views: 587
  • Screenshot 2024-11-17 at 10.40.59 AM.png
    Screenshot 2024-11-17 at 10.40.59 AM.png
    604.5 KB · Views: 592
Crazyraceguy said:
As a somewhat educated guess....I would say that you are using 6 x 40 Dominos in 3/4" material, 15mm into the face and 25mm into the end grain? All it takes it to plunge a face at the wrong depth....out the other side you go. That's how I did it.

You're really close, but I found my own way to mess it up, working too late while thinking about another aspect of the project while doing this....

The headboard is actually a full inch thick thanks to the applied ¼" thick frame pieces. So, if I had been thinking properly, I could have simply done 20mm deep mortises on each. But, I wasn't thinking clearly and didn't realize that I'd be attaching where the frame pieces were and so was thinking I only had 18mm to work with. And I was worried that a 15mm deep mortise would actually be more like 16 or 17mm deep, which might be too close. So I was playing around with different things, cut the deep mortise (tight) in the end using the cross-stop at 10cm, and was thinking I should cut the other tight mortise and so had to setup the other cross-stop at 10cm and that was a pain and then forgot about the depth setting.

Which has always been my paranoia, re-re-checking the depth setting before cutting. But not this time, unfortunately.

The good news is that the cross-stops are calibrated well (never adjusted them) and the edges of the boards line up perfectly. I did  the rest of the face mortises (at 15mm depth!) on tight and the other edge mortises on loose (only 1 loose setting on the DF700) and it did all glue up easily at least.

Looking at my plans, I do have the bottom of the headboard sitting about ¾" below the top of the mattress. Unfortunately, and the hardware directions don't tell you this, but when you use the extended legs to be able to use a thicker mattress (12" instead of 10" or so), you have to move the headboard back so the folded up bed doesn't hit it, which creates a gap when the bed is down.

I didn't 100% trust the dimensions given, and so ended up mocking things up myself with the hardware and scrap and taking measurements. Here's a screenshot of the vector file I drew up showing a cross-section:
[attachimg=1]

It's to scale.


Attachments

  • Screenshot 2024-11-17 at 11.27.26 AM.png
    Screenshot 2024-11-17 at 11.27.26 AM.png
    309.8 KB · Views: 592
I'm gonna try the CNC plug route since I have such a good piece for a potential match, and the area isn't front and center.

With calipers, I measured 6.38mm wide and 19.68mm long. The hole doesn't look clean, maybe my technique sucks, maybe the Seneca adapter introduces some flex. My thinking is to cut a ¼"-⅜" thick plug that's 6mmx19.4mm on one side and 6.5mmx20mm on the other, with corresponding radii. Then glue and tap in pretty strongly.
 
OK, so here are the results:

[attachimg=1]

And close to its in-service orientation:

[attachimg=2]

We'll see what happens after the finish is applied (Either pure tung oil or Odie's oil, after a light stain application), but it looks like it's going to be just fine. Thanks.
 

Attachments

  • HBFlat.jpg
    HBFlat.jpg
    144.3 KB · Views: 530
  • HBVert.jpg
    HBVert.jpg
    94.8 KB · Views: 521
smorgasbord said:
You're really close, but I found my own way to mess it up, working too late while thinking about another aspect of the project while doing this....

Ah, hands doing one thing while brain was doing another.....that cost me half a thumb.

You did a fine job of fixing it, and got lucky about the location, in the first place. The whole thing looks great.
 
[member=77266]smorgasbord[/member] the bed looks terrific and your recovery with the plug was excellent.  Please share photos of the finished product.
 
Got the headboard stained and a coat of finish applied. Here's what the fix looks like up close:
[attachimg=1]

So, the stain soaked into the end grain of the hole and plug and gives a domino outline. That said, the wood itself matches perfectly and not sure how to avoid the end grain stain soak in the future.

I think given the location, when the bed is assembled, it won't be noticeable even to people looking closely. I'll know by the end of the week.
 

Attachments

  • Repair.jpg
    Repair.jpg
    122 KB · Views: 286
Here's the final look with the bed in situ, but without any bedding on the mattress (the pillows will certainly cover it):
[attachimg=1]

.

.

.

And here's an arrow to point it out:
[attachimg=2]
 

Attachments

  • Repair1.jpg
    Repair1.jpg
    119.5 KB · Views: 194
  • Repair2.jpg
    Repair2.jpg
    67.9 KB · Views: 189
smorgasbord said:
So, the stain soaked into the end grain of the hole and plug and gives a domino outline. That said, the wood itself matches perfectly and not sure how to avoid the end grain stain soak in the future.

A careful application of shellac (or sanding sealer), with a small artist brush, can seal the end grain.
Keep it away from the other surfaces and everything will blend nicely.
 
Back
Top