- Joined
- Oct 16, 2015
- Messages
- 5,829
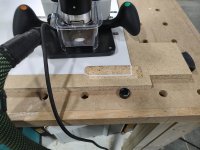
I mentioned this earlier, testing the method, but could not complete it at the time. The hardware they got me was too deep for the cabinet. Fast forward through a few days of other interruptions and waiting for the right ones. This morning was the right time. I meant to take a few more pics, but the main point shows.
I added some blocking to the sides to keep from blowing the edgebanging off. I cut them at 1 1/2" to make it simple to grid/reference.
I takes two different bits to make this profile. I cut the bottom flat with a 1/4" O-flute bit, then made a second pass with a 90 degree V-bit, right on the line. Two bits, two set-ups, and two doors, this took some time. I'm happy to have enough experience with the Shaper to feel comfortable with doing this type of thing.
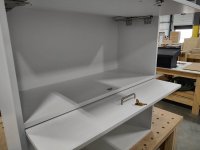
I honestly don't know how I would have done this without it. I suppose a couple of templates, routers and bushings could get it done, but it would take a lot more work.
If I had more of these to do at once, I would probably reverse the set-up. Instead of putting the tape directly on the door and cutting with the pocket close to me, I would put the tape out onto a wider fixture board and then just slide each door into it, cutting on the far side of the door. This would mean gridding only once, rather than each time.
I really don't know how the manufacturer intends this to be done? They give you a diagram, with all of the details/dimensions you need, but that's it. Maybe they assume CNC? but that's not particularly apparent in the documentation and takes it right out of the hands of many. It's not exactly homeowner type hardware, but still.....
I added some blocking to the sides to keep from blowing the edgebanging off. I cut them at 1 1/2" to make it simple to grid/reference.
I takes two different bits to make this profile. I cut the bottom flat with a 1/4" O-flute bit, then made a second pass with a 90 degree V-bit, right on the line. Two bits, two set-ups, and two doors, this took some time. I'm happy to have enough experience with the Shaper to feel comfortable with doing this type of thing.
I honestly don't know how I would have done this without it. I suppose a couple of templates, routers and bushings could get it done, but it would take a lot more work.
If I had more of these to do at once, I would probably reverse the set-up. Instead of putting the tape directly on the door and cutting with the pocket close to me, I would put the tape out onto a wider fixture board and then just slide each door into it, cutting on the far side of the door. This would mean gridding only once, rather than each time.
I really don't know how the manufacturer intends this to be done? They give you a diagram, with all of the details/dimensions you need, but that's it. Maybe they assume CNC? but that's not particularly apparent in the documentation and takes it right out of the hands of many. It's not exactly homeowner type hardware, but still.....