Fireplace build out

Bikeboy80

Member
Joined
Jul 30, 2012
Messages
467
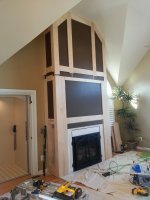
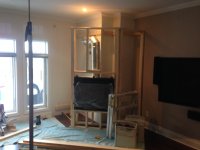
I should be starting a fireplace trim job this week (yes, should....I had planed to start the middle of June before the client decided to replace the gas insert) Here is a drawing that I drew up and the client approved it.[attachimg=#]

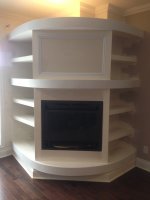
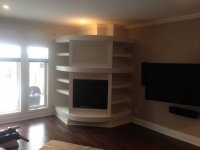
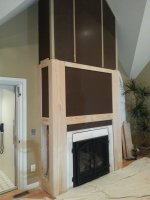
It will be a fairly simple design, recessed panels with 3/4 thick rails, square edges. The drawing is close to scale, the ceiling is ~14' and the angles at the top are the angled ceilings from the underside of the roof. There will be a flat screen TV mounted just above the fireplace. On the side there will be a small cabinet for the cable box, etc. I have planed for a set of Soss hinges with a push, magnetic catch to make it as hidden as possible. The gas insert is surrounded by marble.

I have done a few custom mantles/built-ins in the past but nothing of this scale. So a few questions....

Right now there is just drywall, can I build the "rail" structure right over it and maybe just sand down the painted drywall to obtain a smooth finish on the recessed areas. Or would I be better off skinning the whole thing in 1/4 ply or similar first? The entire thing will be a paint finish.

Being that it will be painted I was thinking of using MDF for the rails, figuring I would not have to worry about the movement of wood. Is there another option or material I should look at?

I figured on using my Domino for as many joints as possible to register the face surfaces, thoughts on this?

Anything else that I may be missing?

I am really excited to be doing this job! [big grin] It's for a really good client and it will be a nice portfolio piece to go along with the many months of other work we have been doing at the home. I just don't want to screw it up! [scared]
 
Funny you posted this now.  I am starting one 8 days from now.

Regarding the drywall - I would skin instead.

MDF - Great until you have edges that need to be dealt with.  I am going with solid wood for my rails and stiles and cabinet grade plywood for the recessed panels.

I will be using the Domino for registration and then pocket screws for speed.

Take pictures and let us see your progress!

Peter
 
Bikeboy80 said:
It will be a fairly simple design, recessed panels with 3/4 thick rails, square edges.
I think 3/4" will give you a fairly large shadow line although the rails and stiles look to be about 6" wide so it may be ok. You might want to use 5/8 or evern 1/2"

Bikeboy80 said:
Right now there is just drywall, can I build the "rail" structure right over it and maybe just sand down the painted drywall to obtain a smooth finish on the recessed areas. Or would I be better off skinning the whole thing in 1/4 ply or similar first? The entire thing will be a paint finish.

Skim coat in plaster if you can or skim with some 1/4" HDF.

Bikeboy80 said:
Being that it will be painted I was thinking of using MDF for the rails, figuring I would not have to worry about the movement of wood. Is there another option or material I should look at?

With the width of those rails and stiles, MDF is the best choice. If you are not applying a molding or profile to the inside edges, you will need to seal the edges with some sizing.

Bikeboy80 said:
I figured on using my Domino for as many joints as possible to register the face surfaces, thoughts on this?

Sure the Domino will work. I would use a biscuit joiner cause you can play with the joint a bit particularly when working with walls that are not true and are often bumpy.

Bikeboy80 said:
Anything else that I may be missing?

Probably. Nothing simple is ever easy. [big grin]

Tim
 
I've worked on a few where the drywall was sanded and painted, it worked well. My preference would be to cover with MDF or as Tim mention HDF. If you have to deal with the edges at all, glue mixed 50% with water, or oil based primer.

I agree with Tim, you need to reduce the edge bulk, thinner material or trim. Maybe a 1/4" face width bevel on the edge if you stick with 3/4???

You could rip all of your pieces out of sheets of lite-weight MDF. Be careful how you fasten it together and to the wall. Bondo will be your friend on the seams.

I would use my Domino, cut mortice, glue up, join, then shoot a 5/8" brad (a slight angle will prevent pop through if your using 1/2" material, watch where your other hand is before you pull the trigger) through the product and domino to act as a key/lock, this will reduce clamp time.

Tom
 
I know people want to do it all the time but one of the worst places to put a big screen TV is above a fireplace like in the above design. The heat from the fireplace can adversely effect the TV and the viewing angle is terrible.

John
 
Just a few reminders,

don't forget about the switch for the fireplace.  If you place it on the side which is typical, place the height of the switch so that it won't interfere with future additions to the mantel.  Above the shelf is a good location.
Power outlet, HDMI, RG6 and internet cable to the location of TV
The shelf to hold the TV should be slightly deeper than the TV or Stand.  The shelf will help direct the heat infront of the TV instead of directly under it.
If the TV is to hang on the Mantel, be sure to account for the added forces, both at the TV connection and the wall.
1/2" cove placed where the mantel connects to the wall isn't terribly ugly and will hide any inconsisency from the drywall.  Of course this depends on the client.  I wouldn't use it for a high paying client.

If you think there's potiential for more work, the client may need side shelving or cabinets for the TV receiver and surround sound speakers.

Jeff
 
CarolinaNomad said:
Just a few reminders,

Power outlet, HDMI, RG6 and internet cable to the location of TV
The shelf to hold the TV should be slightly deeper than the TV or Stand.  The shelf will help direct the heat infront of the TV instead of directly under it.
If the TV is to hang on the Mantel, be sure to account for the added forces, both at the TV connection and the wall.
1/2" cove placed where the mantel connects to the wall isn't terribly ugly and will hide any inconsisency from the drywall.  Of course this depends on the client.  I wouldn't use it for a high paying client.

If you think there's potiential for more work, the client may need side shelving or cabinets for the TV receiver and surround sound speakers.

Jeff

Yea, I didn't mention anything having to do with the TV....3pedalmini is doing all of the AV in the home. We've been working through this process for a few months now. I'm providing him with the cabinet in the side and good framing behind the TV mount, he is taking care of the rest.

This is a VERY good client of mine, it the last 8 years we have done a few hundred thousand dollars worth of work for her at their home nearby, rental condo in Cape May, NJ and now this, their vacation home also in Cape May. Nice beach views, been there about 13 weeks this year moving from one project to the next. [big grin]

Thanks for the pointers, will post some progress pictures as the work starts!

 
Soo yea...the job got pushed off again. [unsure]

We were waiting for the marble to be cut and installed around the new fireplace, now the client is in the house for the month of August. September here we come!
 
And we're back! [big grin]

My client called me a few weeks ago and asked if the surround could be finished for New Year's. So my first question was "Did the marble surround ever get installed? And the answer was no, but the installer would be going down on Dec 5th. Well guess what I am down here and still no marble!  [blink] I am being told this weekend..guess we'll see.

In the mean time I have gotten started.

I first closed off some horrible storage cabinets on the sides and built new ones including figuring out how to install Soss hinges for the first time.[attachimg=1]

Then I built the " ladders" for the sides and preassembled them using dominos and pocket screws.[attachimg=2]

Here is where I got to by then end of the day...more fun tomorrow!
[attachimg=3]

A close up of one of the cabinets
[attachimg=4]

I am glad I went with the suggestions to skin the center panels with hardboard. It helped to get the other trim to pass over the drywall cornerbead, thanks!
 

Attachments

  • image.jpg
    image.jpg
    1.4 MB · Views: 1,737
  • image.jpg
    image.jpg
    1.7 MB · Views: 1,363
  • image.jpg
    image.jpg
    1.4 MB · Views: 3,209
  • image.jpg
    image.jpg
    1.3 MB · Views: 1,394
Thanks Guys...the conduit runs down to a rack setup in the master bedroom closet, that 3pedalmini is installing. You would have to ask him what all is going into it! [wink]
 
Peter Halle said:
Funny you posted this now.  I am starting one 8 days from now.

Regarding the drywall - I would skin instead.

MDF - Great until you have edges that need to be dealt with.  I am going with solid wood for my rails and stiles and cabinet grade plywood for the recessed panels.

I will be using the Domino for registration and then pocket screws for speed.

Take pictures and let us see your progress!

Peter

If anyone is interested, we sell rustic wood beams that can be used for mantles. 
Check us out!  http://www.realantiquewood.com
We are located in Irvington, NJ  :)
 
Here is another picture from today[attachimg=#]

Unfortunately I had to clean up midday and head home so I will have more updates next week!
 

Attachments

  • image.jpg
    image.jpg
    1.5 MB · Views: 1,710
Here is my version of a fireplace build out. The first pic is when I had just started tearing out the framing that the fireplace guys had done on either side which if it had just been drywalled would have made a big box with lots of wasted space behind, you can tell where the framing was where they had cut the base on the left side which left no room beside the window for curtains of any kind and would have covered up power, data, and a subwoofer plug.
The clients wanted to make use of the space on either side and have shelves for books and what not and asked me to come up with something and this is what I came up with, they couldn't be happier!


Attachments

  • IMG_3018.JPG
    IMG_3018.JPG
    1.7 MB · Views: 509
  • IMG_3030.jpg
    IMG_3030.jpg
    1.9 MB · Views: 541
  • IMG_3071.jpg
    IMG_3071.jpg
    1.6 MB · Views: 614
  • IMG_3072.JPG
    IMG_3072.JPG
    1.3 MB · Views: 517
Back
Top