First festool cabinet

Jlovvorn

Member
Joined
Apr 3, 2016
Messages
13
I made decision to make my own cabinets for new kitchen instead of buying and took the plunge on Festool shop. I have made other medium complexity cabinets in the past using the Norm Abrams techniques and had pretty good results. Most were painted projects that I could hide and imperfections with cauldron and paint.

I started on my new kitchen cabinets and made a prototype trash bin cabinet. I am using pre finish plywood for the boxes , and walnut for face frames and door, drawer fronts with wormy chestnut barn wood for door panels.

I have been super impressed with the festool tools especially the MFT. I am using dominos for door frames. I used pre finished drawer stock and thru dominos for drawer construction.

Here are a few pics of the first cabinet.


Attachments

  • image.jpeg
    image.jpeg
    1.2 MB · Views: 1,260
  • image.jpeg
    image.jpeg
    1 MB · Views: 872
  • image.jpeg
    image.jpeg
    1.2 MB · Views: 886
Welcome to the forum!  And what an great and ambitious first project  [thumbs up]

Can't wait to see and read more.

Peter
 
Wow, fantastic job! Welcome to the forum and looks like you've got a really fun project to work on.
 
Those cabinets will look spectacular when your all finished. Keep up the great work. Can't beat the ease of Festool for building cabinets.

Sent from my iPhone using Tapatalk
 
Very nice work! I love the walnut/chestnut combination. I too plan to build my own kitchen cabinets and would like to try the domino exclusively for the carcass joinery. Thanks for sharing!
 
[welcome]!  Very nice cabinet, looks like you're off to a great start!  Great to see someone posting some projects too.  I've built a few kitchens past 20 years.  What was a real eye opener for me was Jim Tolpin's book Building Traditional Kitchen Cabinets.  Great resource and to this day still use it for reference and my own meandering methods are based solely on this book.  Worth a look see. 
Great post, I look forward to seeing more! [popcorn]
 
Looks beautiful.
Although I'm biased, I love walnut. I'm also a fan of contrasting wood colors/species, and how they can be complementary.
Be nice to see how the finish makes the wood pop.
 
Thanks to all for encouragement. I haven't mastered the domidrawer glue up process yet, and haven't decided if I am going to cut off the nubs or leave them proud for "character". I down want to sand down and get into the prefinished drawer sides... Guess I could use my flush cut saw....

I am using pocket joints for the carcasses, seemed easier to me than using dominos.

I will check out the book you suggested... Thanks for recommendation
 
Great looking project! Well done! I love watching other DIY people's projects, so keep us posted.

Jlovvorn said:
I am using pocket joints for the carcasses, seemed easier to me than using dominos.

A lot of people here (including me) are fans or both pocket holes AND dominoes and they compliment each other well. The dominoes give great strength and the pocket holes provide the clamping for the glue-up. Conversely, the dominoes also provide great alignment to prevent any shifting when the pocket screws are put in - no need for right angle clamps.

 
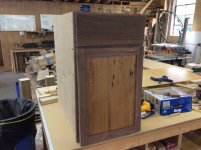
That's a beautiful combination of woods!

A couple of thoughts:

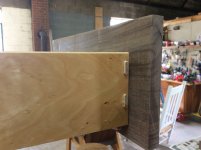
1)  You have some checking at the end of your drawer face.  It's hard to tell how serious it is from the photos, but it looks like it is worse than I would probably allow if it were mine.  It is likely to get worse over time, and it could eventually become a visible split in the front of the drawer face.  To prevent this, my usual practice when milling is to start by cutting the last couple inches off the end of the board until there is no meaningful checking in the end grain, and then mill the board to size.  If you're going to use this board for your drawer face with the checking in place, you might consider mixing some epoxy with walnut dust and pressing it in the end checks to keep it from getting worse.

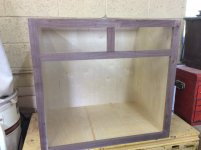
2)  Proportions are always tricky, especially in something like kitchen cabinets that have to sized according to function.  However, looking just at this cabinet, the drawer face seems bulky compared to the thin rails and stiles on your door frame.  To some extent, that may be inevitable, because you're going to have drawer faces of varying sizes, and your rails and stiles need to be fairly uniform throughout the kitchen.  But if you're going to have a lot of drawer faces that are this size or bigger, you might consider slightly wider rails and stiles so that they don't look spindly next to the more massive drawer faces.  Wider rails and stiles would also decrease the amount of visual real estate that the panels consume.  This could be a good thing.  While I really like the visual interest that your wormy chestnut offers, I suspect that by the time you have a whole kitchen full of it, all of that detail will become intense.  That intensity will be there no matter how big or small your panels are, but reducing the panel size slightly by adding an extra 1/4" - 1/2" width on your door frames would soften it a bit.

3)  You might experiment with softening the edges of the door frame and drawer face.  My view is that overlay doors and drawers look very harsh when the edges are relatively sharp.  (I say that knowing that most overlay doors have sharp 90 degree corners.)  Even on inset doors, I like a 1/16" roundover.  I like overlays to be 1/16" or even  as much as 1/8".  Warning:  This is not what you see on most professional cabinet jobs.  But IMHO, a kitchen full of hard lines on the cabinets can have a harsh look.  A slight roundover can really soften things up and make cabinetry much more inviting.  Experiment first, though, because you may not like the look.

Again, I really like the wood combination, and I think what you're doing is great as is.  But these are just a few ideas for fine-tuning.
 
Kelby said:
... and I think what you're doing is great as is.  But these are just a few ideas for fine-tuning.

Although I am not the OP, thanks for these thoughts. Personally I have no natural "eye" for these things - especially when I am in the design phase, so it is really helpful for me to read your suggestions and be able to look out for them in my own projects.
 
Thanks for all of the advice. I made decision on solid drawer frints on the top drawer only. Mostly due to simplicity and small size of the panel with 2" frames and 6" drawer. Bottom drawers are larger and will normal frames and panels.

Most recent activity is around building the boxes. I can't tell you how handy the kreg 90 degree clamps are for assembly. See the pictures on assembly process. A little pricy, but as everything, spend the money once and I can't imagine trying to assemble these without them. Saw a tip to drill double holes and use one hole for clamping while fastening with other. Works great.

These are 2 smaller 3 drawer boxes for each side of oven/cooktop.
 

Attachments

  • image.jpeg
    image.jpeg
    1 MB · Views: 303
  • image.jpeg
    image.jpeg
    1.2 MB · Views: 283
  • image.jpeg
    image.jpeg
    676.6 KB · Views: 246
  • image.jpeg
    image.jpeg
    1,017.4 KB · Views: 282
My first post... Beautiful and inspiring! Please keep posting. I'm just getting started myself.
 
Thanks for sharing, always looking for a good book  [smile]

Jim Kirkpatrick said:
[welcome]!  Very nice cabinet, looks like you're off to a great start!  Great to see someone posting some projects too.  I've built a few kitchens past 20 years.  What was a real eye opener for me was Jim Tolpin's book Building Traditional Kitchen Cabinets.  Great resource and to this day still use it for reference and my own meandering methods are based solely on this book.  Worth a look see. 
Great post, I look forward to seeing more! [popcorn]
 
OK... Finished lower cases and face frames. New kreg k5 with dust port works great. I forgot to drill pocket holes in cabinet sides and there is a jig with kit that allows you to drill holes out of the regular jig.

Next drawer hardware and domidrawers.


Attachments

  • image.jpeg
    image.jpeg
    959 KB · Views: 185
  • image.jpeg
    image.jpeg
    1 MB · Views: 191
  • image.jpeg
    image.jpeg
    661.2 KB · Views: 190
  • image.jpeg
    image.jpeg
    788 KB · Views: 188
Back
Top