First timer with dominos

Martyj27 said:
so looks like cawls & decorators tape are a very good technique.
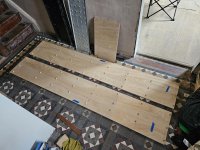
Just watch out you don't do what I did on my first attempt to use this technique: put the decorators' tape too far inside the joint. You will end up with a tiny blue line sandwiched in there. Getting it out would require you to mess up the joint, so living with it is the only option.

Only you will notice this, of course, but it will bug you for the rest of time.
 
"Only you will notice this, of course, but it will bug you for the rest of time"

This is basically the penalty of anything you make with your hands ;D

I've lost count the number of times my wife must have said "oh I wouldn't have noticed it if you hadn't said anything but now that you mention it..."
 
We woodworkers are our own worst enemies when it comes to unsolicited annunciation of the flaws in our work to others.
I guess we feel we need absolution and/or we're just naturally praise-deflecting and self-effacing.  ;D

"This is beautiful." "Well, I did have to correct ...."  [doh]

One of the hallmarks of our craft is being able to well address flaws so that no one ever knows ... except us for eternity of course.  ;)
 
That's why I like to make things in multiples/batches. You're gonna find ONE, if not more, perfect piece out of these! [big grin]

[attachimg=1]


Attachments

  • phone stds.JPG
    phone stds.JPG
    41.5 KB · Views: 244
Michael,

They're foldable phone stands (or tablet stands (if stood using the face rather than the kickstand)):

[attachimg=1]

[attachimg=2]


Attachments

  • phone stds1.JPG
    phone stds1.JPG
    32.1 KB · Views: 244
  • phone stds2.JPG
    phone stds2.JPG
    36.7 KB · Views: 247
That went a lot better than I envisaged but 100% due to the great advice on here.

As for the domino work, got into a good methodical system that's worked well re spacing and alignment. The only difficulty was when I was adding them to the shelf edging, couldn't quite get them perfectly married up. Think likely due to slight warping in the shelf, the edge material or my worktop or possibly micro amounts in all 3 that just added up.

In my excitement to assemble I totally forgot the discussed clamping/taping strategy so need to try that on the next one.

I've clamped pre putting the back on and now thinking that was an error as should have used the back to square it all up first but initial readings look like I might get away with it, but guessing back on before clamps next time?

PS..
Excuse my ignorance but how to I add a photo from my phone to this post?
 
When you want to add a photo, note the "Attachments and other options" below the reply box.  Click on that and look for "Attach:"  Choose your file, but please note the file size restrictions.  [smile]
 
The max file size given is not right. It never works for me, so I always resize my files to below 1 MB.
 
ChuckS said:
The max file size given is not right. It never works for me, so I always resize my files to below 1 MB.

Is there a way to resize on an iPhone?

Native file type and or size is incompatible with the FOG.

The workaround I’ve been using is to “send” the photo to my Gmail account and then Save the resulting jpeg to the Photos collection. Then I can post the new version at FOG.
 
Thanks all, figured out how to resize  [big grin] 2 bookcases made so far, few more to go
 

Attachments

  • 20240529_115033.jpg
    20240529_115033.jpg
    304.1 KB · Views: 52
  • 20240529_142938.jpg
    20240529_142938.jpg
    287.8 KB · Views: 55
  • 20240529_142915.jpg
    20240529_142915.jpg
    294.2 KB · Views: 65
One suggestion, if I may.  You might want to get a development package that allows you to correct the perspective distortion in a photo.  I use darktable (yes, all lower case) which is free from https://www.darktable.org.  There is admittedly a steep learning curve, but the results can be quite rewarding.  [smile]  I tuned your photo so you can see the results.
 

Attachments

  • 20240529_142915_FOG.jpg
    20240529_142915_FOG.jpg
    794.8 KB · Views: 55
Back
Top