ryanjg117
Member
- Joined
- May 18, 2015
- Messages
- 328
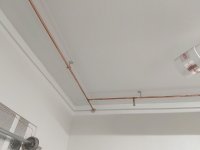
Having recently installed my dust collection ductwork, I knew I wanted to move on to an easier shop project - installing fixed air lines along the ceiling. I did quite a bit of research on the best pipe material to use, considering iron black pipe--cheap and strong, but susceptible to interior corrosion over time; "systems" like Rapid Air--slick looking, good performing, but expensive and then you're locked into those expensive fittings if you ever want to change/expand; and copper--actually quite cheap in 1/2" diameter, but time consuming to cut, prep and sweat. I settled on copper and made sure to pick L pipe, which is thicker walled than M pipe and only slightly more expensive. All of the fittings were purchased in advance from SupplyHouse.com which ended up saving me quite a bit of money. I already had plenty of propane and cutting tools. This was actually my first-ever project sweating copper pipe and I have to say, it can be challenging to get "good looking" joints but even the ugly ones are perfectly functional and reliable. Gave me an appreciation for why this is such a mainstay building product even today.
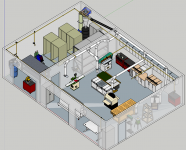
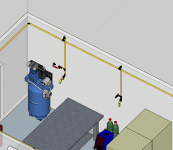
I first mocked up my air lines using my shop SketchUp model. I deviated from the plan a bit as I went along only slightly.
[attachimg=1]
[attachimg=2]
[attachimg=3]
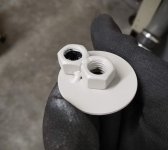
The next part of the project was determining how I was going to hang/mount the air lines. Having had good success with threaded rod hangers with my 6" PVC ductwork for the dust collector, I went with this same approach for the ceilings. Since this pipe didn't weigh much and I wanted the flexibility to locate these ceiling hangers just about anywhere, I decided to hang them with toggle-style drywall anchors, which necessitated an "adapter" of sorts to provide me a surface to hang the threaded rod. I found a simple solution and just welded a bunch of 3/8-16 nuts to some large washers. The screw for the drywall anchor went through the middle nut, and the threaded rod went into the other nut. Soaked the fasteners in vinegar for a day to remove the zinc coating, tack welded, primed and painted.
[attachimg=4]
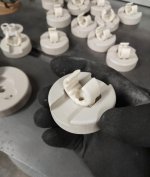
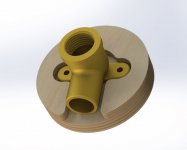
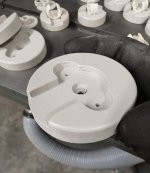
For the wall hangers, I had a couple of different designs. First, I stumbled upon these tubing hangers which provided a nice tight fit on my 1/2" copper pipe, but didn't provide a stable enough mounting platform and would have wobbled quite a bit even when screwed to the wall. So, I designed a larger base for these hangers with a female key hole friction fitting into the plastic mount base. Painted, and then a little CA glue locked it in place.
[attachimg=5]
[attachimg=6]
[attachimg=7]
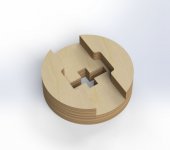
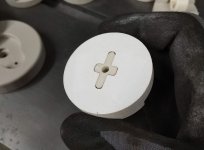
The other connection point on the wall were the 90 degree elbow fittings. These would hold my air quick disconnects I would fiddle with frequently, so I knew I wanted them to be screwed into the wall for stability. But I couldn't just screw them into the wall because the tubing hangers extended the pipe 1/2" off the wall. So, I had to build a similar spacer, settling on the below design which uses just a single screw hole in the middle. Just like the other spacer, cut on the Shaper, and painted.
[attachimg=8]
[attachimg=22]
All my spacers ready to be mounted:
[attachimg=21]
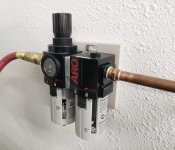
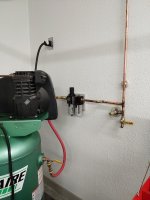
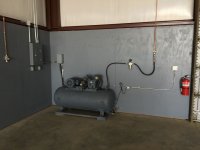
I decided to start at the air compressor. Here you can see the 3 foot whip, providing me a little mobility for the air compressor if needed. For all air couplers, I went with Milton V Style high-flow fittings, which are great. From the compressor, air goes directly into the ARO Filter-Regulator-Oiler combination unit. I'm undecided on whether or not to use the oiler--if you have any thoughts on this, let me know!
[attachimg=11]
[attachimg=12]
Here you can see the purge valve with muffler. Works great for cutting down the sound when depressurizing the system.
[attachimg=13]
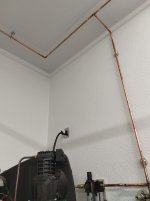
From there, we go up to the ceiling:
[attachimg=14]
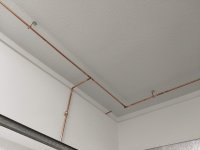
Here you can see me wrapping the air lines around the other side of the garage port, and also going through the wall where most of my tools reside.
[attachimg=15]
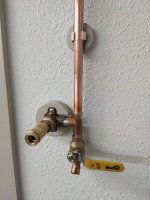
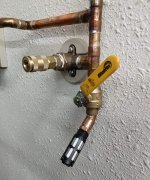
Here's another air drop. I have four of these wall-mounted style drops in the shop, along with numerous "hanging" drops. I opted for a drain at every one of these wall drops, though it was probably overkill. It is nice to be able to purge from multiple valves at the same time though, and if I ever have water build-up in the system I can purge from any one of these low points.
[attachimg=16]
Here you can see how I finished the wall penetration with a little custom-made bulkhead cover painted to match, and also an example of one of my hanging drops with an air coupler.
[attachimg=17]
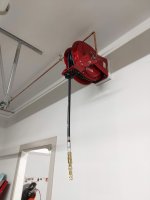
I've had this reel installed for the better part of a year, collecting dust, so it was great to get this incorporated into the system as well. I discovered how much of a workout it is to uncoil this behemoth! It serves no practical purpose other than to extend air far out into the drive way, now that I have so many air outlets in the walls and ceilings.
[attachimg=18]
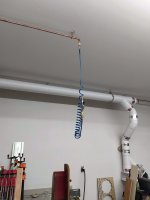
I wanted my air drops to be convenient but out of the way, so I went with coiled air hoses.
[attachimg=19]
[attachimg=20]
All said, the project probably cost me $400-500 in materials. And the best part: when I went to activate the system for the first time, there were NO leaks from the copper joints. The threaded connections to the air couplers, on the other hand, hand some issues and I had to re-apply pipe dope very liberally to both male and female threads. No perceptible leaks as of now, and a good 100 PSI anywhere I want it.
I first mocked up my air lines using my shop SketchUp model. I deviated from the plan a bit as I went along only slightly.
[attachimg=1]
[attachimg=2]
[attachimg=3]
The next part of the project was determining how I was going to hang/mount the air lines. Having had good success with threaded rod hangers with my 6" PVC ductwork for the dust collector, I went with this same approach for the ceilings. Since this pipe didn't weigh much and I wanted the flexibility to locate these ceiling hangers just about anywhere, I decided to hang them with toggle-style drywall anchors, which necessitated an "adapter" of sorts to provide me a surface to hang the threaded rod. I found a simple solution and just welded a bunch of 3/8-16 nuts to some large washers. The screw for the drywall anchor went through the middle nut, and the threaded rod went into the other nut. Soaked the fasteners in vinegar for a day to remove the zinc coating, tack welded, primed and painted.
[attachimg=4]
For the wall hangers, I had a couple of different designs. First, I stumbled upon these tubing hangers which provided a nice tight fit on my 1/2" copper pipe, but didn't provide a stable enough mounting platform and would have wobbled quite a bit even when screwed to the wall. So, I designed a larger base for these hangers with a female key hole friction fitting into the plastic mount base. Painted, and then a little CA glue locked it in place.
[attachimg=5]
[attachimg=6]
[attachimg=7]
The other connection point on the wall were the 90 degree elbow fittings. These would hold my air quick disconnects I would fiddle with frequently, so I knew I wanted them to be screwed into the wall for stability. But I couldn't just screw them into the wall because the tubing hangers extended the pipe 1/2" off the wall. So, I had to build a similar spacer, settling on the below design which uses just a single screw hole in the middle. Just like the other spacer, cut on the Shaper, and painted.
[attachimg=8]
[attachimg=22]
All my spacers ready to be mounted:
[attachimg=21]
I decided to start at the air compressor. Here you can see the 3 foot whip, providing me a little mobility for the air compressor if needed. For all air couplers, I went with Milton V Style high-flow fittings, which are great. From the compressor, air goes directly into the ARO Filter-Regulator-Oiler combination unit. I'm undecided on whether or not to use the oiler--if you have any thoughts on this, let me know!
[attachimg=11]
[attachimg=12]
Here you can see the purge valve with muffler. Works great for cutting down the sound when depressurizing the system.
[attachimg=13]
From there, we go up to the ceiling:
[attachimg=14]
Here you can see me wrapping the air lines around the other side of the garage port, and also going through the wall where most of my tools reside.
[attachimg=15]
Here's another air drop. I have four of these wall-mounted style drops in the shop, along with numerous "hanging" drops. I opted for a drain at every one of these wall drops, though it was probably overkill. It is nice to be able to purge from multiple valves at the same time though, and if I ever have water build-up in the system I can purge from any one of these low points.
[attachimg=16]
Here you can see how I finished the wall penetration with a little custom-made bulkhead cover painted to match, and also an example of one of my hanging drops with an air coupler.
[attachimg=17]
I've had this reel installed for the better part of a year, collecting dust, so it was great to get this incorporated into the system as well. I discovered how much of a workout it is to uncoil this behemoth! It serves no practical purpose other than to extend air far out into the drive way, now that I have so many air outlets in the walls and ceilings.
[attachimg=18]
I wanted my air drops to be convenient but out of the way, so I went with coiled air hoses.
[attachimg=19]
[attachimg=20]
All said, the project probably cost me $400-500 in materials. And the best part: when I went to activate the system for the first time, there were NO leaks from the copper joints. The threaded connections to the air couplers, on the other hand, hand some issues and I had to re-apply pipe dope very liberally to both male and female threads. No perceptible leaks as of now, and a good 100 PSI anywhere I want it.
Attachments
-
 design1.PNG575.6 KB · Views: 6,321
 -
 10.jpg166 KB · Views: 5,844
 -
 12.jpg115.7 KB · Views: 5,669
 -
 13.jpg296.6 KB · Views: 8,572
 -
 14.jpg69.4 KB · Views: 5,737
 -
 15.jpg112.7 KB · Views: 7,069
 -
 16.jpg167.4 KB · Views: 7,881
 -
 17.jpg191.4 KB · Views: 6,787
 -
 06.jpg164.8 KB · Views: 5,657
 -
 05.jpg178.8 KB · Views: 5,479
 -
 09.jpg390.5 KB · Views: 6,529
 -
 08.jpg215.3 KB · Views: 5,716
 -
 07.jpg315.9 KB · Views: 9,263
 -
 design2.PNG433.6 KB · Views: 10,610
 -
 design3.PNG550.5 KB · Views: 6,831
 -
 01.jpg136.3 KB · Views: 5,594
 -
 02.jpg24.6 KB · Views: 5,621
 -
 03.jpg128.7 KB · Views: 5,557
 -
 04.jpg186.1 KB · Views: 5,635
 -
 design4.jpg29.4 KB · Views: 5,608
 -
 05.jpg178.8 KB · Views: 616
 -
 06.jpg164.8 KB · Views: 634

")