Fixin deeper scratches in the table top

Mike35x95x1

Member
Joined
Sep 10, 2020
Messages
96
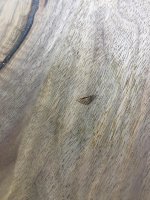
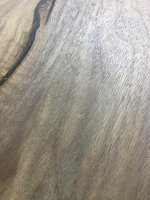
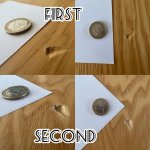
Hi guys, I have a problem and would appreciate any advice on how to solve it. Probably due to fatigue of the material, our pendant lighting fell on the solid ash dining table. After the fall, two deeper scratches remained in the table top - the size of the scratches and the color of the table should be visible from the attached photos. Now I'm thinking about the best way to solve this matter. I will either use ready-made wax sealant in an ash color (for example the Cloe brand), which I will then sand and varnish, or I could use a transparent putty, to which I could theoretically add ash dust from sanding, but here I am afraid that the ash dust will have a different shade due to the fact that it is new wood that has not been exposed to UV radiation - the table is already older and is very yellow. As a last option, I thought of using epoxy (but I have no experience with that at all). Among other things, I want to avoid having to sand the whole board because the repair won't look good. Can you advise what is best?
 

Attachments

  • 0527ADC3-BFAC-4D6C-A55E-4A0C57FF623F.jpeg
    0527ADC3-BFAC-4D6C-A55E-4A0C57FF623F.jpeg
    105.8 KB · Views: 156
Water in the gouges, see if they swell up. If they do you may just need to let dry and sand back. If not, let us know.

Tom
 

Attachments

  • 20230701_192308 (Large).jpg
    20230701_192308 (Large).jpg
    300.1 KB · Views: 303
The damp cloth + iron method works great on unfinished surfaces for removing dents.  I found it does not work on gouges.  I’m not sure it will work on sealed surfaces.

I had a piano delivered.  It was finished in gloss “piano black”.  The delivery guys made a small ding in the finish. 

They sent over an old man with a kit.  He had a bunch of colored wax sticks.  He first used a cigaret lighter to melt a few drops onto the ding.  Then he used a flat steel tool that he heated up and used to press the wax until it was nearly flush.

Then he used (probably) some 1200 grit wet/dry sand paper to blend in the wax.  And finally some rouge to buff it up to the gloss.

When he was done, it was perfectly invisible.  I don’t know how many old timers are out there that can still do this work.  I’m not sure if it was mainly skill or mainly patience that made this work.

When I was a picture framer, we had a soft wax version.  It did a commendable job filling holes and matching colors.  But it never got hard. It could not be polished to a piano gloss finish. 

You can use this search and perhaps find the version that works best for you.  There are some YouTube instructional videos.
https://www.google.com/search?q=coloured+furniture+wax+sticks+melt+sticks&client=firefox-b-1-m&ei=f3mlZLLSDdii5NoP3pS5yAU&ved=0ahUKEwjyjZaJ3_f_AhVYEVkFHV5KDlkQ4dUDCA8&uact=5&oq=coloured+furniture+wax+sticks+melt+sticks&gs_lcp=Cgxnd3Mtd2l6LXNlcnAQAzIFCCEQoAE6CggAEEcQ1gQQsAM6BggAEBYQHjoICAAQigUQhgM6CAghEBYQHhAdOgUIIRCrAkoECEEYAFD6IVi8ZWDhamgEcAF4AIABtgKIAfAXkgEHMC45LjUuMZgBAKABAcABAcgBCA&sclient=gws-wiz-serp

But I think I would plug these.  Take a forstner bit and drill out the offending section just deep enough to cover the ding.  Then get a plug cutter and cut a plug from the underside of the table.  Glue in place, and finish.  I’m not sure this would achieve the level of “invisibility” that you would want. 

I’m not sure that the hot iron would not leave a tell tale print on the surface. 
 
Wow, never heard of such a thing  [eek]. Just have seen on the following video and this is what I understanded I should do:


[list type=decimal]
[*]Watering the dent means to disturb the surface (he uses carpet knife) so that some water can enter the pores of the material
[*] I will drop some (no idea of how much but I”ll drop some :-) water in it and wait some time (no idea of how long so I”ll wait some time :-) to absorb
[*]The ironing looks understandable
[/list]

My only concern is the size (depth) of the cut in the surface. It”s not just a minor dent - the surface is really broken.

I will definitely let you know the result.

Thank you very much guys!
 
Got some ash scrap around, Mike?

Use a hammer and make a similar dent on the scrap, and experiment with it! You probably need more than one round of waterdrops/ironing (with the tip where applicable) to raise the fibre. Keep the rag moist/wet to avoid burning the wood.
 
Omg - why the link to youtube is displayed as empty space - the “Preview” looks just fine. The page is rendered in a very weird way…  :-[

Mike35x95x1 said:
Wow, never heard of such a thing  [eek]. Just have seen on the following video and this is what I understanded I should do:


[list type=decimal]
[*]Watering the dent means to disturb the surface (he uses carpet knife) so that some water can enter the pores of the material
[*] I will drop some (no idea of how much but I”ll drop some :-) water in it and wait some time (no idea of how long so I”ll wait some time :-) to absorb
[*]The ironing looks understandable
[/list]

My only concern is the size (depth) of the cut in the surface. It”s not just a minor dent - the surface is really broken.

I will definitely let you know the result.

Thank you very much guys!
 
An alternative is to come up with a suitable story to explain the ding and keep it as a memory token.

There was a home invasion.  In the exchange of gun fire from me and the invaders, a ricochet hit the table.  Police came and arrested the felons.  Our home owners insurance does not cover ricochets, only direct fire.
[eek] [big grin]
 
Mike35x95x1 said:
Omg - why the link to youtube is displayed as empty space - the “Preview” looks just fine. The page is rendered in a very weird way…  :-[

Mike35x95x1 said:
Wow, never heard of such a thing  [eek]. Just have seen on the following video and this is what I understanded I should do:


[list type=decimal]
[*]Watering the dent means to disturb the surface (he uses carpet knife) so that some water can enter the pores of the material
[*] I will drop some (no idea of how much but I”ll drop some :-) water in it and wait some time (no idea of how long so I”ll wait some time :-) to absorb
[*]The ironing looks understandable
[/list]

My only concern is the size (depth) of the cut in the surface. It”s not just a minor dent - the surface is really broken.

I will definitely let you know the result.

Thank you very much guys!


When a video or image is missing, I use the “quote” function and look at the text.  I copied the YouTube link from the text and then viewed the video online. 

I have had that happen to me also.  Usually, by googling “YouTube” and then searching within that site, I can get a link that works. 

Using that method:
 
The full youtube.com URL needs to be posted for the video to embed.  YouTube/Google's default sharing link is youtu.be/blah-blah
 
I had a similar dilemma when I was making a walnut countertop. I used the water/towel/iron method and that eventually removed 95% of the damage. The first initial steam process gets you to the 75% level and then it'll take several additional applications to bring it further along.

Here's a series of photos and remember these are taken only 3"-5" from the surface. By the time you're happy with the final results, you'll be viewing the area from 18" or more inches away.
1. Initial dent
[attachimg=1]

2. Result after the 1st steam session
[attachimg=2]

3. Result after 4 or more steam sessions
[attachimg=3]

4. Result after light sanding and oiling. You'd need to know where the damage is otherwise it's easily overlooked and this is from 3"-5"...think of trying to locate it from 18" away.
[attachimg=4]
 

Attachments

  • 5005 Before.jpg
    5005 Before.jpg
    505.1 KB · Views: 269
  • 5006 Steamed.jpg
    5006 Steamed.jpg
    532.8 KB · Views: 267
  • 5007 Final.JPG
    5007 Final.JPG
    966.5 KB · Views: 268
  • 5008 Oiled.jpg
    5008 Oiled.jpg
    1.3 MB · Views: 261
Great job there, Cheese.

I'd remove (or attempt to remove) the last bit of dent with a swipe or two of a card scraper.
 
ChuckS said:
Great job there, Cheese.

I'd remove (or attempt to remove) the last bit of dent with a swipe or two of a card scraper.

Thanks Chuck... [smile] ...ya using a card scraper would have been interesting.

This was the first time I've ever had this issue so it was definitely a learning process. It was slow going but I didn't want to do any further damage as I was on the last leg and ready for the install.
I'll note, I used distilled water to prevent any mineral transfer to the walnut surface.
Wet surface & towel then steam, let dry, lightly sand, apply water to re-wet the surface and evaluate if more needs to be done...rinse & repeat.
 
Cheese said:
ChuckS said:
Great job there, Cheese.

I'd remove (or attempt to remove) the last bit of dent with a swipe or two of a card scraper.

Thanks Chuck... [smile] ...ya using a card scraper would have been interesting.

This was the first time I've ever had this issue so it was definitely a learning process. It was slow going but I didn't want to do any further damage as I was on the last leg and ready for the install.
I'll note, I used distilled water to prevent any mineral transfer to the walnut surface.
Wet surface & towel then steam, let dry, lightly sand, apply water to re-wet the surface and evaluate if more needs to be done...rinse & repeat.

I would note that I routinely use this process after assembling my cabinet doors.  The soft-ish poplar seems to get dings and dents easily.  As a matter of course, I use a long strip of flannel (from an old bed sheet) and I iron it until most of the steam has gone. 

This process does raise the grain on raw wood rather quickly.  For me, that is an advantage.  I can sand it down before I apply my primer and no further sanding is required. 

I know that most people treat the steaming as a remedial process.  I treat it as an ongoing production process.

There is nothing worse than getting a nice coat of paint (especially in dark colors) and seeing a noticeable divot on the surface.  I don’t have that problem since I started using the steam as a regular process.
 
It’s sooo similar! Can you give me some timing - how much water how long to wait before ironing?

Cheese said:
I had a similar dilemma when I was making a walnut countertop. I used the water/towel/iron method and that eventually removed 95% of the damage. The first initial steam process gets you to the 75% level and then it'll take several additional applications to bring it further along.

Here's a series of photos and remember these are taken only 3"-5" from the surface. By the time you're happy with the final results, you'll be viewing the area from 18" or more inches away.
1. Initial dent
[attachimg=1]

2. Result after the 1st steam session
[attachimg=2]

3. Result after 4 or more steam sessions
[attachimg=3]

4. Result after light sanding and oiling. You'd need to know where the damage is otherwise it's easily overlooked and this is from 3"-5"...think of trying to locate it from 18" away.
[attachimg=4]
 
It’s sooo similar! Can you give me some timing - how much water how long to wait before ironing?

Not speaking for Cheese, I leave a waterdrop or two in the dent for 5 to 10 seconds, place a wet cloth over the spot, and steam. Repeat as necessary (after wetting the cloth or using another wet part of the cloth).
 
I only tried this once, but it worked and I would not hesitate trying it again.  While building my house I dropped a clamp from the story above onto a formal handrail I was installing.  The handrail was unfinished and I put a nice dent on top of the handrail. The fact that the handrail was not stained or varnished helped. 

I tried to let the water soak in as much as possible.  I even used a syringe to force water into the wood.  The idea is to get water into the crushed pores of the wood, then when it is heated into steam it will expand and "uncrush" the wood. So in my opinion The longer I could keep it wet the better.  Since the rail profile was curved, a regular iron would not work.  I used a soldering iron and was very careful that everything was wet so the wood would not burn. I forget what I used between the iron and the wood. Maybe I used aluminum foil, but probably a wet cloth.  It was desperate times and I don't remember. The soldering iron let me control where I applied the heat.  I was able to raise the wood enough that even I do not know where that damage is at.

 
Mike35x95x1 said:
It’s sooo similar! Can you give me some timing - how much water how long to wait before ironing?

There is no science needed for this project...other than water swells wood...that's all you need to know.  [smile]

A few drops of water on the wood and then a clean, white, moist cotton towel placed over the divot. The towel needs to be moist and not dripping wet. The iron needs to be hot enough to vaporize the water yet not too hot to burn the wood. Try a couple of runs you'll get it.  [smile]

After the initial application you'll immediately understand what you need to do. Just go slowly and don't rush the process as it will need several passes to correct the situation.

Think of it in these terms, the compressed wood fibers need to expand with the introduction of water but some of the fibers are more compressed than others, thus all the wood fibers don't expand equally and it takes several applications before the wood fibers fully expand ...if they ever will.
Good luck, it's a crap shoot but it will minimize your problem.
 
Back
Top