You are using an out of date browser. It may not display this or other websites correctly.
You should upgrade or use an alternative browser.
You should upgrade or use an alternative browser.
Fixing new van racking to van
- Thread starter Larso
- Start date
Mikeyfondu
Member
- Joined
- Mar 13, 2014
- Messages
- 83
Great start on the van it pays to be organized !
Larso
Member
- Joined
- Apr 19, 2014
- Messages
- 112
Have been working a lot and also taking some time with the kids during the school holidays but i finally got around to doing a little more on the van fit out.After carting the tools around and adding extra items that i would like to have available each day i decided to increase the void from the planned 100mm to 190mm.I used 190 by 19 radiata pine for the divisions as i didnt like the screw holding potential fixing down into a ply edge.
Attachments
Larso
Member
- Joined
- Apr 19, 2014
- Messages
- 112
Started around mid afternoon but took longer than i thought (as usual),finished by about 7pm and the temp was only 3 degrees in the driveway and with the wind chill factored in i was more than ready to get indoors.
Anyway one more element completed and hopefully the next stage happens sooner.
BTW so far i have managed to add three new systainers to help sort out the van and probaly need three more to complete the job but now also think all the classics should be replaced as well.
Anyway one more element completed and hopefully the next stage happens sooner.
BTW so far i have managed to add three new systainers to help sort out the van and probaly need three more to complete the job but now also think all the classics should be replaced as well.
Attachments
Larso
Member
- Joined
- Apr 19, 2014
- Messages
- 112
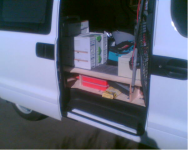
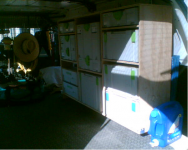
Two more pics of the void taken in daylight with all the tools back in.
The void is super handy but you can see there is still a way to go with getting all the tools and equipment sorted and stored effeciently.
The void is super handy but you can see there is still a way to go with getting all the tools and equipment sorted and stored effeciently.
Attachments
Nippychippy
Member
- Joined
- Mar 12, 2013
- Messages
- 503
Looking good Larso I am in the process of racking mine but can't figure it out yet
Larso, i feel your pain. I too damaged my shoulder playing touch rugby. Not as bad as yours but really friggin sore none the less. The local club wants me to play scrum half in the second 15 team. Full contact rugby at 44,,,,,not a chance ")
Nice van btw
Nice van btw
Larso
Member
- Joined
- Apr 19, 2014
- Messages
- 112
Hey Nippy, The South Africans have a saying Q How do you eat an elephant ---- A One bite at a time!
This is the approach i took,i had a general picture in my head of how i wanted it to finish up but there was too much to consider to create one big plan so basically i started with putting the tools i most use in the sytainer most appropriate for them and then worked on filling the next systainer again placing items based upon number of uses and like with with like.
In my case my LXT hammer drill and impact driver with charger and two batteries went in a no 2 with an attic lid(holding a few of the common fixings i use)i then added a sys mft holding drill bits hole saw and two quick action clamps.I enter most jobs with these in my hand and wearing my tool belt and can usually make a start without going back to the van straight away,this allows me to think through the job and then make the next trip to the van worthwhile.
I carry a Festool track saw,sander and one hand planer all the time which came in their own systainers. So anyway i now have i think 14 systainers and need two or three more but now have a clearer idea of the rack i need to build.
I spent some time on the w/end stacking them in the driveway to come up with the best stack order for me and i have sketched a unit based upon the result.
I will post some pics when i eventually get around to building it,looking forward to seeing your van when done.
Larso
Member
- Joined
- Apr 19, 2014
- Messages
- 112
Wood guy all i can say is dont do it!
I made a come back to the first fifteen in my 30s and a season long intentention turned into a short 5 game cameo.I was carving them up and feeling good but a couple of young bucks decided i needed to be reminded how old i was and bashed my from one end to the other in my 5th game back,they were too good for me and although we won i took the opportunity to bow out with win.
4th division and beers at half time is the go once your in your 40s!!!!!!!!
Although i am pretty sure i would play again tomorrow if asked,what is they say about never growing up! [eek]
Nippychippy
Member
- Joined
- Mar 12, 2013
- Messages
- 503
Thanks for the advice Larso I'll just doit and make it happen I'll get some photos to thanks
Larso
Member
- Joined
- Apr 19, 2014
- Messages
- 112
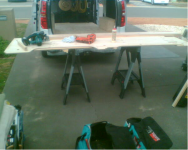
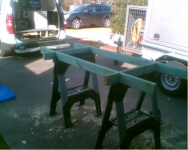
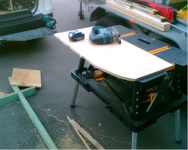
Got a little more done on the van fit out while i am waiting for a plumber to get out of the way so i can complete my current job.
Before starting i put together some half lapped pieces of pine studs to use on my fold up saw horses as a cutting table for the track saw.
As usual some pics included
Before starting i put together some half lapped pieces of pine studs to use on my fold up saw horses as a cutting table for the track saw.
As usual some pics included
Attachments

Larso
Member
- Joined
- Apr 19, 2014
- Messages
- 112
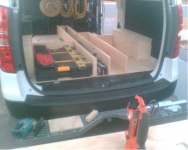
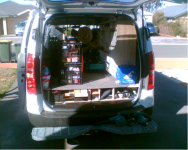
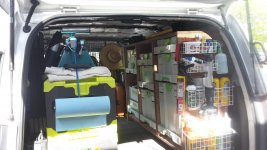
Ok another day lost waiting for a plumber but i did get the adjustable shelves in the van so not a total write off.
A few things ,I drilled the holes for the shelves at 4mm diameter instead of the usual 5mm so the shelf supports are a tight fit and dont vibrate out.
I used Pryda framing brackets attached the the cabinet and tek screws into the van interior to hold the cabinet in place at the top the bottom is sitting on the box over the wheel arch and is screwed down where possible,the whole thing sits up off the van floor as will everything eventually this will allow sheet goods to be carried laying flat in the back.The iload with the cargo barrier installed is only capable of a full 2400mm sheet at floorlevel up to about 250mm high off the deck.
It might not look like it but i have more items in the van than i have been able to carry before and i still have space available so once the fitout is complete this should work out pretty good all round.
Attachments

overanalyze
Member
- Joined
- Aug 1, 2013
- Messages
- 409
What a great project! It is turning out nice. Its amazing how a little organization can make you feel happy!
wrightwoodwork
Member
- Joined
- Jul 1, 2013
- Messages
- 410
Makes life easier
Larso
Member
- Joined
- Apr 19, 2014
- Messages
- 112
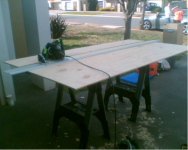
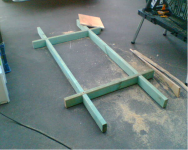
Not too much happening today but did find some neat wire racks for around $4 that would help with the van fit out so when i arrived home today it was out to the driveway workshop and fitting the end panel to my systainer cabinet.
Once the panel was scribed to the curve of the van and screwed on the new racks got put up and now all the various tubes of caulk etc no longer live in a milk crate.
The cutting platform for my saw horses made a few days back works equally well on the ground but i will add a couple more cross pieces next time i have a piece of pine left over from a job as it would be a little less of a fiddle with more support under the cut pieces.
Attachments
Larso
Member
- Joined
- Apr 19, 2014
- Messages
- 112
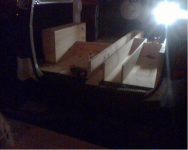
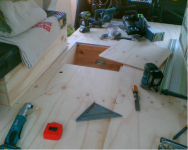
Sunday afternoon and some free time so i thought a little more towards the perfect van set up would fill the day just nicely.
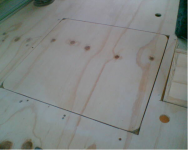
When dividing up the underfloor space i was unsure how to use the space accessed from the side doors and after trying lots of configurations i ended up with one dead area about 500mm square.
I decided that this spot should be accessed from above so today i cut a little trap door and sorted out he surrounds to support the lid.It worked out well but access will be bit painful until i finish the various racks etc as currently there are systainers sitting on top of the lid.
I have some items i rarely use in there so hopefully i dont need them until everything has a permanent home.
Here are a few pics ---- nothing real exiting but i include them because the threads i enjoy the most are the with pictures included and thought others may as well.
Attachments

Larso
Member
- Joined
- Apr 19, 2014
- Messages
- 112
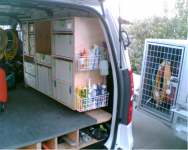
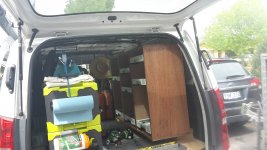
An little up date after a year or so of driving the van.I finally replaced the temporary systainer storage for a decent unit with sys az drawers and after just one day of use i love it.
Some pics as well. One in progress and one with everything loaded in.
Some pics as well. One in progress and one with everything loaded in.
Attachments
Larso
Member
- Joined
- Apr 19, 2014
- Messages
- 112
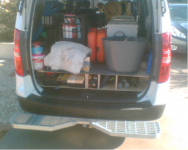
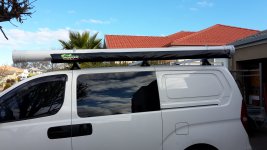
Another couple of additions to the van which have helped with site work are shown in attached pic.
The pipe is just over 3.2 metres long and is useful for picking up trim and plaster cornice without tying to the roof rack.Its 150mm diameter.
The pull out awning is water proof and reasonably sturdy when erected. i usually use it to set up my SCMS so i can work out of the direct sunlight,and it has saved me from packing due to rain once already.
Attachments
Billy stray
Member
- Joined
- Jun 16, 2015
- Messages
- 307
These things just evolve, somebody stop me ....lol
Similar threads
- Replies
- 16
- Views
- 2K
- Replies
- 0
- Views
- 582
- Replies
- 62
- Views
- 2K