Flush trim bit frustration

ReneS

Member
Joined
May 22, 2024
Messages
21
I put some pine edge banding on a couple of 1/2 inch plywood shelves. I left around 3/16 of the banding on either side of the edge.

I thought I could run the shelves against a flush trim bit in my router table and quickly get the banding flush with the shelf.

But it took off only very small amounts with each pass. I ended up using a block plane to get things close, which was much quicker, and then sanded the banding flush with my ETS something something.

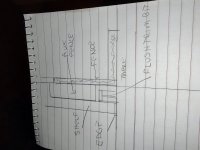
It is a Freud flush trim bit. I lined the bearing up with the fence of the router table. I applied pressure against the shelf into the fence and downward.

Does anyone have any ideas of what I am doing wrong?
 
What diameter is the flush trim bit?  Straight, spiral, or compression?

A 7/8" hog like the "Ultimate Flush Trim Compression Bit" is going to be much more effective at removing nearly 1/4" of material in one pass than a 1/4" or even 1/2" diameter bit.
 
BTW, this bit was removing very small amounts (1/64 or so) and not evenly.
 
ReneS said:
It is a Freud flush trim bit. I lined the bearing up with the fence of the router table.

Yes, this ^^^ is what you are doing wrong. When the bit is aligned with the fence, there is nothing to remove. There is a fix for it though. You need an auxiliary fence, to allow for some clearance. This fence needs to register on the shelf itself and then the flush trim bit will cut. Align the bit to the auxiliary fence. Don't run your bit so high, that was for clarity only.
I'm sure that doesn't translate by words very well, so a crude drawing might help.
Picture this as an end view, all parts are labeled. You can stick the aux fence to the main one with double sided tape.
 

Attachments

  • Aux fence.jpg
    Aux fence.jpg
    551.2 KB · Views: 85
Crazyraceguy - In your drawing, it looks like the aux fence is aligned with the bearing. Wouldn't that be the same as my split fence being aligned with the bearing?

Oooh. I think I see my problem now. The fence needs to be behind the bearing  since the bearing should only touch the reference edge, and it shouldn't touch the wood that extends past the reference edge.

Boy can I be dense at times.

Thanks for the reply and drawing. And if I am still confused, I would appreciate you letting me know.

EDIT: Phew - I just reread your comment and understand it better. Thanks again.
 
ReneS said:
Crazyraceguy - In your drawing, it looks like the aux fence is aligned with the bearing. Wouldn't that be the same as my split fence being aligned with the bearing?

Oooh. I think I see my problem now. The fence needs to be behind the bearing  since the bearing should only touch the reference edge, and it shouldn't touch the wood that extends past the reference edge.

Boy can I be dense at times.

Thanks for the reply and drawing. And if I am still confused, I would appreciate you letting me know.

You've got it now. In my drawing, it's hard to show the overhanging edge, on the bit side. In this position, it would have already been cut off.
Also, be careful about how much you remove. 3/16" is quite a bit, so you could possibly get some chip-out. I don't recall you saying how thick your edging is? or the species of wood, but both of these can play into this, as far as tear-out. It is possible to rip chunks out, if the bit lifts the grain.
Depending on how many parts you have, it might be worth it to move the bit back from the reference face and take a shallower cut? But that would mean 2 passes for every edge. If you only have a few, it's not that bad. If there are a lot of parts, it gets old pretty quickly.
 
I use a 2” wide, and very sharp chisel to trim edge banding. 

It takes about 30 minutes of practice to get the hang of it.

I would say that a router is not ideal for this process.  And if the grain is going the wrong way, the router will tear it up.

I use a sanding block to finish off, holding the block at about a 30 degree angle.

And while I could use a plane, I guess, but of you are taking off more than 1/16” the plane will not be ideal.

Try the chisel.
 
As CRG says, cutting the full 3/16” in one pass might cause tearout, but if you’re lucky the chipping will only be on the outside layer and the stuff close to the shelf will still be clean. A larger diameter bit is better.

You can also use the aux fence idea on the tablesaw to cut the overhang down. Get it to 1/16” or less and even a small diameter trim bit will cut chip free.

If you have the means to use an end cutting bit and run the router on top of the shelf then you don’t have to worry about grain direction. But if you do have the means and knowledge you do not need me pointing that out  [tongue]
 
Thanks guys. All good points.

I can get a little greedy at times. (My father told me my eyes are bigger than my stomach many years ago.)

Sometimes my impatience can exceed the ability of the tool I am working with. Luckily, I have a good sense of fear, so I don't take chances that might cost me more than some tear out.

And CRG, two passes is fine. Given my mistake, I was making many passes, which got old after a while.
 
CRG correctly diagnosed your router table problem, but as he and others have added, the risk of tear-out is pretty high with the router bit oriented in that direction. Another issue is that flush trim bits have no flexibility.

Trimming your edge banding with the router perpendicular to the shelf face eliminates tear-out and lets you dial in exactly the amount of "trim" you want. Leaving a few thousandths above the plywood lets you get a nice sand on the banding without risking blowing through the veneer.

Woodpeckers makes a router base specifically for this task, but it wouldn't be hard to duplicate, if you prefer building jigs to buying them.
https://www.woodpeck.com/woodpeckers-flush-trim-base.html
 
Thanks. That's very interesting.

Funny thing about Woodpeckers, they often have very long lead times, well long in today's terms...
 
If you're flush trimming a larger object, this (Fastcap Little Lipper) may come handy:
=_iKTBR6I_LIo8dv0

The lipper they now sell has a safety guard:
=vt22z7dItVz0qU6U

I use it as a flush trimming tool for plugs, tenons, etc. in addition to edge trimming.

 
This fits exactly into the intended use for the MFK700, which is how I would do it, but that's a big expense for a home hobbyist. Especially since this is not an everyday task. The best part of doing it with the MFK, is that it can do the same thing around curves, inside or out.

jeffinsgf said:
CRG correctly diagnosed your router table problem, but as he and others have added, the risk of tear-out is pretty high with the router bit oriented in that direction. Another issue is that flush trim bits have no flexibility.

Trimming your edge banding with the router perpendicular to the shelf face eliminates tear-out and lets you dial in exactly the amount of "trim" you want. Leaving a few thousandths above the plywood lets you get a nice sand on the banding without risking blowing through the veneer.

Woodpeckers makes a router base specifically for this task, but it wouldn't be hard to duplicate, if you prefer building jigs to buying them.
https://www.woodpeck.com/woodpeckers-flush-trim-base.html

The vertical base of the MFK700 can do that natively. It is a bit more restricted as far as bit size choice, but is does work, but as above, probably this most expensive way to go about it.
 
Back
Top