Frame-less Cabinet Joinery - Blind Dado's, Domino, or Pocket Screws??

Bugsysiegals

Member
Joined
Mar 19, 2016
Messages
908
I'm building cabinets for my basement wood shop, laundry room, pantry, kitchen, bathroom, etc., and am confused which joinery method to use.  Cabinets will be made of 19mm (3/4") Maple veneer plywood which is prefinished on one side.

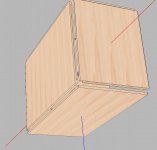
My main struggle is that these are all going to be frame-less cabinets and to me it looks incorrect to have the front edge banding with a visible Dado joint where end panels meet the top and bottom panels.  They will have full overlay drawers but that's no excuse to do it incorrectly ... do you agree this is not a visually appealing joinery for frame-less cabinets?  In my mind, the edge banding on frame-less cabinets should be like the Roman numeral II with horizontal edge banding extending flush to the sides and vertical edge banding running flush between them ... am I wrong?

FWIW - I've ripped Maple hardwood down to 3mm thick strips and plan to glue it to the exposed panel edges so I can hand plane it flush before cabinet assembly.  I suppose I could get away with Full Dado's if I glued it on afterwards but I don't think I could get 3mm edge banding flush after the fact and I'm fairly certain most people apply edge banding prior to assembly?  I want to use a joinery method which not only lasts many years but is easily repeatable so by the time I get to the kitchen, everything is aligning nicely, and I'm able to create something I can be proud of for years to come....

As far as related tools are concerned for these joinery methods, I have a lot of tools and I've included the ones I think would be most useful for this project .... Festool Domino XL with Seneca adapter for smaller wood, OF1400 router/guide rails, LR32, MFT/3, SawStop with Incra fence system and extended router table wing with 3HP router and Incra lift, Craig Jig, digital calipers, etc., etc.

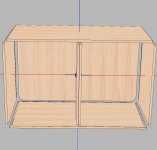
FYI - With regards to the base cabinet model I've attached, the top/bottom is flush with the sides rather than the sides being flush with the top/bottom like kitchen cabinets because this is for my shop cabinets which will sit on top of 4 swivel casters.  I'm not sure how heavy the items in the drawers may be and I may even use these them as outfeed tables / saw horses, if they can support the weight, so I'm trying to minimize any sagging.


Attachments

  • front top down.jpg
    front top down.jpg
    103.9 KB · Views: 1,989
  • back top down.jpg
    back top down.jpg
    101.9 KB · Views: 896
  • back bottom up.jpg
    back bottom up.jpg
    107.3 KB · Views: 923
Dowels, biscuits and/or screws work too.  I prefer to avoid the arithmetic  involved with dados, personally.  Commercial shops are using a tossup of dowels (w/case clamp), CNC dados, and Confirmat screws for a lot of frameless cabinets these days.  They all work.

 
I use 2 dominos per joint and 3ea  2 1/2 screws with the nibs on the heads which will self counter sink in between the dominos.

Quick and easy. Only if the sides are not going to be seen/ covered up or its paint grade
 
It seems the blind dados would take a lot of setup/effort and probably have a higher probability to not be perfect every time versus the dominoes / screws?

Some of the cabinets will get Oak applied ends so I could screw between domino’s from the outside but some will not.  For the cabinets without doors, I suspect nobody would ever see Craig jigged screws from the inside ... is there a reason not to use Craig jig screws between domino’s from the inside versus using Confirmat screws from the outside?
 
That should work fine.  Just keep the Kreg screws in relative close proximity to the dominos. The Kreg screws may cause a slight misalignment of the joint, having a domino within a few inches of the screw preserves the panel alignment.
 
I would pass on the blind dado but would suggest a rabbet/dado for the 1/2" back panel. If you're making your own drawer boxes with undermount slides you can dado your side panels and drawer boxes together without changing set-up.

Glue and screws for the carcass assembly are fine.

If you edge band after the unit is built you can sand off any inconsistencies picked up during processing and assembly. 
 
RKA said:
That should work fine.  Just keep the Kreg screws in relative close proximity to the dominos. The Kreg screws may cause a slight misalignment of the joint, having a domino within a few inches of the screw preserves the panel alignment.

I just used the Kreg jig for the first time ... besides having to use clamps to align the edges close enough that I could sand any differences, it was easy!!  And I have 36” clamps so I have just enough length to clamp the sides where they need to be for alignment.

That said, I haven’t used the Domino yet ... I’ll give that a try and see if I no longer need to align edges and clamp them in place which would save a lot of time and anxiety ... if I’m not mistaken it will align edges perfectly, if done correctly, and only have side to side movement if put on the wider settings, correct?
 
escan said:
I would pass on the blind dado but would suggest a rabbet/dado for the 1/2" back panel. If you're making your own drawer boxes with undermount slides you can dado your side panels and drawer boxes together without changing set-up.

Glue and screws for the carcass assembly are fine.

If you edge band after the unit is built you can sand off any inconsistencies picked up during processing and assembly.

Since the insides are prefinished, I don’t think glue will add any strength unless I dado  the joints so the raw wood fibers are joining together, correct?

I agree rabbits and dados could be repeatable but how would I glue on 3mm thick Maple edge banding after cabinet assembly and trim it perfectly so it’s flush and not all rounded over from sanding ... seems it would be very difficult to produce good results?

2899efaaf8c160e07dbf60e9ef1ea867.jpg
 
Yes, titebond will not bond to pre-finish. There are construction adhesives that will do the trick but if you have a domino or biscuit cutter you’ll have a much stronger joint.

I love building frameless cabs, for a number of reasons, but it does require more precision than traditional face frame. I would suggest using metric and repeatable set-ups that referenced off fixed dimensions/jigs for processing.

If your cabinet box parts are coming out within less than 1/2 mm of each other that would be outstanding and you could look at banding before assembly. If I had to apply banding after assembly, I would hold the banding tight to the pre-finished face and flush up the outside with the MFK. As for the round-over, if you radius before assembly you’ll have a butt joint going into a round over. If you radius after assembly, you’ll have 4 inside corners that will not have a radius. You’ll need a narrow bearing and a radius of 1mm or less to minimize this issue. A small file can clean up the remaining wood on the inside corners.

 
escan said:
Yes, titebond will not bond to pre-finish. There are construction adhesives that will do the trick but if you have a domino or biscuit cutter you’ll have a much stronger joint.

I love building frameless cabs, for a number of reasons, but it does require more precision than traditional face frame. I would suggest using metric and repeatable set-ups that referenced off fixed dimensions/jigs for processing.

If your cabinet box parts are coming out within less than 1/2 mm of each other that would be outstanding and you could look at banding before assembly. If I had to apply banding after assembly, I would hold the banding tight to the pre-finished face and flush up the outside with the MFK. As for the round-over, if you radius before assembly you’ll have a butt joint going into a round over. If you radius after assembly, you’ll have 4 inside corners that will not have a radius. You’ll need a narrow bearing and a radius of 1mm or less to minimize this issue. A small file can clean up the remaining wood on the inside corners.

Thanks for the tips!  BTW, my entire shop is metric as I thought the math would be easier and I’d make less mistakes ... the math is definitely easier but for some reason I’ve cut several pieces either 5mm off or 10mm off ... I need to measure twice I guess!!

With regards to the Domino, this is my first time using it since I bought it 2-3 years ago, and all 6 joints I’ve made are canted!!  Is this normal??

e1a169127c36065f7196a3ca0853a6a7.jpg
 
I have to say for the money I paid for the DF700 I’m a bit disappointed.

I made these initial plunges to get a feel for the machine and align the plastic fence. With regards to the fence, it’s offset to the right of the mark and even after moving it as far to the left as it could go, it still needed another millimeter resulting in my having to take the guard out and file the leftmost edge so it could slide further left.

With the guard finally adjusted and marks in alignment, I can’t even make a parallel hole and I have better alignment with a Kreg jig. ;(

When I measure the bottom of the fence, in 90 degree position, there’s a difference of about .75mm from one end to the other. I assume I can adjust this by loosening the 2 torq screws at the top of the fence assembly which position the 2 poles it slides up and down on?

ebc3ce644e3c9e6674f0c62bbe870f1a.jpg
 
I had the ruler to far out on one side and missed a little tab, they’re the same on both sides ... the only thing I can figure is the motor is not quite tight enough or to tight on one side??

I’m going to check on the warranty before I go messing with that ... ;(

fbeddd4b5dfe7af4990f47492fb07688.jpg
 
I do Dominos with Kreg pocket holes for cabinet boxes. If you put the pocket holes on the outside of the cabinet box they are automatically hidden by the next box or an end panel. Or the top or they end up underneath depending on side , top, or bottom, screw location. That way they don't show on the inside either. Plus if it is a narrow cabinet you don't have to work inside the cabinet.

Seth
 
SRSemenza said:
I do Dominos with Kreg pocket holes for cabinet boxes. If you put the pocket holes on the outside of the cabinet box they are automatically hidden by the next box or an end panel. Or the top or they end up underneath depending on side , top, or bottom, screw location. That way they don't show on the inside either. Plus if it is a narrow cabinet you don't have to work inside the cabinet.

Seth

Thanks Seth!! 

Since I’m doing frameless full overlay cabinets, they require double partitions for single cabinets with multiple bays which would leave one partition with holes exposed; however, this could be avoided by building individual boxes per bay and screwing them together to form a longer cabinet run.

That said, does this complicate or make it more difficult to align cabinets during install? 

 
I've had alignment issues with the domino as well. Most people attribute misalignment to technique and the initial learning curve which requires rear hand position, concentration and a smooth plunge to achieve good results. I agree with holding off on tinkering too much and check your warranty. There are some experts on the domino on the forum so hopefully one of them will chime in and shed some light on the possible issues/solutions. 
 
Bugsysiegals said:
SRSemenza said:
I do Dominos with Kreg pocket holes for cabinet boxes. If you put the pocket holes on the outside of the cabinet box they are automatically hidden by the next box or an end panel. Or the top or they end up underneath depending on side , top, or bottom, screw location. That way they don't show on the inside either. Plus if it is a narrow cabinet you don't have to work inside the cabinet.

Seth

Thanks Seth!! 

Since I’m doing frameless full overlay cabinets, they require double partitions for single cabinets with multiple bays which would leave one partition with holes exposed; however, this could be avoided by building individual boxes per bay and screwing them together to form a longer cabinet run.

That said, does this complicate or make it more difficult to align cabinets during install?

Aah, yes, there are quite a few ways to put cabinet runs together. Sometimes I forget that when answering a question  [smile]

generally  build separate boxes for everything I build and "stack" them together upon install. I almost always go with a separate ladder frame base that gets leveled and then the boxes go onto that. Unless something is just wrong or off I don't have any additional alignment problems. I like this method because no matter the floor /wall / square /  level/ etc issues you at least get to start with a solid level platform to work off.  I also find it much easier to level a ladder frame than separate cabinets. It is easy to get to the back and you aren't dealing with trying to shift boxes around and get them all to play nice with each other.

Some of the construction method depends on the situation and the way you work.

Seth
 
[member=60777]Bugsysiegals[/member]

>>When I measure the bottom of the fence, in 90 degree position, there’s a difference of about .75mm from one end to the other. I assume I can adjust this by loosening the 2 torq screws at the top of the fence assembly which position the 2 poles it slides up and down on?
 
Based on another thread of similar issue, I’ve done some further testing...

I’ve set the fence at 0 degrees and lifted it to maximum height. I then clamped wood to my MFT/3 in the second row from the front. This allowed me to set the DF700 bottom directly on the MFT/3 table to eliminate any opportunity for deflection caused my operator error. I plunged the board nice and slow ensuring the bottom of the DF700 remained flat against the MFT/3 table. I repeated this for the second board and assembled.

As you can see, I have the same issue ... this board is half the length of the ones before but you can easily see the front boards left end lifted up in the air and back board raising up on the right.  Obviously on cabinet panels this would be worse and be an unacceptable way of aligning panels.

I’ve taken the fence completely out of the equation here and am left to conclude the bit isn’t moving in parallel with the DF700 base.  I’m going to try another bit to make sure it’s not a bent bit.

91669e6bf1d2d4be72131e2e2fe72bc1.jpg
ff1a39ff9ae2616868e02e72785449be.jpg
9e73824e9d50b6397f862dbfc6ea26c1.jpg
662394983a03e734d32019da5b139a0e.jpg
 
Well, same result with a new bit  ;(

I wasn’t aware I needed to go online to do any registration as I’m only now beginning to use the tools ... am I to late to go online and register so I’m not stuck with shipping on this brand new tool which clearly has some misalignment?

a5d457f5caee89530239d2cc9b5c4cc3.jpg
 
Certainly didn’t think your domino was out of whAck but you did a good job researching and illustrating the issue.

Festool used to get right in touch with you if you had a major defect here but now days less so. Better call them and get the process going.

Sent from my iPhone using Tapatalk
 
Back
Top