Framing Square holders for face frame

Packard

Member
Joined
Nov 6, 2020
Messages
4,752
NOTE: I (consistently) used “carpenters’ square” when I meant “framing square”.  Those corrections have been made below  Packard.

Not that, but I do want to see another product.

To date, I have produced three MFT-type table tops.  I used a peg board as a template, along with a Vix bit, to locate the holes.

In each table top there is one hole that is out of alignment (and never in the same spot).
Here is what I would like:

A dog that would allow me to hold a carpenters’ framing square securely to the table top (three pieces would be needed).  Then I can use the carpenters’ framingsquare for squareness and not depend on the hole placement. 

Ideally the dogs would hold the carpenters’ framing square about 3/16” above the surface.  That would provide a better height for clamping.

NOTE:  I would clamp the work pieces to the table, but use the square to maintain squareness.  I would not clamp down on them carpenters’ framing square itself. 

So as long as my carpenters’ framingsquare is dead on at 90 degrees, the hole alignment will not be critical. 

This would be useful for many applications, but a shoe in for making face frames using pocket screws. 

Carpenters’ framing squares come in a variety of thicknesses, so I am not sure how you would design it. (Or if it is even feasible.)

I can’t imagine that my table tops are the only ones out there with alignment/squareness issues.  Currently I have used a Magic Marker to circle the offending holes.  I just pick a different spot.

In any case, relying on a carpenters framing square for squareness seems more reliable than relying on the MFT tops.

I hope this is useful.  I’d be glad to test the beta design. 

I would note that not all carpenters’ framing squares are perfectly square either.  I test them before using them.  I like the aluminum ones because they are thicker. 

Good luck
 
I was planning on making some from wood scraps.  When I get it done, I will post images.
 
“So as long as my carpenters’ square is dead on at 90 degrees, the hole alignment will not be critical.”

Good luck with that.

What you are describing is what TSO has provided in their squares. Which really are square.
But is sounds like you want at least one adjustable dog mounting hole (in the square itself) to accommodate a hole pattern that isn’t exactly 96mm on center.

If you find a suitable aluminum carpenter’s square you can drill the mounting holes and enlarge as needed. Then you need (are asking for in this thread) 3D printed dogs that have proud heads just an 4mm or so thick (to lift the square) with a hole in the center for a screw.
 
I tried to make a sketch, but that was useless.  I cobbled together a mock up (which is fully usable).

I used 2-1/2” x 3/4” scrap and a 3/4” dowel (my tables use 3/4” holes).  If you are going to 3D print this, you can make it much more compact. 

I used the saw kerf for the slot, and that is a bit too snug.  It can be fairly loose on the square and still work fine.

The third image shows how I would use it for pocket screws on face frames.

The frames will be square even if my holes are not in alignment. 

In the final image, I had added rare earth magnets (mainly because I had them in the house).  I have no idea if they are useful because the slots are so tight that the square stays put without the magnets.  In my imagination, the slots are looser and the magnets are useful, but an added cost and probably not worth the effort or expense. 

I have the square so that it is 3/8” above the surface of the table.  It will be nearly dead center in the middle of the 3/4” stock. 

Permanently mounting the dogs to a square would seem to work, but they would not work on my tables as the hole placement is not precise enough for that.  The holes could be 1/4” out of alignment and my mockups would still function.

I plan on trying these out on the next face frame job I come across.

If you have any questions, feel free to ask here.  I think these would be nicer if 3D printed.  The smallest profile is 1/4” and it is not under stress.  The only part under stress is the dog itself. 

It would be more compact if you include the dog as part of the piece, but designing it to use standard dogs would be cheaper and the dogs are the parts that are stressed, so possible more durable that way. 

I hope it works out for you.

Packard

Fuw7XtT.jpg


lTYCLoe.jpg


Rvllcgt.jpg


NyPZCUZ.jpg


KBfkKt6.jpg


Note:  This is not an idea I created out of whole cloth.  It is derivative of the Milescraft piece (shown at the 68 second mark).  But theirs is too flimsy for me to use (the clamp is handy).
https://www.milescraft.com/media/4016-benchlock-overview-video/
 
I think a pared down version of the framers’ square holder will also work.  I’m not going to make additional mock-ups because for my purposes, the ones I made work fine. 

But since the application is clear now, I think a simple description will suffice.

Part #1:  2-3/4” diameter disc 3/8” thick with a 3/4” hole in the center.

Part #2:  2-3/8” long, 3/4” diameter dowel.

Assembly:  The dowel is glued in place in the center of  the disc so that 1” of dowel is exposed on both sides.

Use:  Three of these are used in the same manner as my earlier mock-ups.

Advantage:  Uses less material, for shorter manufacturing run times and less resin.

Unknown:  If the framers’ square will be as stable on these as on my original design. 

I’m going to try to stop thinking about this now. My mind kept running through the design despite my best efforts to abandon the project.  [eek]
 
I tested my framers’ square holder today using my Black & Decker Workmate.  It worked as expected.

It was easy to clamp using a 5” throat c-clamp from Harbor Freight.

I’m happy with how it works.  But I am beginning to have doubts about if it is a suitable product for 3D printing. 

When I thought the product would appeal to users of pocket hole screw devices (a huge number of DIYers use pocket hole joinery) and people with MFT tables (a very small number of people), the small market seemed a good fit for this product made on a 3D printer.

But once I realized it could also be used by owners of Black & Decker Workmates, that opened up the potential market in a big way.

I think it will work until someone decides it is a good idea and invests in an injection mold to produce these things for 20 to 30 cents each.  At that point, the 3D printed version will loose all of its market share. 

In any event, anyone who wants to copy what I made has my blessings. 

Packard
18onv7g.jpg
 
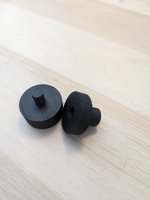
I printed a simple model that consists of a bench dog with large should surface to support the framing square and a scew on top. I think it should work well for the purpose. You don't need to screw it tight for the dog to held it enoug for the task.


Attachments

  • PXL_20230311_155133514.jpg
    PXL_20230311_155133514.jpg
    1.2 MB · Views: 159
Francis_Beland said:
I printed a simple model that consists of a bench dog with large should surface to support the framing square and a scew on top. I think it should work well for the purpose. You don't need to screw it tight for the dog to held it enoug for the task.

I think that will work fine.  It is a fairly simple and fairly obvious device.  I am worried that there is already out there an existing device of similar design.

Note:  I have a much smaller framers square and that actually works better for this application.  You really don’t need one that large for face frames. 

I was also able to use light duty bar clamps (sourced from Harbor Freight and with just 8” of bar) to tighten the wood pieces to the square as well as the c-clamp to the face of the table (for the B & D Workmate only).

For the MFT table, the Festool clamps are great for this application. 

As mentioned before, Milescraft makes a flimsy square/holder for use with their clamp. 

I do wonder if there are others out there.  Patent infringement would be the concern.  I know I came up with this idea on my own, but being so obvious others could have too. 

Your device looks like what I had in mind for the “pared down” version and is elegant in its simplicity.  Good luck with it.

Packard

Addendum:  My dogs are 3/4” diameter, slightly smaller than the 20mm diameter holes on the Workmate and on MFT tables.  Despite that difference and the fact that the dogs were fairly loose on the Workmate, it still functioned perfectly well. 

I was surprised (years ago) to learn that the Workmate used 20mm holes instead of the fairly standard (in the USA) 3/4” bench dog.
 
Michael Kellough said:
“So as long as my carpenters’ square is dead on at 90 degrees, the hole alignment will not be critical.”

Good luck with that.

Exactly.

If you can find written tolerances on a woodworking square, you will not be impressed.  Most have no specifications.  Lee Valley has a SS carpenter's square with tolerance in writing --- its not cheap and its not particularly accurate (see specs in the "care and use" tab).  I did find a couple of accurate aluminum squares, but for those prices, I could find better steel units.  I have a couple of smaller machinist's squares, but needed something bigger, so I investigated this just a couple of months ago.

I recently bit the bullet and bought an Insize #4707-500  machinist's square (20").  Not at all cheap, but reasonably accurate (about .0025"). 
 
If I need a longer square and being aware of the minor issues it presents I use a Starret and lay an accurate straight edge against the blade. Not ideal but it works for my purposes. Framing squares are used for building houses which is one of the reasons houses are not square.  [big grin]
 
Even the inaccurate framing squares are off by 1 degree or less.  It is pretty easy to cherry pick an accurate one. 

I don’t use a CT vacuum, but I do observe that their replaceable bags are vastly more expensive than the ones for my ShopVac.  The aftermarket versions cost me $20.00 for six bags (10 gallon size).

So an adapter that allows ShopVac bags on CT vacuums would probably be well received. 
 
My suggested elevation will work for face frames, but a lower elevation would allow you to square up your track for square cuts with your track saw. 

This would be a less expensive (and less convenient) way to make square cuts with a track saw than using squaring arms. 
 
Back
Top