Garden Bench

HowardH

Member
Joined
Jan 23, 2007
Messages
1,572
Nothing fancy.  LOML wanted one.  I was commanded to build one.  Pretty much ready for some wild paint color, some last minute sanding to be done.  The Domino was indispensable for this project.  It eliminated the need for screws.  Now I was told I need to get ready to build more since she plans to show it to her friends who most likely will want one.  Hmmmm.  Sounds like some extra money to be made for more Festools!  ;D


Attachments

  • IMG_0738 2.JPG
    IMG_0738 2.JPG
    2 MB · Views: 576
  • IMG_0739.JPG
    IMG_0739.JPG
    1.8 MB · Views: 434
Great job!

Only advice is on the seat. It might get a tad uncomfortable sitting on that flat seat!  I made one for the LOML a few years back without dominoes. Still going strong in this Midwest heat and snow.

Cheers. Bryan.
 
bkharman said:
Great job!

Only advice is on the seat. It might get a tad uncomfortable sitting on that flat seat!  I made one for the LOML a few years back without dominoes. Still going strong in this Midwest heat and snow.

Cheers. Bryan.

I'm mixed on that ... if you put a curve in the seat you find cushions don't sit nicely. To me that'll look nice with a dark stain and a navy cushion with white piping or even a navy and white stripe fabric.
 
Kev said:
bkharman said:
Great job!

Only advice is on the seat. It might get a tad uncomfortable sitting on that flat seat!  I made one for the LOML a few years back without dominoes. Still going strong in this Midwest heat and snow.

Cheers. Bryan.

I'm mixed on that ... if you put a curve in the seat you find cushions don't sit nicely. To me that'll look nice with a dark stain and a navy cushion with white piping or even a navy and white stripe fabric.

Very true Kev. Very true.

But... I don't want the LOML's friends getting comfortable and staying longer then welcomed!

;^)

Cheers. Bryan.
 
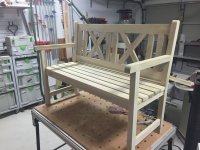
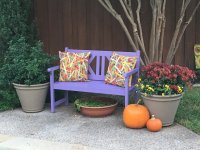
It's going to sit out by the pool with some cushions but I really don't expect much actual sitting.  It's more of an accent piece.  If someone commissions another one, I'll definitely put a curve into the seat supports.  I sat on it and it didn't seem too bad. One mea culpa, tho.  After it was all glued up, I was looking at it from one side and notice one horizontal arm was angled lower on side than the other!  ??? ???  I missed the lecture that day on measure twice, cut once!  ;D  I had to go buy a japanese pull saw with a very thin kerf, cut through the domino where the arm was attached to the back upright and the front upright to remove the arm.  Once it was removed I was able to measure and make sure it was right and matched the other side.  Re-dominoed (is that a word?) the joints and it's now perfect.  Whew!  Like a surgeon, it didn't happen if you find your mistake before you close up the patient!  [laughing]
 
Again, great job Howard!

When you stain it and deal it, snap a few pics.

Cheers. Bryan.
 
The vertical back corner pieces appear to bend at seat level to give the back rest a more comfortable angle.

How did you produce this bend?
 
Nice work.  I like the mix of vertical and X-shaped slats.
 
Birdhunter said:
The vertical back corner pieces appear to bend at seat level to give the back rest a more comfortable angle.

How did you produce this bend?

I started by taking two 6" wide 4/4 boards and sandwiching them together.  This should help them not to warp by virtue of them being outside.  I traced the outline of what I wanted and then cut them on the band saw.  The face of the leg that faces forward needed to be perfectly flat to accept where I attached the horizontal arm, seat and cross pieces with dominos.  To accomplish that I ran that one face across the jointer.  I had to do it in two steps because of the angle but after that was done, I simply had to sand a bit to create a rounded transition between the two angles.  The back side wasn't so critical so I just sanded them pretty flat.  Here is it finished.  Some of you may recognize the color as being TCU Horned Frog purple but that wasn't by choice...BTW, the Domino was critical to the build.  It allowed the "X" pieces to be put together so that not only were they strong, but no visible means of attachment.  This bench does not rack whatsoever.  The Domino is amazing!


Attachments

  • IMG_0743.jpg
    IMG_0743.jpg
    1.8 MB · Views: 219
Back
Top