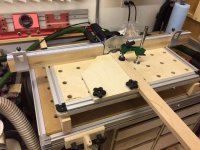
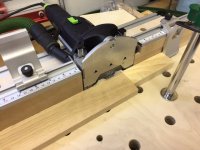
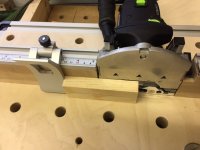
Giving my DF 500 Q one more chance before I get rid of it.

dckchk said:
  OK, I have now assembled and used my DF 500 mounting jig.  As I suspected from my experiment with the Woodpeckers offset base, solidly bolting the DF 500 to a plate produces perfectly aligned reference surfaces.  Apparently despite my best efforts to hold the business end of the tool tight to the bench-top, the back end has been dropping during the plunge. 

Great looking set-up. I have had to re-do about 10% of my Domino joints due to not being able to hold the tool steady enough or from not clamping the workpiece properly. Buying an MFT helped with the clamping problem, I may build a table like this if I still have problems.
 
gippy said:
Great looking set-up. I have had to re-do about 10% of my Domino joints due to not being able to hold the tool steady enough or from not clamping the workpiece properly.

That sounds a little high % of recuts in my book (assuming you were talking about cutting with the narrowest setting). Could it be also due to your plunging the joiner too quickly and hard, causing a slight movement to the joiner itself?

Don't know if this would help in your assembly: I always microwave oven the dominoes (10 to 15 seconds) before the dry-fitting and gluing-up.

The use of dominoes has greatly reduced my assembly stress and frustration compared to the other regular joinery methods I have used before.

Chuck
 
ChuckM said:
gippy said:
Great looking set-up. I have had to re-do about 10% of my Domino joints due to not being able to hold the tool steady enough or from not clamping the workpiece properly.

That sounds a little high % of recuts in my book (assuming you were talking about cutting with the narrowest setting). Could it be also due to your plunging the joiner too quickly and hard, causing a slight movement to the joiner itself?

Don't know if this would help in your assembly: I always microwave oven the dominoes (10 to 15 seconds) before the dry-fitting and gluing-up.

The use of dominoes has greatly reduced my assembly stress and frustration compared to the other regular joinery methods I have used before.

Chuck

Could be too fast, how I hold the Domino and / or not pressing down hard enough on the fence. I haven't had the machine that long and have to practice some more. Even with having to re-do some joints I wouldn't be without it.
 
  I am now pretty happy with my machine after mounting on the fixed base.  I have added a Woodriver drill press hold down (sold by Woodcraft for $21), stick-on measuring tapes and a fence for end cuts on sticks.  I also have a dual 45 deg fence.  The photo shows it mounted on a pair of 2x4 risers which are bolted down on the Festool MFT.  The MFT is an older one at a lower height and the 2x raises the working height, provides under-jig access, and isolates the MFT MDF from excessive continuous center loading.  I am very pleased with the Veritas work surface for this application.
  With this setup I am making very quick mortises in styles and rails which are dead smooth on the show face, just what I'm after.  This works much faster than clamping each stick in a vise and working with the tool free hand.  Also I have the ability to move the fences or stops a fraction of a mm if I want to adjust the joint for some reason.
  I do plan to rout a depression under the tool base wide enough to install from the top using bolts and clamp knobs.  This will permit raising with spacing plates and facilitate quick removal for free hand work with or without the Woodpeckers base. Finally I will make a 45 degree ramp fence to permit cutting mortises in vertical miters on the raised base.
  I plan to use the DF 500 only for stick joinery.  I use only biscuits for commercial plywood assembly as they are strong enough and much cheaper than dominos.
 

Attachments

  • IMG_0152.JPG
    IMG_0152.JPG
    130.1 KB · Views: 719
That looks really nice.  Do you have photos showing how DF is mounted to the table?  I'm really interested in this jig.

DrD
 
Very innovative setup. I can see how that would allow you easily and quickly do face frames.
 
DrD said:
That looks really nice.  Do you have photos showing how DF is mounted to the table?  I'm really interested in this jig.

DrD

Ditto - looks like you are using a bunch of parts from Lee Valley, including the base table, which I believe has 3/4" holes on slightly different spacing that a Festool MFT.  I'd love to see pictures that show how you built the jig, and some that show setups for different kinds and angles of cuts.  Also a Lee Valley parts list.
 
Just a thought -- might not the clamping force used to hold pieces in place perhaps be responsible for some of the vertical misalignment you are experiencing?  Not sure how stable the table surface is, but certainly on the MFT there can be some minor warping with the MDF when using a lot of clamping pressure.
 
I didn’t take any photos as I was building my jig and there’s not much on the underside to see at this point.  I think it’s probably more helpful for me to describe what I did. I am attaching a couple of photos showing the use of a 5" spacer block to assist with the installation of stick-on measurement tapes and positioning a workpiece.
The Base I'm using is the Lee Valley Veritas Large Worksurface.  They are just stacking two sheets of Baltic birch plywood (I assume so as to cancel any camber).  So you basically have a 1 1/2" thick Baltic birch plate with a T-slot track perimeter and 3/4" dog holes.  There's not much to see in a photo on the underside.  There is no MDF in my jig.  The MDF is only in the top of the Festool MFT which I am using as a support table.
  I just picked a location centered side to side and with the base of the DF 500 fully on the wood.  I allowed the motor to hang off the back to maximize the workpiece mounting area but making sure I had enough room to rout a depression later for "quick-release" mounting plate. 
  I located holes by using my Woodpeckers base as a template to mark them out on the top surface.  I used a caliper to check the diameter of the metric bolts that fit the two mounting holes in the base and drilled a tight fitting pair of holes.  If I didn't have the Woodpeckers base I would have made a template out of a piece of scrap to transfer the drilling locations because it is really important to end up with the domino fence precisely parallel to the 3/4" dog hole pattern.
  After drilling the holes I mounted the DF 500 to the Worksurface with two bolts which I purchased at a hardware store. I think they are 8 mm but you need to check this.  The bolts I used are about 2 1/4" long and go through the base a bit further than they need to, which is no problem.
  After getting the DF 500 fence mounted I cut two pieces of maple (actually some pieces I had been given made up of three-strip glue-ups that had been used for some sort of shipping purpose) 1 1/2' long and jointed and planed them to fit Veritas large "Flip-stops" and 1/2 of a three foot Veritas Tape T-Slot Track that I had cut in half.
  I clamped a jointed piece of material to the Worksurface and tight to the face of the DF 500 fence.  I marked a line parallel to the straightedge to use for locating fence hold-down screws and center punched three locations along the line for the screw holes.  I drilled 1/8” through holes in all six locations using a drilling guide to maintain perpendicularity.
  I then placed the wood fence section which is against the DF 500 angle locking tab and marked out the wood which needed to be removed to clear the tab in all positions.  This meant cutting away more in the back than in the front of the fence to keep as much of the fence face as possible.
  I then placed both fence sections in position against each side of the DF 500 (leaving around 1/32” of space to allow for future tool removal) and clamped them against the straightedge and down to the Worksurface  using 4 clamps.  I turned the worksurface over and clamped it to the bench with hold-down clamps.  I then drilled through the Worksurface and into the clamped fence sections, opening the 1/8” holes up and creating the screw pre-drill.
  I then unclamped everything, removed the fence sections and straightedge, and opened up and countersunk the holes in the Worksurface to 1/64” larger than the OD of the #10 screws used to hold down the fence sections.
  I then re-clamped the straightedge and fence sections before installing the fence screws.
  In order to align the stick-on measuring tape it was necessary to make a stop block because the Flip-stops can’t get much closer to the center mark than 3-to-4”.  therefore I cut a 5” reference block and used that to set the tape position.  the Flip-stops also have a fine adjustment screw which can be used to get a precise reference but I don’t find it necessary to use them.
    There are a number of different hold-down options of course but I really think they will be unnecessary for most cuts.  It’s very easy to hold the workpiece against the extended fence sections.  The perpendicular fence that I showed in my previous post also make for secure hand-held positioning. 
    I really have only found it necessary to use a mechanical clamp when doing something like moving a cut over slightly to make a correction.  I added the Woodriver quick set drill press hold down for those types of cuts.  It’s cheap and very convenient to use but it’s throat depth is insufficient to reach close to the cut using the 3/4” dog holes so I drilled two 10 mm holes in a good position midway between dog holes on either side of the DF 500’s centerline.  I also had to countersink the bottom of the Worksurface 3/8” to allow installation of a washer and 10 mm nut.  This still leaves 1 1/8” of Baltic birch to resist the clamping forces.  Everything is absolutely rigid.
    Most of the time I’ll be making my cuts by hand holding the workpieces.  When cutting on the end of a stick I do check to make sure the sliding side fence is perpendicular by just forcing it toward the fixed fence although I don’t find a tiny amount of error in that perpendicularity to be very significant.  For me the most important issues are maintaining an equal reference to the complimentary end and edge cuts for a right-angled cut, and maintaining an absolutely perfect surface registration.
  This jig does require the use of a riser strip under very thin material and perhaps a thick clamping strip above as well if the material is very thin.  I don’t find these to be a problem.  This jig seems to be providing the repeatability and accuracy in joint alignment that I am looking for and that I feel to be more important than exact positioning of the domino.


Attachments

  • IMG_0158.JPG
    IMG_0158.JPG
    115.2 KB · Views: 566
After posting on this it occurred to me that as a bonus for putting up with my initial rant on this thread I have another setup that many might be interested in.  I have mounted an ETS 150/5 EQ  in a fixture which presents the sanding surface vertically for use in edge sanding of sticks.  I will post in in the Jigs & Attachments section with the title "ETS 150 Edge Sanding Machine"
 
[member=64480]dckchk[/member]

We would love to see your fixture for the ETS 150!

I am confused about one thing with the DF500 fixture.  Again it looks really neat, and more importantly really useful.  Where I'm getting balled up is with the referencing off the bottom.  There is a fixed distance of, I think, 10mm from the bit centerline to the bottom of the DF.  With the DF bolted to your fixture, the cut mortise will always be centered 10 mm from the bottom edge, regardless of the material thickness, will it not?  That's my issue.  Please help me if this really isn't the case, because I really see the overall elegance and utility in your fixture.
 
  Yes, you are correct that as it is configured all mortises will be 10 mm above the reference surface.  That is not however a problem for me.  I really don't care where my tenon is buried in the wood so long as the desired surface of both mating workpieces are on the same plane and there is enough material above and below the domino to maintain a strong joint. The fact that the domino is 10 mm from one surface instead of 12 1/2 mm in a 25 mm doesn't bother me.  What does bother me is to add a half mm discontinuity at the reference surface interface because of a mistake in clamping the parts or holding the DF 500.  When the parts become so thin that my mortises are getting too near a surface I can easily add a spacer strip under the workpiece to move it closer to center.  Again I don't care whether it's centered, just that all parts are in agreement and the cut is well controlled and repeatable.  As I said, I am planing to add spacers under the DF 500 to deal with thicker (> 1 in) thick material.  Adding spacers under the workpiece takes no significant time.  Putting spacers under the machine takes a bit longer but I don't expect to be doing that much.
  I am very happy working with this setup because I now can easily see if there is any gap between my workpiece and the Worksurface.  It is also very easy to locate and maintain proper alignment.  Before I always seemed to be fussing with the clamping of the piece to be cut in a vise.  Now it's just slap it down, line up the mark and pull the machine through the cut.  Also changing bits is more convenient because the motor is hanging out in space easy to grab and the fence is anchored so it's easier to reassemble.
  I have posted  the edge sander in the attachments area.
 
I should add one note of caution with my setup.
  Because you are pulling the cutter toward you and, in my case very often hand holding the workpiece, you must be careful to keep the digits away from the path of the cutter.  It's very easy with the Domino machine to make a depth of cut mistake and have the cutter come right through the material being cut and right into your hand if its in the way.  This is another reason why I have added a hold down clamp.
 
Very good! Ok, I can see referencing off the bottom isn't so bad, with the option of shimming thin stock.  Thanks a lot, and I caught the ETS fixture o your other thread.

Best wishes,
 
dckchk said:
    I bought my Domino machine right after it was first released.  I have never been able to depend on it to produce joints with the accuracy that I expect in the course of producing quality furniture joints.

So after 10 years you're going to give it one last chance?
 
After another long period ignoring my DQ500 due to continued joint mismatch, I finally ran into a project for which the Domino seemed the perfect solution - providing I could get decent registration.  After making a number of test joints with a very solid and well calibrated positioning arrangement, I finally concluded that my previous careful calibration had to be in error.  In the past I have used test cuts and transfer of the base calibration to the fence.  This time, with the machine bolted to a solid surface and set for minimum oscillation, I decided to make a test cut on a workpiece just thick enough so the top surface of the workpiece was in line with the center of the cutter.  That way I could watch the cutter in action.  After finishing the cut I checked the cut width against the fence alignment marks with a square.  I found it to be roughly 1 mm off center and not correctable by shifting the calibration window which was already against a stop.  This tool has been worse than a write off for me.  It has been a huge waste of time.
 
dckchk said:
This tool has been worse than a write off for me.  It has been a huge waste of time.

Sorry to hear that. Either that your DF500 is a lemon (unfortunately) or you don't have the user skill to use it properly or both. The DF500 is game-changer for me and I use it freehand -- that's not bolted to any platform or jig.  I have used the DF500 in complex angled joinery work with success which I would not try at all if I had to resort to a router and angled jigs.

If someone skilled in using the DF got a chance to make cuts with your DF, they could then look at the results and conclude if it was the machine or you, the user, that caused all the frustrations.
 
I built a jig for doing mitered domino joints with 700 XL.  Works fantastically well, and I can speed through the joints in minutes. 

I originally tried it free handed, and well, yeah that didn't work at all, hah.


Attachments

  • IMG_0883.jpg
    IMG_0883.jpg
    164.3 KB · Views: 421
Back
Top