Gluing Small Piece of Hardwood Flooring

GoingMyWay

Member
Joined
Oct 11, 2017
Messages
3,782
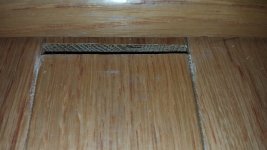
There has been this gap in the hardwood flooring almost since the day I moved into the house, almost 10 years ago.  I bought the house brand new from the builder so during one of our inspections I had them fix the gap.  There used to be a very small piece of flooring that was under the quarter round moulding.  They fixed it by adding a longer piece of flooring and I think they glued or nailed it in place.  It was ok for a while, but I guess the little filler piece of flooring moved and now I get to look at this gap everyday.

[attachimg=1]

This bothers me as much, if not more than the cracked caulking on the stairway trim.

I was thinking of using Titebond III to glue to end grain together.  Maybe shoot a couple 23 gauge nails through the face (ideally under the quarter round) to tack the piece in place while the glue dries.  Is this a bad idea?  Would it it be better to not glue the joint and just shoot either 18 or 23 gauge nails through the face of the small piece of flooring?

I didn't want to pull the quarter round trim up before I was actually ready to make the fix since I'm afraid my little puppy might want to start exploring and chewing on the newly exposed area.
 

Attachments

  • 20180305_163142.jpg
    20180305_163142.jpg
    3.5 MB · Views: 572
Glue is probably not needed. If you pull the quarter round, you should be able to move the small piece tight, removing the gap. All that is needed then is to fasten that piece so it can move away again. A wedge behind it, a small brad through it, (if the piece is large enough to do so without cracking it), or even some gorilla glue or expanding foam behind it. You just want to make sure it can’t move away again, which is what the previous repair job failed to do. 

Good luck, I would expect it to be easily remedied.

Clint
 
Thanks for your feedback.

If glue probably isn't needed then I think I'll just pull it tight and shoot 2, 23 gauge pins through the face of the small piece.

I thought having anything behind would be a bad idea - I thought you needed some room for expansion and contraction.  That's why I was thinking of gluing the 2 pieces together, that way they'd expand and contract as one whole piece, but there'd still be a gap that would be covered under the quarter round.

I think the old repair lasted "long enough" maybe 6 months or more likely 1 year+.  I don't think I noticed the gap reappearing until after a fair amount of time went by.  If it had been immediate, I obviously would have complained.

This should definitely be easily fixed.  I got my new little California Air Tools Compressor so it should be super easy and most importantly super quiet to shoot those few nails.
 
You should be able to wedge something behind that small piece of flooring as a bit of insurance. Wood mostly expands and contacts across the grain. It's pretty dimensionally stable with the grain.
 
Oh so maybe a wedge or a shim is the way to go.  I don't remember how big of a gap there is behind the small piece of flooring.  I'd need to pull the moulding to find out.

Are there any risks or downsides to gluing the pieces together?
 
Is there a tongue between the two pieces that are separated?  If so, that would be the ideal place to shoot your pins. That way if one of the pieces were to somehow try to shift, the other piece would then have to follow. I couldn’t tell from your picture.
If there isn’t a tongue between them, I’d try to shoot the pins through the small piece into the adjoining pieces on each side instead of just face nailing it. Theoretically, the entire finish floor is nailed to the subfloor so face nailing should also work. And if you’re going to use 23ga pins, they like to sometimes turn around and come back out the face when the pinner is angled, especially the longer ones like you would need to use. They will sometimes do it even when not angled depending on the grain of the wood being shot into. Face nailing will lessen the chance of this happening though.

Agree that the pieces should pretty much not be moving. There can be some expansion and contraction across the pieces, but should be pretty much non-existent lengthwise on the pieces.

 
Unfortunately, there is no tongue in between the separated pieces.

Thanks for the warning about the pins sometimes wanting to come back out the front.  I do know not to keep my hands anywhere in the vicinity of where I am shooting nails because the nails do seem to have a tendency to come right back out where your finger might be, especially around knots in the wood.  Fortunately I did not learn that the hard way.

Would an 18 gauge nail be better?  I really like how the 23 gauge pins practically disappear.  I only have a cheap Porter Cable pin nailer too.  I couldn't really justify the huge price difference with Grex.
 
I don’t think the pins from the PC would be long enough to hold it secure. I’d use the 18ga instead and position the holes so the quarter round would cover them.
 
A 1-3/8” pin would go 5/8” into the subfloor after going through 3/4” flooring. When shot straight in. I usually try to go with a longer fastener in that situation with the 23ga being as small as it is. It should hold okay depending on your subfloor material. I was thinking that the PC’s max fastener size was a little shorter than that. I might have been remembering a Bostich pinner that I used to have that could only use pins up to 1-1/8”.

A longer fastener will give a little more assurance against ever coming loose. Also gives one the option of shooting the fastener at an angle and having plenty of penetration into your substrate.
 
Oh, I could use my 18 gauge Porter Cable brad nailer.  I believe that can shoot up to 2".  The size of the head shouldn't matter since it should be behind/under the moulding.
 
I would fear damaging the trim removing it. If possible with a sharp object (Think hook tool) I would grab the little wooden piece and pull it back into place, apply some wood glue and call it good. Gaps happen, cracks happen, but you are more likely to cause more damage trying to dismantle the house. Although you will probably see a tiny gap after repair NO ONE else ever will ;) Unless you foolishly point it out.
 
Normally I'd also be fearful trying to pull the trim up without damaging it, but I have successfully pulled up other pieces of trim without much difficulty.  I can already pull this trim away slightly with just my fingertips so it's fairly loose to begin with.
 
I'd pull the quarter round and scoot the small piece forward until it butts up against the longer piece. Clean up the ends of both boards
because gluing the butt joint is a good idea.
Because you'll be nailing the small piece very close to the end, I'd drill 2 small holes for brad nails and hammer them home. This eliminates the possibility of splitting the flooring. Then reinstall the quarter round as the quarter round will cover the 2 brad nails.

When pulling the quarter round you may find some of the brads want to pull into/through the quarter round. Don't try to drive them back through the face of the quarter round, that can become a mess. Either continue to pull them through the back or nip them off and putty up the holes.

 
I think I will glue the butt joint then.  Doesn't seem like it would hurt anything any way - can only help.  Well that is unless I apply too much glue and make a big mess.  I plan on using the least amount of glue as possible.

You think the flooring is likely to split?  I hadn't thought about that really.  The piece of wood may not be super short.  I'll need to reconfirm once I pull the trim.  I recall that this new filler piece was much bigger than the piece that had been in there originally.  I thought the problem was that there was nothing really behind the filler piece.  I kinda chuckled at the thought of actually needing to use a hammer to drive a nail.  Seems so primitive with pneumatic and cordless nailers.

Thanks for bringing this up.  Pulling or cutting the nail from the backside is probably the hardest part of the whole job.  I learned this technique a while back from either the New Yankee Workshop or This Old House.  It is rather counter intuitive - before I'd just drive em back out the front.
 
GoingMyWay said:
You think the flooring is likely to split?  I hadn't thought about that really.  The piece of wood may not be super short. 

I kinda chuckled at the thought of actually needing to use a hammer to drive a nail.  Seems so primitive with pneumatic and cordless nailers.

It all depends upon how much meat is left on the tail end of the board. A 15/16 gauge nail driven within a 1/4" of the end would make me nervous. Also the flooring doesn't appear to be 3/4" thick, that also factors in.

Typically when I put in a floor I'll always have a 15 ga flooring stapler, 15 ga finish nailer and an 18 ga brad nailer oiled and ready to go. But off to the side there is always a drill with a 3/32" bit, a hammer, brads and a nail set.  [big grin]
 
mike_aa said:
[member=66216]GoingMyWay[/member]  Titebond has a new glue that came out about a year ago.  It has some gap filling properties and flexibility so you might want to look at it for your application.
http://www.titebond.com/Libraries/LiteraturePDFs/FF1026_QuickThickSalesSheet.sflb.ashx

Mike A.

Thanks for that link.  I had not seen that product before.

Cheese said:
It all depends upon how much meat is left on the tail end of the board. A 15/16 gauge nail driven within a 1/4" of the end would make me nervous. Also the flooring doesn't appear to be 3/4" thick, that also factors in.

Typically when I put in a floor I'll always have a 15 ga flooring stapler, 15 ga finish nailer and an 18 ga brad nailer oiled and ready to go. But off to the side there is always a drill with a 3/32" bit, a hammer, brads and a nail set.  [big grin]

The flooring appears to be about 1/2" thick.

Do you use the 15 ga nails for tight spots where you can't get the stapler into to nail through the tongue?
 
GoingMyWay said:
Do you use the 15 ga nails for tight spots where you can't get the stapler into to nail through the tongue?

Yup, also the drill, brad and hammer. You want to drive that in as close to 45 degrees as possible to prevent lifting and sometimes there just isn’t enough room for a gun at 45 degrees.

I also only top nail the last board and it will be nailed (at a slight angle) in the area where shoe or trim will cover the nail heads. I absolutely abhor seeing “birds eyes” in a wooden floor  [mad]
 
Just a thought -

Drill two small holes in the piece and two in the flooring.  Do so on each side so you can get two pairs of needle nose pliers in place to squeeze both sides at once.  Tap in brads into those holes to use the pliers to pull together.  Might need a small pry bar against the quarter round.  That might let you move the piece forward without having to pull up the quarter round.  If it doesn't work, you have four small holes that you could easily fill should you need to resort to more desperate measures...
 
Back
Top