Grooves for shelves

Jeff Zanin

Member
Joined
Jan 2, 2009
Messages
328
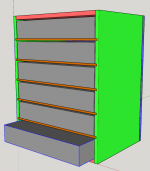
I am making a shelf for Racco parts boxes, because I have nine of them and only four will fit in the Racktainer. 

The cabinet is 12mm plywood assembled with 4mm dominoes, and the shelves are 1/4" plywood - the real thing from years ago.

[attachimg=1]

[attachimg=2]

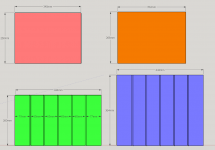
My question is how to make the grooves in the sides (green) and back (purple)?  It isn't shown on the drawing but I would prefer the grooves in the back to be stopped so they don't show when the cabinet is assembled.  The spacing of the grooves needs to match for the shelves to fit properly.

It seems like a table saw job - set the fence for groove 1, run all three pieces, move the fence for groove 2, run all three pieces, etc., and I could do it this way if necessary.

My preference would be to do this with a router (OF1400), but I am stuck trying to figure out a jig or other arrangement to align the parts to make the groove spacing match on all three pieces.

All suggestions gratefully received.
 

Attachments

  • Racktainer1.PNG
    Racktainer1.PNG
    25.4 KB · Views: 678
  • Racktainer2.PNG
    Racktainer2.PNG
    43.3 KB · Views: 690
The Racco boxes are stiff. They only need to be supported by the outside corners. So instead of a full width “shelf” panel you only need a 20mm strip on each side, as long as it is well glued into a snug groove. Therefore, you don’t need grooves in the back, and that back panel only needs to be 1/4” thick. It’s just a shear panel to keep the cabinet from racking. Unless you plan on hanging the cabinet on the wall and need to put screws through the back.

It might be good to use a full width shelf in the middle position to keep the sides from spreading in the front.

You can make the grooves with a router or table saw.
The kerf needed is too big for a single table saw blade so you’ll need a dado stack.
There are router bits sized for plywood. In this case the nominal 1/4” bit will be a little smaller.
 
Whip up a quick dado jig for your router.

Here is one of many you can find on YT and elsewhere.
 
I'd gang those boards together and use a router on a guide rail. If you want to use stopped dadoes on the rear panel, will one of the sides of the cabinet be hidden by a wall or partition?
 
Make the grooves in a large piece first. Then cut the sides and back from that piece to ensure alignment.

Seth
 
I like to use the router and a guide rail with the TSO parallel guides for this. It's very accurate and like mentioned above you can use guide stops to make the edges slot unseen on the back piece.
 
Thanks to all for the responses.

  • I have used the technique of making the grooves in a large piece before cutting on another project, this works well but on this project the (leftover) material did not provide the right shape or amount to do this.
  • The Racco boxes are quite stiff and probably don't need the shelves, I wanted them in case there are other boxes that can use them and also to prevent the boxes dragging on each other when being moved in or out.  I probably don't need the grovves in the back and that would make for a bit less work and easier to fit the shelves.
  • The piece for the shelves is really 1/4" because it is a leftover I inherited from my father, I have no idea how old it is but it is in great condition.  I may need to sand it a bit, it is a tight fit in a groove made with a 1/4" bit.
  • I think sirhc's idea of the guide rail and parallel guides might be the ticket for this.  I will need to make a spacer to support the guide rail for the grooves on the edge, but that should be easy enough.  The router on a guide rail is how I wanted to do this, just couldn't figure out a repeatable setup - TSO guides should work well.

This is why I really like this forum.
 
I finally got around to doing this, the jig idea using the TSO guides worked well, as shown in the photo.  This is the first time I have used the guides this way, where the guides are stationary and different workpieces are inserted. 

In this mode the markings don't seem to relate to anything, so I did the layout on one piece, adjusted the router to the layout and the guide stops to the workpiece, cut the dados, then repeated for each piece before moving to the next layout line.  This was sufficient to align the dados on the sides and back.

View attachment 1
 

Attachments

  • OF1400_DADO.jpg
    OF1400_DADO.jpg
    352 KB · Views: 200
I generally do this with the MFT holes in my assembly table. I set up a fence and a dog as a stop for one end and then cut spacers to move the parts accordingly. This also works to cut Domino slots, rather than dados.
 
I got my first (and only) table saw because I wanted to make the back room cabinets for my picture framing business.

One of the cabinets was to hold prints awaiting framing and and measured about 4’ x 4’ x counter height. 

I cut 3/8” grooves to accommodate 1/4” (I think, Masonite). The Masonite was sized to slide freely in the grooves, and was attached to the drawers underneath and acted as drawer slides. 

I could get actual dimensions (I still have it and it is in the basement).

My point is, you don’t need a shelf and a box.  You can make the box act as its own shelf.

As I recall I used butchers’ wax on the edges of the Masonite.  But I never re-applied any and it is about 30 years old and works well.

However the vertical mat board racks I made with removable partitions had more closely fitting grooves.  The moisture in my basement has cause swelling and the vertical separators are no longer removeable.  The larger grooves I used for the print cabinet still allow free movement of the drawers. 

The drawer rails extend the full length of the cabinet.  However the drawer interior is only about 34” deep.  The rest allows for nearly full extension.

Obviously this was done on the cheap.  The metal tracks that long would have bankrupted me.

When I get home I will try to get a few pictures.
 
My inexperience paid off.  I used MDF for the drawer frame, a material I would never choose nowadays.  But it is stable and having the Masonite glued to the bottom did not run into issues of seasonal movement.

Tha cabinet is is two pieces and weighs a ton.  The largest print it is designed to hold is 32” x 40”.

I was mistaken when I said that the drawers were not full length.  They are.  I have never pulled them out more than about 30” and frequently far less than that.
https://imgur.com/a/zG5Isy7

Note:  I don’t know why the images are not showing in the post.  But the link works.

(I used regular household wall paint and the MDF bled through.  I’m too lazy to repaint it though.)
 
Back
Top