Guide rail advice

mino said:
YMMV

I proposed two 55" LR32  and cutting one exactly because the 1900 is too long 99% of the time and the 1080 is too short for a lot of smaller rips still and neither are LR32.

I rarely do full-width cross-cuts. When I do make them, I take the 1400 and extend it a bit by the 376 or take my 1016 and join it with my 632.

The thing is, eventually you will want 2x55" LR32 for full-height cabinets so with 1080 and 1900 you then end up with twice the rails you actually need. Well, given your Kreg kit, kinda 3-times.

I started with 1400 from the TSC set and a "2600" (shortened 2700 so I can store i vertically in a flat), then realized I need to augment the 2700 a bit so made a short piece about 400 mm from the 1400 => 1016 and 376. Then I realized the 1400 is too short for full rips and that I really want the LR32 system. So added 1400 LR32. Then I realized one 1400 LR32 is a PITA when I needed to make 2600 mm cabinets. So I got another LR32 1400 which I cut in 1016 and 376. I then proceeded to cut the 1016 from the original FS/2 again to get 632 from it and 376. I use the 1016 the most, followed by 632, these two joined, then the 2400 + 632. Lastly I again shortened my 2600 to 2400 for ease of storage/handling as I anyway have to extend it most of the time.

In the end, this works well as I have below combinations on hand:
376 + 376 + 376 in SYS-MFT along with the GRSes, clamps and connectors, I use this when need to do something off-shop and do not want to carry the full rail bag.

632 for those ad-hoc short cuts and to augment my 1016 LR32 for full cross-cuts
1016 LR32 - most used, including the LR32 function as is just right for small cabinets
1400 LR32 - bigger cuts the 1016 cannot make
1016 + 632 or 1400 LR32 + 376 - full cross-cuts /rare/
2400 (cut the 2600 again to 2400) + 632 for rips
2400 + 1400 for long rips of raw wood

1400 + 1016 + 632 as my "mobile" set when I need to rip at the wood yard

Long story short, I made three mistakes:
- getting the 2700 thinking I "needed" a long rail base on forum feedback from pros while I am a hobby user ...
- NOT getting the LR32 at the start and going for the set version of my TSC
- getting a set of the Festool connectors /never used, once they arrived realized how bad they are and ordered the Makita ones/

These mistakes mean I now have rails to spare, and get the nice 3x376 combo for mobile work. But really it was not worth the $500+ spent in addition as I rarely need to take out the 2400 and the "mobile" mini-rail set, while nice having it, is not worth it either.

Going at it again, I would definitely start with two 1400 LR32 to cover all bases and consider a shorter rail or cutting one etc. only when those two were "not cutting it" for me.

Ok, thank you very much for taking the time to document your journey.  My kreg setup will be getting sold as I migrate to the festool pieces.  I have already had a few times that I needed to crosscut a 4' sheet with the kreg and it's 62" rail is fine for that, but since the 1400 will still do it with a bit of care in positioning I suppose that alone is not a good enough reason to get the 1900.

Thanks again!
 
I made a thread somewhere here about the new Metabo rails. I much prefer them for straight alignment. Theyre basically perfect. I never found joining two 1400 festool rails that accurate unless using a long straight edge and real, time consuming, care in the method.

The Metabo rails join perfectly every time with no effort or faff. I’m totally sold.
 
There is one particularly good reason to have a one-piece rail, of whatever length you need, and that is the pistol grip style clamp. The rail connectors may hold them in alignment just fine, but I'm sure they are not intended to be pulled against.
It also depends, at least a little, on what you are doing with the rail. Sawing puts virtually no side load on the rail, even if you are in a bad position and are somewhat pushing against it. Routers however, are completely different. The rotation of the bit is constantly pulling on the rail, so it has to be well secured.
I got the 1400 with the TS55 and added a 1080 fairly quickly. Using these together, I routed a groove in my cutting station top to house a wide double T-track. Even though the groove didn't need to go the whole length of the table, the rail did, so it could be clamped in place. This combination was barely long enough to reach (and I probably didn't have it clamped as well as I should). I was not taking a big cut because I knew it was going to take several passes anyway since the groove needed to be so wide. 1/2" bit about 1/4" deep and somewhere past half way, it started to move. This made a crooked line, fortunately I could fix it because of the width. I re-grouped and re-gripped and it worked out, but it certainly steered my toward longer rails. I got a 1900 the next week and a 3000 soon after.
Since then, I have used all of the longer rails far more than I ever realized I would, but again, I am in a very large shop, doing this for a living, so probably not the typical user.
 
mino said:
Yes, the best connectors for precision are the Makita ones - which are accidentally the cheapest too. They do not have the issue with denting the rails like the Festool ones have while allow to align the rails to the reference edge.

The TSO connectors are the easiest but not the most precise. They do not allow aligning against the reference edge but depend on the rails being exactly the same - or close-enough - instead.

Is this the general opinion here? Makita is the most precise.

I only have the TSO connectors and can see what you mean. What they call “keystone” profile relies on the guide rail and tightening the screws might move the rail away from a reference edge.

What do others think with both connectors?
 
I thought that the true reference on the guide rails is the raised rail itself?  It has been shown from measurements and observations that the ends of the extrusions are not always the same distance from the rail head from one rail to the next, but they're darned close.

And the rail profile itself may be slightly narrower from one rail to the next, which is why the saws have the cams on the base plate.

If you have pre-cut your splinter guard from one end to the other and have rails with the same profile width so that the cams don't need to change from one rail to the other, then the splinter guard cuts should line up with one another, regardless of whether or not the metal cross sections match up perfectly.

This is partly why Sedge shows using the saw base itself to line up two rails; that's the reference point from one rail to the next.  Using a straight edge on the metal side of the rail may not actually cause the raised rail and the splinterguard to match up between rails.

From what I've observed and read over the months, that is...
 
As long as the two rails go together straight it is ok. I do not put two rails together for any precise joinery. If I need perfectly constant I use a rail longer than that which I am cutting. A connector that would be adjustable for slight variances would be great but I imagine expensive. I have also considered that since the TSO reference the way they do they could be used to great effect in some jig construction. People will say buy holey first but I bought a standard 1400 and had the 1080 from the MFT. I then added the 1400 holey but eventually added the 3000. I could have easily skipped one 1400. I did add an 800 last year and I have used it more than I thought I would.
 
We have used the Betterley Straight Line with the original Festool connectors for many years. We started out with a pair of the 1400(55") rails when we bought our original TS55. That was for storage as well as portability. The longest rail in our shop now is the 1900(75"). We also have three of the 1400(55")rails, a 1080(42") and an 800(32"). We can join rails in just a couple of minutes. The Betterley has never failed to align our rails. We have used this system with three rails for extra long cuts.
 
Only in the USA the holey rail sells for the same. In Europe the LR32 rail is about 25 bucks more..
 
squall_line said:
I thought that the true reference on the guide rails is the raised rail itself?  It has been shown from measurements and observations that the ends of the extrusions are not always the same distance from the rail head from one rail to the next, but they're darned close.

And the rail profile itself may be slightly narrower from one rail to the next, which is why the saws have the cams on the base plate.
Correct.
The -only- part of the rail which is guaranteed/made-to be exact is the "inner" vertical surface on the inner rib. I.e the one the saw slides on. All the other surfaces or distances are straight/same more by accident than by design.

If you have pre-cut your splinter guard from one end to the other and have rails with the same profile width so that the cams don't need to change from one rail to the other, then the splinter guard cuts should line up with one another, regardless of whether or not the metal cross sections match up perfectly.

This is partly why Sedge shows using the saw base itself to line up two rails; that's the reference point from one rail to the next.  Using a straight edge on the metal side of the rail may not actually cause the raised rail and the splinterguard to match up between rails.
Here you are actually wrong in interpreting Sedge advice. What he is actually presenting is a trick to /ab/use the saw slides when you do not have a straight edge on hand as a "poor man's straight edge".

The best practice is to use a straight edge, ideally clamped against the reference surface, and then tighten the connectors. This makes sure the saw slides on a fully aligned surface and there is neither a "bump" nor an angle where the rails join. The cams side of the rib is not important - the rib may be a minutely different width which the plastic cams can handle.

The saw then determines the distance of the cut line. If both the rails had their splinter guard trimmer correctly, then they will also align. But they are not the reference surface.

Crazyraceguy said:
...
I got the 1400 with the TS55 and added a 1080 fairly quickly. Using these together, I routed a groove in my cutting station ...
Did you have/use the Makita connectors at the time?
If not, the most likely reason is your connectors were not tight-enough. The problem with the Festool connectors is not only they dent the rails, but since they dent the rails, one cannot tighten them as much as is needed for truly secure joining.

The Makita-style design does not have this problem. It can be tightened as much as the screw - or the hex head in the screw to be precise - will handle. Which gives like 10x stronger connection than the Festool-style connectors can ever support.

Using those, I find the the lateral "bending" of the rail being a way bigger issue when going beyond 7' or so. And that is independent of the connected/not-connected context. To solve that, I have found that on long cuts, it is critical to "support" the rail laterally by taking advantage of the rail's anti-slip pads. This is done by pressing the rail against the material as much as possible either by hand or by the tool so it is not allowed to bend from lateral forces.

With a router that may not be possible though.
 
Before I bought my 188" rail I joined rails with Makita connectors and a 5' piece of 8020 extrusion that I made UHMW plastic guides to attach to the 75 and 55 rails.  I needed perfectly straight cuts as I fabricate plastic sheets, acrylic, polycarbonate and ABS that had to be exact.  I also did not use the anti splinter to place my cuts, I use my Paolini set 3mm from the edge of the rail.  All four of my saws are set to cut at this space.  Eventually I bought the 118 as I often needed the 75 to crosscut and taking apart and reassembling was a time consuming pain.
 
I forgot to mention than when I use the Betterley connector. I check the alignment with a Woodpecker framing square. I've never seen a misalignment, But I always check.
 
Hello,
This is my first post to FOG.
I notice the original post mentioned a TS75.
I've recently bought a TS75 with the 1400mm guide rail and also a 3000mm rail.  The 1400mm rail with the TS75 can only just cut across an 8x4 sheet (which are actually 2440x1220mm here in the UK).  Using the 1400mm rail and TS75 to cross cut an 8x4 sheet is difficult because the saw is larger than the TS55 and has a slightly different mounting mechanism on the rail, it can be done but you do have to put the rail in the right place
I would recommend a rail longer than 1400mm if you wanted to cut across 8x4 sheets with a TS75 and not have to worry too much about where you put the rail.
Regards
Bob
 
mino said:
Crazyraceguy said:
...
I got the 1400 with the TS55 and added a 1080 fairly quickly. Using these together, I routed a groove in my cutting station ...
Did you have/use the Makita connectors at the time?
If not, the most likely reason is your connectors were not tight-enough. The problem with the Festool connectors is not only they dent the rails, but since they dent the rails, one cannot tighten them as much as is needed for truly secure joining.

The Makita-style design does not have this problem. It can be tightened as much as the screw - or the hex head in the screw to be precise - will handle. Which gives like 10x stronger connection than the Festool-style connectors can ever support.

Using those, I find the the lateral "bending" of the rail being a way bigger issue when going beyond 7' or so. And that is independent of the connected/not-connected context. To solve that, I have found that on long cuts, it is critical to "support" the rail laterally by taking advantage of the rail's anti-slip pads. This is done by pressing the rail against the material as much as possible either by hand or by the tool so it is not allowed to bend from lateral forces.

With a router that may not be possible though.

No I didn't, all I had were the Festool ones. At that time, I wasn't aware that there was a difference in how they worked.
 
bobtskutter said:
Hello,
This is my first post to FOG.
I notice the original post mentioned a TS75.
I've recently bought a TS75 with the 1400mm guide rail and also a 3000mm rail.  The 1400mm rail with the TS75 can only just cut across an 8x4 sheet (which are actually 2440x1220mm here in the UK).  Using the 1400mm rail and TS75 to cross cut an 8x4 sheet is difficult because the saw is larger than the TS55 and has a slightly different mounting mechanism on the rail, it can be done but you do have to put the rail in the right place
I would recommend a rail longer than 1400mm if you wanted to cut across 8x4 sheets with a TS75 and not have to worry too much about where you put the rail.
Regards
Bob

Thanks Bob, that's good input!
 
I have been unable to find a spec for how much more rail the TS75 "eats up" versus the TS55... the Festool guide rails all mention being able to make a cut 6" less than the rail length, but they don't specify which saw this is using.  That would seem to imply that it is the same for the 55 and 75. But several posts over the years as well as Bob's comment above seem to indicate you have less room on the rail with the 75.  Anybody know the difference?
 
Since I have both, I can get an actual measurement for this, but there is some variable here.
The minimum will change based on the depth of the cut. What you really need is to have enough of the saw's baseplate on the rail to have the rear contact point adjuster engaged and the blade far enough behind the material the you are cutting to not make contact until you push forward. You never want to contact the material, from the edge, until you are at against the depth stop (plunged as far as needed)
The saw will climb down (quite quickly)
So there will be a little bit of difference if you were cutting at full capacity (depth) than there would if you were only cutting through something much thinner.

This is not to say that you can't make a plunge cut out in the middle of the sheet, you clearly can, but you do not want to do that from en edge.
 
Crazyraceguy said:
Since I have both, I can get an actual measurement for this, but there is some variable here.
The minimum will change based on the depth of the cut. What you really need is to have enough of the saw's baseplate on the rail to have the rear contact point adjuster engaged and the blade far enough behind the material the you are cutting to not make contact until you push forward. You never want to contact the material, from the edge, until you are at against the depth stop (plunged as far as needed)
The saw will climb down (quite quickly)
So there will be a little bit of difference if you were cutting at full capacity (depth) than there would if you were only cutting through something much thinner.

This is not to say that you can't make a plunge cut out in the middle of the sheet, you clearly can, but you do not want to do that from en edge.

That's good info, hadn't thought about it that way.  So obviously the TS75 has more max depth than the TS55, but if the depth is the same (let's say a tad over 3/4" for typical sheet goods) does the 75 still need more rail?  I'm guessing so, but just wondering what those numbers would be in that fairly "apples to apples" case.  Most of the time I imagine myself really maxing out the rail's length is when dealing with sheet goods so my depth will be on the shallow end in those cases.
 
I would not over-complicate. The difference is not that big.

1400 rail is a too short in either case and 1700+ rail is good enough in both cases.

Simple rule is, subtract about 400 mm from rail and that is how much you can *comfortably* cut. 300-350 mm for the "start" to place the saw and 50-100 mm for overhang.
Subtract about 250 mm, and that is how much you can cut without a plunge cut but with some careful rail and saw positioning.

The difference between TS 55 and TS75 is that you can "barely" do a cross cut without a plunge with TS55 and 1400 rail. But it is still not comfortable, for that you need 1600+ . And at that point also TS75 will be fine.
 
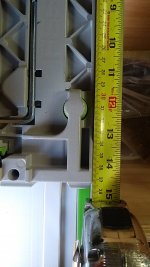
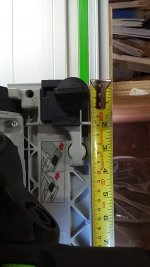
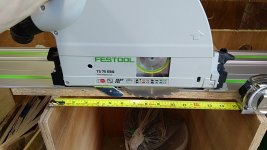
I've just taken some pictures of my TS75.
The base plate is 380mm long.
I've set my saw up with a plunge depth of 27mm, that gives 4mm of tooth below the board.
For an 18mm thick sheet of OSB and the saw being at the left hand end of the rail, you need 210mm from the left hand end to cut through the board.
For an 18mm thick sheet of OSB and the saw being at the right hand end of the rail, you need 170mm from the right hand end to cut through the board.
That gives 1400 - 210 - 170 = 1020mm of cutting width.
If you make the cut deeper, and the saw closer to the guide connectors can you can make longer cuts.
 

Attachments

  • IMG_20210609_171125.jpg
    IMG_20210609_171125.jpg
    465.1 KB · Views: 219
  • IMG_20210609_171109.jpg
    IMG_20210609_171109.jpg
    436 KB · Views: 230
  • IMG_20210609_170931.jpg
    IMG_20210609_170931.jpg
    456.4 KB · Views: 218
Thanks Bob, really appreciate you taking the time to do the measurements and post the info!!
 
Back
Top