Hand railing: How hard can it be?

bellchippy said:
Can you share some of the setting out, that would be interesting.

I will look at my cad drawings and see if I can work them into some sort of how to.
In theory I should only have done working drawings for one side and just flipped them to get the other handing.
As nothing on site was now geometrically based, my geometry based plans had to be constantly fudged to make things work.

Thanks again for all the interest shown.

Rob.
 
Brilliant job.. must have been a bloody nightmare, probably wouldn't have been much harder to whittle a walnut tree with a pen knife!

Out of interest, did you look at anything like laser point cloud surveys and then CNC'ing?
 
mattfc said:
Brilliant job.. must have been a bloody nightmare, probably wouldn't have been much harder to whittle a walnut tree with a pen knife!

Out of interest, did you look at anything like laser point cloud surveys and then CNC'ing?

Funny you should ask that  ;D
Originally the whole lot was going to be made off the architects drawing but I was not comfortable with that idea.
I believe a price for CNC manufacture was obtained but the lead time was too long to suit the clients site management team.
After our full survey I drew it up in Autocad 3D and could not get the rails to flow (sweep or extrude along a path line) and look right.
CNC was discussed again and it threw up too many " What if's " & time, again, became a big issue.
The site management team would often push the various trades on site to make a show for client visits, ie: spend time making it look like things were more advanced.....
of course that then had to be re-done!
It was also felt that if the cnc guys just followed the metal (bearing in mind some of it was still in the process of being "mucked up" ) the client would refuse to pay.

At one point I felt sorry for the metal guys, they were not just out of their depth, they were treading water over the Marianas Trench and not a life belt in sight!

Rob.
 
ROB  [thumbs up] [thumbs up] [thumbs up] [thumbs up]

your the first one I have ever given 8 thumbs up to on this forum !  that is awesome, and thanks so much for taking the time to share with us, something I wish the other 7,000 plus members would do.

that is some amazing talent you guys have in order to achieve this project !!!
 
honeydokreg said:
ROB   [thumbs up] [thumbs up] [thumbs up] [thumbs up]

your the first one I have ever given 8 thumbs up to on this forum !  that is awesome, and thanks so much for taking the time to share with us, something I wish the other 7,000 plus members would do.

that is some amazing talent you guys have in order to achieve this project !!!

Thank you for this response, Kreg, it has blown me away.  [jawdrop]

I posted this project after a lot of re-writes and soul searching because it was not a "look how easy this was" or "how easy Festool's made this happen" although as I stated some of my Festool kit
really helped me out during the project. ( I actually forgot to mention that my Kapex was instrumental in cutting the compound angles required for the curved section joints, which were one chance only cuts! )

I think the message to all the forums members is, post your projects!............. What may seem mundane or of little interest, will probably be of great interest or a boost in confidence in some-one else.

A number of members are using Festool products as part of their hobby, and just maybe, they feel they can not compete with those who use them for a living: it is not a competition, we learn new stuff all the time. It is a shame so many don't share their projects, I have been guilty of that too, on occasion.  [embarassed]

Rob.
 
Wow!!

Rob, I've only come across one chap that was a proper handrail specialist and he tried to explain the intricacies of falling lines, varying pitches etc to me. To be honest most of it went over my head but seeing what you managed to turn out, given the extremely challenging circumstances is truly phenomenal.

Chapeau Sir.  [not worthy]
 
Rob, you ended up with a product I would have expected from you.  I thought your previous projects were stunning but this,,,,I would have been standing scratching my arse looking at it for days before knowing where to start  [embarassed]
Kudos for not walking.

On a side note Rob, I will email you a picture of a staircase I have to price for a log cabin.  Need some advise,,,,,again !
 
Out of interest Rob, have you ever seen anything like this in the UK?

Bending Rail
6010B-1-01.jpg


It looks interesting, probably only anygood for uniform planes as really only bends sideways I would guess
 
Woodguy7, you have a PM, sir.

Mattfc, I actually know two joinery companies locally who have used that technique but machined the bits themselves, apparently some slight twist is do-able though they say the downside is the multiple glue lines and time to clean up. The glue is harder than the wood to scrape/sand.
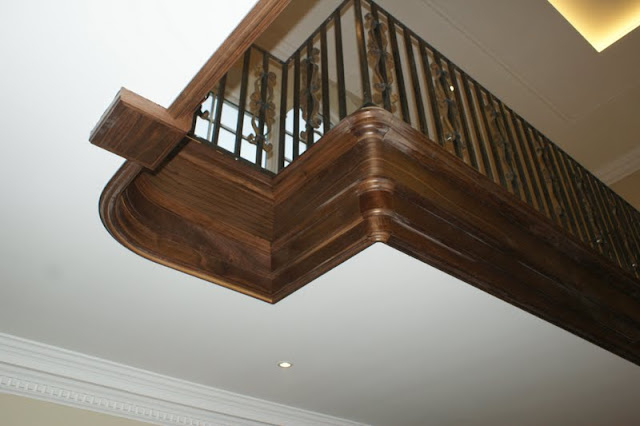
On another part of the job I made the internal and external mouldings by laminating up approx 2mm thick veneers for this:

DSC01045.JPG


The top moulding was this section,

100_0238.JPG


Even though the cascamite had been dyed to prevent white glue lines the lines are still evident close up (the sapwood, light coloured walnut is covered by marble flooring)

100_0239.JPG


As the sections were spindle moulded, after glue up, using jigs and a ring fence very little sanding was required.
The only issue I had with this was the plys slipping past each other across both length (which you need) and width......which in that handrail example the widthways slip is held in check.  ;D

An interesting note is: in George Ellis' Modern Practical Stairbuilding & Handrailing, a method of using multiple dowel "rods" to form a continuous handrail is shown  [eek] can you imagine the work in that? Especially as it (the example given) had been made in the late 1700's or very early 1800's!

Rob.
 
Hey Rob
I've got a question (and again, fantastic work)
In your last post...
Where you laminated those 2mm veneers for the curved moldings, were you using existing straight molding or laminating the curve first and then shaping? I mean, if you slice up a bit of molding to fabricate a curve, you'd lose some of the thickness to sawkerf, is there a trick to building the thickness back up so it flows into a straight section?
 
Rob-GB said:
The handrails had to be altered yet again to suit the metal, breaking the glue joints and altering the angle of the sections re-gluing, shaping or changing sections. Some of this was done on site and my MFT3 and its new buddy the leg vice really came to the fore.

Rob:
I forgot to mention, your leg vice is very cool.
Great idea.
Tim
 
Rob-GB said:
As the sections were spindle moulded, after glue up, using jigs and a ring fence very little sanding was required.

ahhh, read it again, cheers.
 
Rob-GB said:
An interesting note is: in George Ellis' Modern Practical Stairbuilding & Handrailing, a method of using multiple dowel "rods" to form a continuous handrail is shown  [eek] can you imagine the work in that? Especially as it (the example given) had been made in the late 1700's or very early 1800's!

I really must try to get through & study that book. So much to learn, so little time...
Tim
 
That is a true work of art. You are a very patient man lol

Im not a welder by trade but it almost looks like they welded to much in one area causing the heat to warp the metal. Seems they should have tac welded at points to assemble then randomly weld the spindles. Did they even have a framing square? A trick I learned putting in railing when I was younger, put the 16" side on the edge of 2 treads and the top of the 24" side is the bottom of the railing. I know that staircase is much more complicated but it might have helped….well maybe not hmmm

I mig welded a radius (Single Helix) stair case from start to finish. Its the largest thing I have welded. The pic is 1st floor to 2nd floor, I did basement to 2nd floor. It  was gone over by a certified welding company and all passed. Note: I am a trim carpenter  [scared]

We were suppose to wrap the steel in Mahogany. In the basement is rough cut mahogany most from the property, from a saw mill ripped to about 2 inch slabs, stacked on slats many years ago. It still isn't finished. Hopefully I will get a chance to do it.


[/URL]
 
Hi JLB,
I am a great believer that a craftsperson can transfer their skills to other mediums and are usually keen to learn from others or at least willing to listen to another viewpoint.
These metal guys were as rigid as their medium.
That metalwork you did looks great, bet you got a kick out of the coded welder giving you a thumbs up  [big grin] that kind of thing always makes the effort worthwhile. [thumbs up]
Thanks for the feed back.

Rob.
 
Back
Top