I am a DIY'er and built the following for a small study for my in-laws. I got back into building furniture since November last year, so at the moment it is mainly sheet goods, and trying to put some of the techniques I have been seeing into practice. Loving Festool (of course!).
Construction:
Cabinet Carcasses - White Melamine particleboard, dominoes, pocket holes, and french cleats, drilled for shelf pins
Doors and outsides - Laminex (in alabaster colour), soft close hinges, 1mm gap all round
Hanging method: French cleats secured by blue anchor screws, then all carcasses joined
Tools used:
- TS55 & MFT for breaking down sheets & shelving, with some stop blocks for consistency & repeatability, bevel cut at 45% for french cleats
- Domino 500 for joinery = excellent alignment & strength, and Kreg Pocket Hole Jig = no clamping, and more strength
- Kreg Shelf Pin Hole Jig - 200 perfectly positioned and drilled holes in approximately 20 minutes
- Makita 10.8V drill = excellent for small jobs, Makita 10.8V impact driver = great for securing cleats to walls, Bosch 240V hammer drill for wall anchors
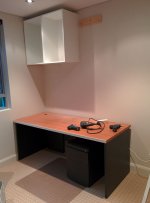
On a side note... the study desk below the cabinets was once "L" shaped with a curve, but the TS55 plus guide rail made is simple to cut it off whilst still in the room with no dust! That impressed the in-laws no end. Both parts were then professionally edgebanded. You can see the cut-off in some of the photos to the right of the desk.
Carcass with french cleat:
[attachimg=#1]
Attachment to wall
[attachimg=#2]
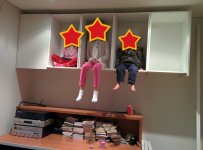
Load Testing ;D
[attachimg=#3]
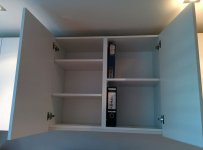
Adjustable Shelving (ignore my blood in the lower left corner)
[attachimg=#4]
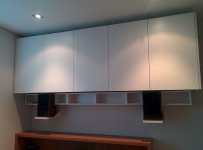
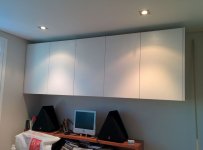
Final Product
[attachtimg=#5]
Construction:
Cabinet Carcasses - White Melamine particleboard, dominoes, pocket holes, and french cleats, drilled for shelf pins
Doors and outsides - Laminex (in alabaster colour), soft close hinges, 1mm gap all round
Hanging method: French cleats secured by blue anchor screws, then all carcasses joined
Tools used:
- TS55 & MFT for breaking down sheets & shelving, with some stop blocks for consistency & repeatability, bevel cut at 45% for french cleats
- Domino 500 for joinery = excellent alignment & strength, and Kreg Pocket Hole Jig = no clamping, and more strength
- Kreg Shelf Pin Hole Jig - 200 perfectly positioned and drilled holes in approximately 20 minutes
- Makita 10.8V drill = excellent for small jobs, Makita 10.8V impact driver = great for securing cleats to walls, Bosch 240V hammer drill for wall anchors
On a side note... the study desk below the cabinets was once "L" shaped with a curve, but the TS55 plus guide rail made is simple to cut it off whilst still in the room with no dust! That impressed the in-laws no end. Both parts were then professionally edgebanded. You can see the cut-off in some of the photos to the right of the desk.
Carcass with french cleat:
[attachimg=#1]
Attachment to wall
[attachimg=#2]
Load Testing ;D
[attachimg=#3]
Adjustable Shelving (ignore my blood in the lower left corner)
[attachimg=#4]
Final Product
[attachtimg=#5]

")