He said she shed

Upcoaster

Member
Joined
Mar 2, 2019
Messages
23
It's been really fun poking through the workshops sub forum so I figured I'd join in and chronicle my new shop build. I'm not sure I'll be doing anything terribly innovative that hasn't been seen before but I'm super excited about the build.

When we were looking for a plot on which to build our new home a few years ago, we were thinking 2 acres would be nice given what we wanted to be able to do.  5 acre plots were a lot more common so thats what we ended up looking at the most.  Somehow we ended up with 8.27 acres which is waaaay more space than we need.  Plenty of room for our 2600 sq. ft. home, an outbuilding and a nice sized hobby garden for my wife. The price was right on the land and it was nice, flat prairie with zero trees to clear. Other site prep looked to be minimal hassle so we went with it before it got sniped out from under us. We are blessed beyond reason with all this elbow room.

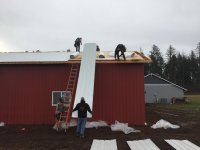
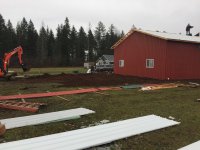
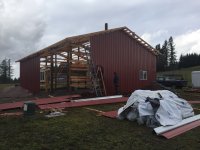
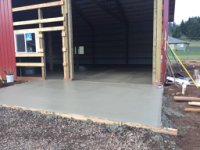
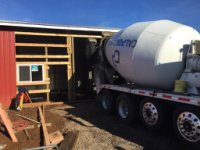
After several cost overages with the house build, I was forced to economize as much as possible where the outbuilding is concerned so we went with pole building construction. The contractor was a pain in the ____ to work with so I won't mention his name but overall we are happy with the end result. They weren't very organized, communication was poor and they definitely didn't display any semblance of customer service attitude.  Once we got the building permit in hand, they warned me they were juggling several jobs so I extended them as much grace as possible.  I had heard previously that a 36'x48' pole building could go up in three weeks so I figured on doubling that plus a pinch and thought two months might end up being the build duration. These guys managed to drag out the build to four arduous months.

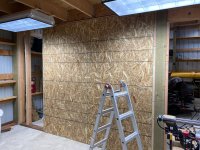
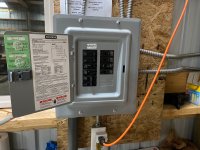
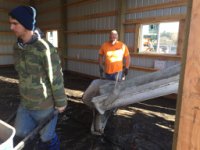
Much of the interior build-out that I had hoped to be doing over the winter now becomes a spring / summer project.

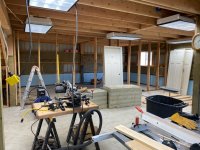
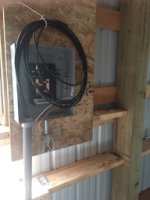
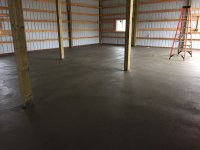
We needed an outbuilding to serve multiple functions so all that square footage is NOT dedicated to my wood shop.
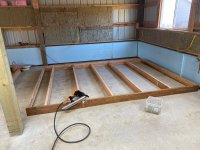
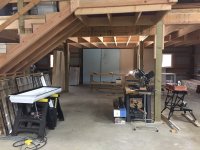
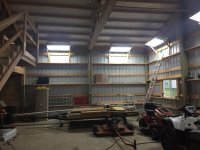
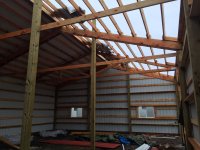
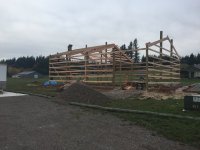
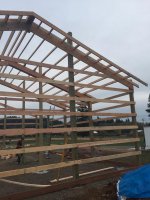
The long axis is 48' and half of that has a loft. The space beneath the loft will be walled in, insulated and divided into two rooms:
24'x24' will be dedicated to the wood shop and my wife will end up with a 12'x24' space for her art studio (a.k.a.  the 'she shed'). The latter may also double as a finishing room from time to time.

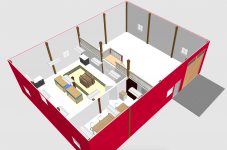
Here's the 3D model I made with Sweet Home 3D.  They have some 'furniture' you can place in the model but alas no stationary tools. You'll have to use your imagination on a few things:
  • The big wooden crate represents a table saw.
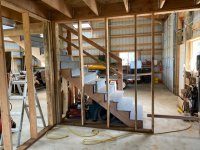
    The floor at the loft level is intentionally missing so you can see the workspaces beneath. Hopefully the staircase fills the gap to visualize the overall gameplan here.
 

Attachments

  • 3d barn 2.png
    3d barn 2.png
    373.9 KB · Views: 1,071
  • 3d barn 1.png
    3d barn 1.png
    289.5 KB · Views: 933
Now that all the contractors are out of my way, the fun of building out the space beneath the loft falls to me.
I've got several temporary workstations in place to facilitate the project but things are moving slowly due to other obligations tugging at my discretionary time.

I've collected most of the lumber needed for the endeavor but have mostly been focusing on some preliminary electrical for now.

I got a screamin' deal on 32, reclaimed fluorescent light fixtures.  More than enough to adequately light the heck out of this barn.  Several have bad ballasts but I've been putting LED tubes in them anyway.  Most with bad ballasts will be fitted with tubes that can take 110VAC directly and don't require ballasts.  I'm into each fixture for about $7 each so I'm not too upset that many of them didn't work.

After building some mounts for them, I began with testing the coverage of these fixtures in the 'implements' portion of the barn (mowers, quad, etc. lives here) to get a sense of how much light they put out. It was a worthwhile exercise as now I have a far better idea of the density of fixtures I'll want to install in my wood shop area.  Here's a photo of my smoke test once I got them all mounted and wired up.

[attachimg=2]

Yup! It's almost bright enough to perform surgery in there.  Next up, I'll be mounting more in the wood shop area and stretch some temporary power to them. It's kinda dark under that loft at the moment so having the lighting in place sooner vs. later will really help to facilitate the rest of the build.

[attachimg=1]
 

Attachments

  • The project ahead.jpeg
    The project ahead.jpeg
    834.6 KB · Views: 3,073
  • Barn Lighting Test.jpeg
    Barn Lighting Test.jpeg
    761.2 KB · Views: 3,086
Hmm. there was supposed to be a post in between the 3D model and the lighting test that focused on the actual barn raising.

It was very photo heavy and for some reason didn't post.  I'll re-create that work soon and try again.
 
Stand alone  buildings like this need a first rate security and fire alarm system that is centally monitored. I have land line phone connectivity as  primary and a very well hidden cell as secondary in case they cut the line.

Also insulate very well when walls are open
 
It looks like you are going to have a nice shop.  Can't wait to see it finished.
 
OK, so here is some of the fill-in that was intended to be sequenced between the first two posts. Somehow it got lost in the ether.

The raising of the barn...

[attachimg=1]

[attachimg=2]

[attachimg=3]

[attachimg=4]

[attachimg=5]

[attachimg=7]

[attachimg=8]

In parallel to all this I was roughing in the sub panel for power.  I did it on my own in in small bits so it seemed to take forever. Really happy with the end result though. My previous experience with electrical was stuff like swapping a bad breaker, adding an outlet or light fixture to an existing circuit. Something on this scale was new to me. I got some fantastic counsel from the electrician that wired my house during its 2017-18 build and I learned a lot.  Ultimately I passed the L&I inspection on the first go.

[attachimg=9]
 

Attachments

  • sub-panel.jpg
    sub-panel.jpg
    64.5 KB · Views: 2,676
  • IMG_3598.JPG
    IMG_3598.JPG
    594.5 KB · Views: 2,868
  • Interior facing West.JPG
    Interior facing West.JPG
    2.2 MB · Views: 3,052
  • IMG_3598.JPG
    IMG_3598.JPG
    594.5 KB · Views: 612
  • IMG_3595.JPG
    IMG_3595.JPG
    2.4 MB · Views: 3,072
  • IMG_3590.jpg
    IMG_3590.jpg
    2 MB · Views: 2,851
  • East & South wall.JPG
    East & South wall.JPG
    2.2 MB · Views: 3,063
  • Barn raising 2.jpg
    Barn raising 2.jpg
    126.4 KB · Views: 2,842
  • Barn Raising 1.jpg
    Barn Raising 1.jpg
    99 KB · Views: 2,835
It's concrete day! 

[attachimg=1]

[attachimg=2]

...and even a nice sized apron out in front.
[attachimg=3]

Ahh! Exciting that the concrete is done and I'm able to walk on it. I'm finally starting to see the potential of this place!

[attachimg=4]

After reading a lot about how pole buildings tend to sweat and what some of the best countermeasures are, I put down 6mil plastic vapor barrier prior to the concrete. That certainly won't prevent the issue entirely but it'll make a dent.


Attachments

  • Concrete poured.jpeg
    Concrete poured.jpeg
    385.4 KB · Views: 2,695
  • ConcreteApron.jpg
    ConcreteApron.jpg
    74.5 KB · Views: 2,671
  • Concrete3.jpg
    Concrete3.jpg
    80.9 KB · Views: 2,655
  • Concrete2.jpg
    Concrete2.jpg
    76.6 KB · Views: 2,675
RDMuller said:
Stand alone  buildings like this need a first rate security and fire alarm system that is centally monitored. I have land line phone connectivity as  primary and a very well hidden cell as secondary in case they cut the line.

Also insulate very well when walls are open
I saved money and bought a shotgun and 1000 rounds :)
 
Happy new year FOGgers!

It's been a long time since I've updated this thread. With summer comes outdoor chores (including about 3 acres of mowing) which sucks down most of my discretionary time.

With the arrival of winter, I've resumed work on building out the area beneath the loft in my pole barn. I took a few extra days off around Thanksgiving and Christmas and have got some good momentum happening here.

All of the partition walls are framed and plumbed and I even began skinning a few of the bays that face out into the full-height portion of the barn. It felt good to have a place to hang my clock and a few other items like my saw track to keep it out of harm's way when not in use.

Once the framing was done I focused on roughing in all of the wiring for outlets. There's even a 240v run to the corner where my dust collector will be. I cheated and went with flex conduit for plumbing the shop with power. I'm just not that talented with an EMT bender. I'm super happy with the LED tube lighting I put in. I've got nine fixtures in the 24'x24' space that will be the wood shop. My wife is still noodling on what her preferences are for her art studio space.

I ran about 50' shy of 12 gauge wire so I've switched gears and have been focusing on hanging insulation on the perimeter walls.  Some of the spaces between the wind girts will take the 2'x4' batts right out of the package but around 70% of it needs to be custom cut down to size. The band saw has been working nicely to size down the rock wool.

We've been been monitoring for rodent activity in the barn since it went up and finally noticed some. Construction came to a halt. We dropped everything and bought some ultrasonic deterrent, laid some poison and set traps as well (both inside and outside). My wife added some steel wool down into the bottom of the corrugations of the metal skin of the building just in case critters were entering through those spaces where the metal meets the bottom, pressure treated stretchers between the posts. We went for a multi-pronged approach and still have some other measures to implement.  That insulation is quite expensive and I'd really hate to have it all go to waste by having mice convert it to a lovely nesting space!

I figure I'll have the last of the rock wool hung this weekend for the perimeter walls, then we can start cladding those walls with OSB.  More photos as I have them.

Take care y'all!
David in Washington
 

Attachments

  • 1_Beginning partition walls.jpeg
    1_Beginning partition walls.jpeg
    550.5 KB · Views: 666
  • 2_More stud walls.jpeg
    2_More stud walls.jpeg
    241.7 KB · Views: 632
  • 3_Skinning walls.jpeg
    3_Skinning walls.jpeg
    792.8 KB · Views: 633
  • 4_Lighting.jpeg
    4_Lighting.jpeg
    241 KB · Views: 623
  • 5_Sub panel complete.jpeg
    5_Sub panel complete.jpeg
    1.1 MB · Views: 670
Looking good!  That is definitely a ton of work.
When you said 8+ acres at the beginning I was thinking lots of mowing... lol  I hope you have one of those commercial zero turns.  Pretend like you're a race car driver making those stripes.

I see you have one 240v(if I wrote 220 my dad would somehow know and slap me) circuit... While you have the ease of wiring I'd suggest putting at least one more, if not 2, 240v circuits.
The DC is definitely a good choice to use one of those curcuits, but what about bandsaw, tablesaw, etc.?  A lot of the bigger stationary tools have 240 versions that give you more power and/or efficiency.
Also, what if you want to do welding?  Might be handy to install a 30 amp 240v in the garage area.
I set my garage based workshop up with two 240v(20 amp and a 30 amp) and am thinking about adding one more.  I have a Laguna 14BX '220' version and am thinking about getting a Nova Voyager and setting that up with the 240 plug.  I also have a Oneida Dust Gorilla '220'.

For the lighting in your wife's art studio space I'd suggest LED lighting with a really high CRI.  I picked the CREE LS4(92 CRI) for my shop and they are excellent! https://www.creelighting.com/products/indoor/surface-ambient/ls-series
On the spendier side but they have awesome output - you don't need a ton of fixtures.  The high CRI helps with clarity - reduced eye strain, accurate colors, etc.

For the rodent problem I have two words.... barn kitty...
When my wife and I moved into our house in the woods a couple years ago that was the advice our pest guy gave us.  He helped us get rid of the mice in the house and secure the perimeter, but he still advised a good barn cat to help out.

Congrats and have fun!
Jared in Washington

 
+1 on the barn cat idea. I spent my career in the paper recycling business and trust me when is say that there is no better rodent control device than a healthy well taken care of junk yard cat!
 
jarbroen said:
Looking good!  That is definitely a ton of work.
When you said 8+ acres at the beginning I was thinking lots of mowing... lol  I hope you have one of those commercial zero turns.  Pretend like you're a race car driver making those stripes.

I see you have one 240v(if I wrote 220 my dad would somehow know and slap me) circuit... While you have the ease of wiring I'd suggest putting at least one more, if not 2, 240v circuits.
The DC is definitely a good choice to use one of those curcuits, but what about bandsaw, tablesaw, etc.?  A lot of the bigger stationary tools have 240 versions that give you more power and/or efficiency.
Also, what if you want to do welding?  Might be handy to install a 30 amp 240v in the garage area.
I set my garage based workshop up with two 240v(20 amp and a 30 amp) and am thinking about adding one more.  I have a Laguna 14BX '220' version and am thinking about getting a Nova Voyager and setting that up with the 240 plug.  I also have a Oneida Dust Gorilla '220'.

For the lighting in your wife's art studio space I'd suggest LED lighting with a really high CRI.  I picked the CREE LS4(92 CRI) for my shop and they are excellent! https://www.creelighting.com/products/indoor/surface-ambient/ls-series
On the spendier side but they have awesome output - you don't need a ton of fixtures.  The high CRI helps with clarity - reduced eye strain, accurate colors, etc.

For the rodent problem I have two words.... barn kitty...
When my wife and I moved into our house in the woods a couple years ago that was the advice our pest guy gave us.  He helped us get rid of the mice in the house and secure the perimeter, but he still advised a good barn cat to help out.

Congrats and have fun!
Jared in Washington

Hello Jared! Where in Washington are you? I’m in Washougal.

I keep about 3 acres mowed regularly and I use a tow-behind mower that I use with my quad. We just let the other 5 acres grow tall and a neighbor comes to hay it once a year. The quad Is my do-it-all workhorse for the property — mowing, a detachable snow blade on the front for winter and a small trailer for moving materials around the grounds.

I stand corrected on the 240v thing. Thanks.

As for additional drops, I did leave some extra service loop strategically located for a future mini split but that’s about all.  I don’t do this for a living so I don’t expect I’ll be upgrading any of my other stationary tools to something that requires 240v. My current Shop Fox band saw has the option for 240v wiring but it came into my possession (just last summer) configured for 110 and it seems to do its job well as is.

As for welding, my stepson is well equipped for that sort of thing so I’m not feeling a need to spend the money to tool up to become a metals guy. Wood is far more forgiving and my preferred media.

On the lighting topic, you’ve got great taste with the CREE LS4 but so far I’m super happy with what we’ve deployed thus far in the wood shop space.  I am overstocked with some second hand, three tube florescent fixtures that I’ve retrofitted with 5000K LED tubes.  I’ve been really happy with their performance so I figure I’ll keep putting up more in the art studio side too.

Our rodent problem appears to be under control.  We put down poison and traps.  None of them appear to have been touched or sprung.  Why? We also installed two, highly rated ultrasonic deterrent gadgets. I’m crediting those with what drove out whatever population we had inside.  From what I’ve read, the trick is to not run them constantly or the local population will get used to the noise.  Every now and then, turn them off for about 10 days, then fire them back up.  We have an 11 year old German shepherd and he’ll be last pet.  No cats for me but I DO genuinely appreciate the testimonials.

I’ve got ALL the insulation hung as of Monday and I’ll be skinning the walls shortly.  More pics coming soon!

David

 
I'm up North in Snohomish.  I've been to Washougal a few times - really neat, rural area without being too far into the boonies.
Quads are awesome!  I wish I had a bit more space to rip around on one.  1 acre means I'd just be getting yelled at for tearing up the lawn... lol

I'll probably never use a welder either... It's one of those things that sounds cool, but the reality is not enough time to learn another skill.
Extra loops is a good way to go.  Especially if you can easily pull more wire. 

I did the same thing in my last garage with the tube fixtures upgraded to LED and i was really happy with it.  Excellent output and way less expensive.  Good plan when you have such a large area to light.
 
I always like reading these US based threads where someone says they’re building a ‘shed’, then proceeds to throw up something three times the size of my house...
 
I can appreciate that sentiment. “He said, She Shed” was just a cutesy sounding name for the thread.  Heck, it might even become the name of a YouTube channel one of these days!

I fully recognize I have far more than a shed and for that matter, a TOTAL indulgence.

I experienced some serious sticker shock when I first started looking into the cost of putting up any sort of an outbuilding. Once I started getting into the numbers, I also learned that once you start building, it only costs a fraction more to nearly double the square footage.

The initial, bare-bones need was truly for a “shed” to house the grounds caretaking implements like the quad and all of its attachments I mentioned in an earlier post. Something approximately the size of a two car garage was first proposed until we started getting into the numbers and scenarios of “...well, what if we scale this up a little? ...”  We started thinking about extra storage and some hobby space so the idea of freeing up my 20 foot land sea container (my previous woodshop space) for my wife to use as a potting shed came up. That gave birth to having a space in the new outbuilding for a wood shop for me and an art studio space for her. We went with the most inexpensive construction methodology I could find which was a pole building.

I designed it for half of it to have a loft. It is that space beneath the loft that we are building out to be insulated and other creature comforts for our hobby space. We have aspirations of some of what we produce becoming side income as well.

David
 
Hello All!

I fell out of habit some time ago with updating progress on the build out of my shop here on the forum.  My focus shifted to taking video that I’m steadily getting edited down into something watchable.  My  wife and I finally launched our YouTube channel so we now have a medium for sharing our story.  The build out of the shop will speak for the first several episodes  but the channel will also feature other types of projects around the property. After we’re done working ON the shop, I’m intending to follow on by documenting what happens IN the shop once it’s up and running.

These first few videos on our channel are admittedly not super engaging but (in my estimation) the next ones we have in the queue get progressively better. I hope you enjoy despite the humble beginnings.

Feel feee to drop by and subscribe to He Said She Shed!

Take care all!
David
 
I haven't had a chance to watch more than the first minute or two of the intro video, but where are you from in Iowa, David?  8 acres, especially if most of it is prairie, sounds absolutely lovely!
 
Nice job! One things that's always baffled me with electrical installs in the States, (and Canada, dunno?), is why don't the wall sockets have integrated switches to control them?
 
Back
Top