Help to perfect fit for dogs on homemade MFT top

EWS

Member
Joined
Jan 31, 2019
Messages
3
I have looked for and have tried lots of different router cutters to get  perfect holes for my dogs, but without success. I use MFT slab as jig  with 30 mm bushing,and with different 20mm router bits, but the holes were too large and loose. After trying a lot, I finally found something that seems very good for me. I use 18mm bushing with one layer of packing tape which is 0.03 mm around the bushing, so that it becomes 18.06mm. Then use 8 mm holes router  cutter and at full speed on Makita palm router . Then the holes become 19.87 mm, and they become firm and tight. It takes a little longer, of course, but it works. I hope this can help someone :)
 
Parf Guide System invented by Peter Parfitt and made by AXMINSTER UJK beats anything we have seen for non CNC-machined 20mm hole pattern accuracy and easy of use. Buy the tool once and find ever more uses for it after you make your first 20mm top with it.
https://tsoproducts.com/workholding-accessories/ujk-technology-parf-guide-system/

We stock and sell the largest selection of AXMINSTER UJK brand tools in the US with money back satisfaction guarantee.

Why do it the hard way?

Hans
 
Sorry, but i don`t agree. I have the parf guide system, but its take to long an drill all the holes. I timed the two diffrent method for some days ago on 2 tops with 66 holes. With the parf guide system i used 1 hour and 22 min., and with the MFT-slab and the guide bushing i used 31 min.
 
The Parf system holes, are accurate and a perfect fit every time. The first couple of times you use of it might go slow, but each other time you can speedily make an mft top and there's no packing tape to gum up the works....
 
[member=10397]Hans[/member]

I have used both your TSO Guide Rail Square (GRS) and the Festool LR32 system to quickly make very accurate MFT-type tops, using the following procedure:

1.  Using my TS55 I insure a straight edge along the long edge of a piece of 3/4" MDF.
2.  Using the TS55 and the GRS I create a square corner at one end of the long edge of the MDF.
3.  Using the LR32, with the 16 mm stop "up and out", I align the LR32's holey rail so that the first hole will be 71 mm from the short edge and 80 mm from the long edge (16 mm, plus two additional 32 mm holes). I slide the GRS up to the MDF and clamp both ends of the holey rail in that position.  Using my OF1400 router with a 20 mm cutter, with the MDF over a sheet of insulating foam on my MFT/3, I plunge 11 holes 96 mm apart.  Alternatively, you can simply align the holey rail, without the 16 mm guide, so that the center of the first hole is 71 mm from the edge, as this saves a later straight cut.
4.  Next, I move the holey rail to make the additional 6 holes from the short edge for each of the 11 holes that were already cut.  To align the holey rail, I partially plunge the bit (with the router off, of course), and I insert it into the existing hole.  With the router, thus aligned, I slide the holey rail so that the LR32 plate is in one of the holes.  Then, I slide the GRS up to the long edge of the MDF, and lock the GRS in that position.  I clamp the rail to the MDF, and I am now able to cut the 6 additional holes square to the edge using the GRS and LR32.
5.  Without moving the GRS, I move the rail to the next hole along the long edge, confirming its position by using the partially plunged 20 mm cutter.  I repeat the above process 10 times.
6.  At this point I have a piece of MDF which has the required 77 holes, one line of which is already at the required 61 mm from the long edge.  I next use the GRS, rail, and TS55 to cut the other three edges so that they are also 61 mm from the edges of the holes, resulting in the required 718 mm x 1102 mm MFT/3 top.

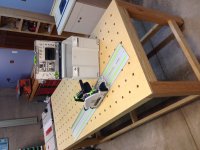
As I have been using the foregoing method for a while, as you can see in my posts at Portable, Folding Workbench With MFT, Router Table, and Other Tops and Folding MFT-style Bench with Router Table wherein I made a 7 x 12 hole MFT-type top, I was amused to see that TSO will be marketing a single-unit "parallel guide" that is used with the GRS in the identical manner that I used the existing holes (from the first line) as a parallel guide to space additional, parallel rows, each being spaced 96 mm from the prior row.

Sandy
 
The method I wrote about in the start gives me precisely 19,87mm every time. And its a lot faster then the parf guide system (and do get me wrong, its a brilliant system by Peter), but when I am making a lot of tops, its to slow. I measured all holes on the test top, and  I got these measurements from the smallest to the largest hole ( 19,867 to 19,874) and that i call exact [big grin]

But my point in the first place was not to talk any system down, but give help if anyone needed it [smile]
 
This is a timely topic for me. I have tried both the Woodrave and Dominofix. They are both ok, but the Woodrave setup had too much play. The Dominofix only has only four holes and I felt it was too time consuming.

As luck would have it I was talking to my wife's cousin about our CNC machines. I have a Shapeoko and said I was thinking of making my own template but was worried about accuracy. So he offered to cut me one using his Haas :)

Here's the design I have come up with:

View attachment 1

- The template allows me to drill 30 holes without moving it
- The large holes are 30mm for a router guide
- I have found some bench dogs that have a small 30mm head allowing me to use these in the same holes
- The small holes are 20mm and are only meant to lock the template in place
- The outside set of holes are 70mm edge to center
- All the other holes are 96mm center to center
- The green areas are channels that allow a track clamp to sit below the surface of the template
- In the middle I have offset templates for 4, 3, 2, and L-shaped channels with a set of 20mm holes to lock into place. I am not certain I will use these but there's no additional cost to include them

I plan to validate it in MDF this weekend before he creates an aluminum one for me.

Feedback is appreciated!


Attachments

  • Capture.PNG
    Capture.PNG
    43.3 KB · Views: 414
[member=3194]sandy[/member]  your Post on REPLY # 4 is an excellent point-for-point description of using the LR-32 for creating the 96mm pattern of 20mm holes. Thanks for posting it in such helpful detail.

One enjoyable aspect of woodworking is that it provides so many different ways to achieve the same end result and this thread proves it [smile]

Hans
 
As much as I love all the DIY options that people are undertaking, and I think the Parf guide system is very well designed I still can't understand why people do not simply get their tops cnc cut. It's much more affordable than people might think.
 
Ptk16 said:
As much as I love all the DIY options that people are undertaking, and I think the Parf guide system is very well designed I still can't understand why people do not simply get their tops cnc cut. It's much more affordable than people might think.

One reason is that not everyone has access to a CNC machine. Second reason, wait time. If you need one right now to complete a job or mock up a quick cutting station you can do it on site with the Parf Guide system. I have the original Parf guide and I used it to make a cutting station and the Stanton bench. With both of these made I rarely need to make a new one but if I did I could do it without finding a place to do it for me and waiting for them to make it.
 
[member=59876]Ptk16[/member]
As much as I love all the DIY options that people are undertaking, and I think the Parf guide system is very well designed I still can't understand why people do not simply get their tops cnc cut. It's much more affordable than people might think.

Out of curiosity, approximately how much are you paying for a CNC-cut top and how long is the turn-around?  I can purchase a 4' x 8' sheet of 3/4" MDF at Home Depot, and have them cut it into three 32" x 48" pieces (to fit inside my SUV), enough for three MFT/3 tops, for under $30.  That's less than $10 per top.  Also, as shown in my referenced posts at Portable, Folding Workbench With MFT, Router Table, and Other Tops and Folding MFT-style Bench with Router Table, not all of the tops I have made use a 7 x 11 hole pattern.

Sandy
 
[member=59876]Ptk16[/member]
I paid $130 CAD for a 4x8

That's about US$99, or $33 per MFT/3 top if laid out in three 7 x 11 sections, if that included the setup and MDF.

Not bad!

Sandy
 
Ptk16 said:
As much as I love all the DIY options that people are undertaking, and I think the Parf guide system is very well designed I still can't understand why people do not simply get their tops cnc cut. It's much more affordable than people might think.
Would you be willing to share where you are and who is CNC maching your tops? 
 
cubevandude said:
Ptk16 said:
As much as I love all the DIY options that people are undertaking, and I think the Parf guide system is very well designed I still can't understand why people do not simply get their tops cnc cut. It's much more affordable than people might think.
Would you be willing to share where you are and who is CNC maching your tops?

I am located east of Oshawa and TBH, it was at a cabinet company that did it as a favour, they don't normally do this. That being said, they did charge me their standard hourly rate of $100 as I insisted on it, which was on par with most cnc places. It took under an hour to process.
 
When we say 20mm dog hole do we mean 20mm hole or 20mm dog?

What is the "correct" or "optimal" size for the dog holes? Or what do Parf or bench dog manufacturers design for the hole to be? May be two answers?

I just had tops CNC'd. The machinist used a scrap piece MDF to bore about 6 holes that were in 0.001" increments. I brought my new Veritas Parf dogs to select the hole size. The 20.1mm (0.791") that many suggested was WAY too big for the 0.782" (19.86mm) Veritas dogs. We ended up selecting 0.787" (19.99mm). The dog didn't fall in but took almost no effort to seat. Figured over time they will loosen somewhat too.

I wanted some taller dogs so I purchased a couple of UJK long Super Dogs. These are too tight to seat in the holes. They only go about 1/3 way in the hole. These UJK Super Dogs are 0.785" (19.94mm) in diameter.

I'm perplexed what to do. If I open the holes for the UJK dogs the Veritas will be too loose not to mention the work involved. Guess I could use my wood lathe to chuck up the UJK dogs and reduce the diameter a bit. But, again, am I correcting the right thing?

Thanks for your input/guidance.

Mike
 
I worked for a prototyping shop a few years ago.  I wanted a “Super MFT”, since I did not need the portability of the MFT. The shop had a huge ShopBot, able to easily machine 4’x8’ sheet goods.  I decided on 3’x7’ as my final size, to better fit my basement shop.  I also sized it’s width to be a good size for an outfeed table for my tablesaw.
We used the ShopBot to machine the outer perimeter, as well as the holes.  I bought a 1/2” spiral bit, there is no need to “drill” 20mm holes when your using CNC, you just machine them to size. A 1/2” bit was a reasonable size to use.  On the perimeter of the MDF sheet we milled test holes until my Qwas Dogs had a perfect fit.  We then milled all the holes.  I decided on 4” spacing between holes, since I saw no need to stick with 96mm.  It made spacing on the sheet quite easy.  At the time, I saw no issues with this.  I’d probably mill them at 96mm spacing on a new top, in case I ever wanted an aftermarket gadget that required this spacing.  I’ve had it 5 years, and hasn’t been an issue yet. 
Nothing fancy for the frame, but it works.
 

Attachments

  • 7093B5FA-8B30-4F79-B01C-F8F5129C8CDD.jpeg
    7093B5FA-8B30-4F79-B01C-F8F5129C8CDD.jpeg
    2.3 MB · Views: 946
I think I am missing something in this post. Are you saying the hole diameter is not meeting your spec or is it the spacing? If it is the hole itself, festool sells the "correct" 20mm bit to match the festool table dimensions.
 
tallgrass said:
I think I am missing something in this post. Are you saying the hole diameter is not meeting your spec or is it the spacing? If it is the hole itself, festool sells the "correct" 20mm bit to match the festool table dimensions.

The Festool 20mm bit I have makes 20.1mm holes. Way too big for the dogs I have that fit snug in my MFTs. If CNCing a panel to be similar to an MFT, making the holes suit your existing dogs is the way to go. Buy the dogs first if just starting out.
 
Michael Kellough said:
tallgrass said:
I think I am missing something in this post. Are you saying the hole diameter is not meeting your spec or is it the spacing? If it is the hole itself, festool sells the "correct" 20mm bit to match the festool table dimensions.

The Festool 20mm bit I have makes 20.1mm holes. Way too big for the dogs I have that fit snug in my MFTs. If CNCing a panel to be similar to an MFT, making the holes suit your existing dogs is the way to go. Buy the dogs first if just starting out.

[member=297]Michael Kellough[/member]

If you read my post above this is exactly what I did. I bought Veritas Parf dogs from LeeValley to test the fit the holes before I had my tops CNC'd and just yesterday received a couple of UJK Super Dogs and found out they are larger diameter than the Veritas. The Super Dogs are 0.003" larger in diameter than the Parf Dogs. This is actually a huge difference if one is looking for a snug fit. I would have thought the Parf & Super Dogs would have been the same size.
 
Back
Top