Hickory walls

Tayler_mann

Member
Joined
Nov 23, 2014
Messages
416
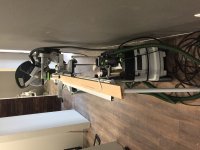
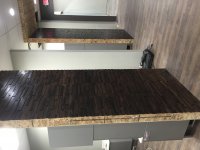
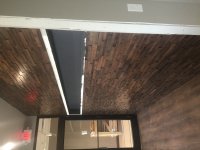
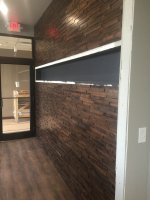
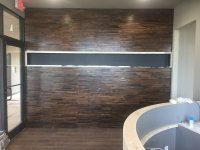
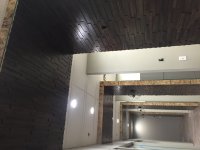
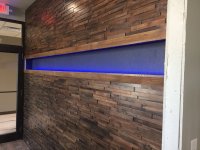
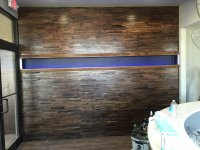
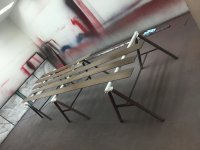
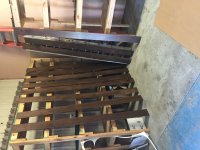
I started a job for a new dental clinic in town. I am installing a hickory wall that is tounge and grooved and layed basically like flooring. I am also doing the sign for the front lobby wall that will include some trim I made.

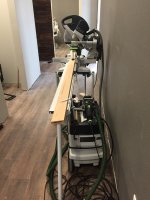
Couldn't have done this job without my Kapex...well I could have but it would have sucked. Also the mess you see in the photo of the Kapex that is on the floor is after all the walls installed. I love dust collection

I'll update more pictures when done.


Attachments

  • image.jpeg
    image.jpeg
    1.9 MB · Views: 669
  • image.jpeg
    image.jpeg
    1.7 MB · Views: 600
  • image.jpeg
    image.jpeg
    1.7 MB · Views: 711
  • image.jpeg
    image.jpeg
    1.7 MB · Views: 628
Love the look.

How did you decide on the "pattern?"

Peter
 
Looks great!  I wouldn't go to that dentist though. Too much taste and probably will raise the rates to pay for your fee!!

;^)

I am also curious how you did your randomness on the wall. Great accent!

Cheers. Bryan.

Sent from my iPhone using Tapatalk
 
Whoa, that's beautiful! Care to share your secret cause I know my wife is gonna ask?
Seriously,
Kevin
 
Awesome design and execution. I love the look...would love to hear more about the build.
 
Beautiful workmanship!!!  The downside that I see is in keeping those blocks properly clean and dust-free in a busy dental practice.  Looks great, though. 
 
Not to detract at all from the obvious craftsmanship in building that wall from scratch there are a couple of products out there that, in Kevin's case if his wife asks, somewhat mimic those walls. We've installed them as feature walls in some client's houses.

Try this link:
http://ecwalldesign.com/pages/duchateau

 
[member=10478]Offshoreman69[/member] got it right. It comes in a kit and you lay it like flooring. The pattern is picked for you not much besides measuring and cutting. The skill part comes in at fixing the poor craftsmanship the company had when producing the pieces. The part that is custom will be the order where the sign goes. Those pictures are still to come. I'm working on milling the casing and  making a rebate where the letters go today. Also in working on a way of attaching some LED to backlight the sign.
 
Looks great!

(Sorry, my neck was hurting, rotated photos for you  [smile])

[attachimg=1]

[attachimg=2]

[attachimg=3]

[attachimg=4]
 

Attachments

  • 4.jpeg
    4.jpeg
    311.3 KB · Views: 1,093
  • 3.jpeg
    3.jpeg
    176.8 KB · Views: 994
  • 2.jpeg
    2.jpeg
    318.5 KB · Views: 950
  • 1.jpeg
    1.jpeg
    364.6 KB · Views: 918
[member=10478]Offshoreman69[/member] [member=42383]Tayler_mann[/member]

Ha, she did ask! So thanks for sharing the secret... The fact that it is prefab in no way detracts from its beauty. I'd love to figure out how to reasonably accomplish this from scratch.

Kevin
 
Krkww said:
[member=10478]Offshoreman69[/member] [member=42383]Tayler_mann[/member]

Ha, she did ask! So thanks for sharing the secret... The fact that it is prefab in no way detracts from its beauty. I'd love to figure out how to reasonably accomplish this from scratch.

Kevin

The total of the wall itself was roughly $10 per sqft. So this was $9,000 in materials and roughly going to be 100 hours in labor plus the sign labor and materials.

I don't know about making it yourself. You would spend a fortune in wood to the extent of you might as well just save your time if it's only a couple hundred square feet.

[member=18038]copcarcollector[/member] thanks I don't know why my phone has been rotating pics.

There is a lot of trim to go up next along with doing the ceilings. Not looking forward to that part at all.

 
Finally got to get back to work on the walls today. Finished the wall for the reception sign with the trim pieces I made. Than installed the blue LED's soldered the connections and wired to a switch next to it. I partially got the letters installed for the sign that go on the ledge of the trim piece.

Than I finished a handful of the ceiling for the partitions in the exam area. It was a busy night considering I didn't start any of this till 3:00.

It's starting to look a little better but still not my style.


Attachments

  • image.jpeg
    image.jpeg
    1.7 MB · Views: 220
  • image.jpeg
    image.jpeg
    1.3 MB · Views: 287
  • image.jpeg
    image.jpeg
    2.1 MB · Views: 218
  • image.jpeg
    image.jpeg
    2.1 MB · Views: 244
Tayler_mann said:
Krkww said:
[member=10478]Offshoreman69[/member] [member=42383]Tayler_mann[/member]

Ha, she did ask! So thanks for sharing the secret... The fact that it is prefab in no way detracts from its beauty. I'd love to figure out how to reasonably accomplish this from scratch.

Kevin

The total of the wall itself was roughly $10 per sqft. So this was $9,000 in materials and roughly going to be 100 hours in labor plus the sign labor and materials.

I don't know about making it yourself. You would spend a fortune in wood to the extent of you might as well just save your time if it's only a couple hundred square feet.

That's helpful, thanks.

And I love the contrast of the sign letters, blue background and dark hickory! I look forward to seeing the trim all completed. Keep up the great work!
 
Spending the morning in the booth to try and get the rest of the trim sprayed. Half of them done and half more to go.


Attachments

  • image.jpeg
    image.jpeg
    1.6 MB · Views: 227
  • image.jpeg
    image.jpeg
    1.7 MB · Views: 311
Completely installed the sign at the end of the day and finished the last two ceilings. Now onto the trim and back of the partition walls.
 

Attachments

  • image.jpeg
    image.jpeg
    1.6 MB · Views: 205
  • image.jpeg
    image.jpeg
    754 KB · Views: 187
Nice look. I like the blue LEDs. Incidentally where is the 200 gallon salt water fish aquarium. Any self respecting dentist will have fish in the reception area?
 
Back
Top