High precision Domino jig for narrow parts

Roachmill said:
I'll add my thanks and intention to steal that idea forthwith ;)

For times when you want to exactly mirror the main stop distance from the centre of the bit I'd wonder if something operating like a ruler or t-track with a stop on it could be used. It could reference from the side of the Domino machine and fixed fences with the moveable stop referencing of the main stop. Could be easier than cutting a reference piece indexing off the pins?

Thanks! I had something similar in mind, my idea was like a round steel rod housed inside the flip fence, retractable and lockable lengthwise, still indexing the pin. So, when it's time to flip the fence I slide out the steel rod until it stops against the pin, lock it and then flip fence. I assume the pins are better references for the center of the cut than the outer surfaces of the machine base are but I might be wrong.

Problem with the rod idea is that I want to index the base of the pins as they flex more further out and then my hole would end up very close to the edge.

Edit. Stupid me [smile]. I can place the hole further from the edge and have a pointer att the edge of the rod, indexing the pin. Will make a quick sketch.

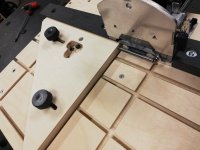
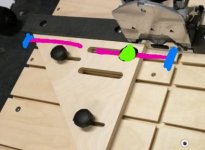
Something like this. Pink is a round steel rod that runs in a round hole in the fence, rod has a T or L thing screwed to the front. Steel rod locks with green knob (which needs to lock from side as any protruding part will cause interference when flipped). Might be possible to run one rod through entire fence, if not I move it to other side for mitered corners mode.

[attachimg=1]


Attachments

  • 2019-12-18-22-01-10.jpg
    2019-12-18-22-01-10.jpg
    46.5 KB · Views: 7,156
Excellent video and idea.  Thank you for sharing!

When I get some tinker time I want to build a table like that.  For me it could serve a dual purpose.
1.  Domino for narrow stock - face frame, etc.
2.  Hybrid Pantorouter table - the stock one is limited in clamping options and small surface area.

Guess I need to buy a new router bit. :)

Any tips/learning lessons on positioning the slots (X and Y)?
Usually, I crank out something like this and have to make a version 2, 3, 4...
I put things too close together, too far, too big, too small.  A lot of making a useful jig is the 'Goldilocks' effect. :)
 
Found a picture I had of the clamp modification, very simple but could be of interest anyway.

[attachimg=1]
 

Attachments

  • inCollage_20190413_123906436-1440x2160.jpg
    inCollage_20190413_123906436-1440x2160.jpg
    519.2 KB · Views: 6,581
Ola C said:
Hi All,

My first post here, just finished a short video of my Domino jig and thought someone might interested. If you are curious how I manage to keep the Festool clamps from falling down by themselves I made a short movie of that as well. This is a feature I really think Festool should design into the clamps, should be very simple using a spring loaded small ball, spring clip or something else…

Thanks for posting!

Edit2. Think I managed to post direct URLs to youtube videos [smile]

High precision domino jig=youtu.be
Rail clamp modification=youtu.be

[attachimg=1]
 
Yesterday I tested a concept of "integrated fence flip memory". I made a channel in the fence where a 8mm metal rod runs and can be locked in position. So, when finished cutting on side #1, I slide rod until it touches domino reference pin, locks the rod in position and then flip the fence. On side#2 the rod is used to set fence position and then slid out of the way.

Seems to work great but I need a harder rod ans softer screw and also a thumb screw variant that can be tightened without tools, already ordered [smile]

[attachimg=1]
[attachimg=2]
[attachimg=3]
[attachimg=4]
[attachimg=5]
 

Attachments

  • IMG_20191225_203602-3456x2592.jpg
    IMG_20191225_203602-3456x2592.jpg
    1 MB · Views: 6,401
  • IMG_20191225_203546-3456x2592.jpg
    IMG_20191225_203546-3456x2592.jpg
    754.5 KB · Views: 6,357
  • IMG_20191225_203714-3456x2592.jpg
    IMG_20191225_203714-3456x2592.jpg
    1.3 MB · Views: 6,507
  • IMG_20191225_203752-3456x2592.jpg
    IMG_20191225_203752-3456x2592.jpg
    1.2 MB · Views: 6,717
  • IMG_20191225_203816-3456x2592.jpg
    IMG_20191225_203816-3456x2592.jpg
    1.2 MB · Views: 6,971
Replying to reply #26

Nice development work Ola C for your 10th post on this site that impressive mate. Loving it
 
I want more "stops", similar to the two on the tool.  I want to build a tool similar to this where the domino is mounted on a "table".  I finally figured out that if I wanted additional "stops", I could put dowel pin inserts recessed into the table.  Put the pin where you want the stop, remove when you don't.  Clearly, yours is much more flexible.  However, I find that with dominos, they don't need to be super precise (like you would with a saw's stop), but they do need to be consistent.
 
TealaG said:
I want more "stops", similar to the two on the tool.  I want to build a tool similar to this where the domino is mounted on a "table".  I finally figured out that if I wanted additional "stops", I could put dowel pin inserts recessed into the table.  Put the pin where you want the stop, remove when you don't.  Clearly, yours is much more flexible.  However, I find that with dominos, they don't need to be super precise (like you would with a saw's stop), but they do need to be consistent.

Pins in the table means you have to center the Domino to the pins (left/right pins) when you mount it to the table. Could of course be done but might be trickier than it sounds. No the pins doesn't need to be super precise when it comes to location but they need to be very precise in terms of equal distance to the center of the cut on left and right side.
 
Finally the new integrated fence flipper is built and filmed. Works extremely well and is super fast to use.
=youtu.be

[attachimg=1]


Attachments

  • IMG_20200213_182029_copy_3456x2592.jpg
    IMG_20200213_182029_copy_3456x2592.jpg
    1.1 MB · Views: 1,672
I'm just now seeing this thread.  This is absolutely brilliant, IMO.  Not sure why some manufacturer has not called him and put together another 'Peter Parfitt success' story. 
 
Ola, is there an reason for using the threaded inserts for the fence and not using the dovetail tracks to clamp the fence in position.

It looks to me like there would be a greater range of adjustment using the dovetail tracks but maybe that's not needed.

I built the MicroJig 360 sled which also uses dovetail tracks for their clamps. If anyone is wondering the Festool and Bessy clamps fit in the MicroJig dovetail tracks.
 
Bob D. said:
Ola, is there an reason for using the threaded inserts for the fence and not using the dovetail tracks to clamp the fence in position.

It looks to me like there would be a greater range of adjustment using the dovetail tracks but maybe that's not needed.

I built the MicroJig 360 sled which also uses dovetail tracks for their clamps. If anyone is wondering the Festool and Bessy clamps for in the MicroJig dovetail tracks.

My first version of this jig, built some four years ago, hade through holes for the clamps holding the wood, mft style. To make a long story short, from usability point the elongated holes and threaded inserts at that time was a better option as clamping the fence in through holes required both hands on the clamp = No hands left to hold the fence in position while clamping. Also think I only owned two rail clamps att that time [smile]

With the current design with routed t-tracks it would work well to clamp the fence in the tracks as that can be done with one hand. Although I think the threaded inserts make it a "cleaner" solution with less protruding parts. Adjustment range is more than enough for my usage, and of more is needed I would add another pair of inserts.
 
Rick Herrick said:
I'm just now seeing this thread.  This is absolutely brilliant, IMO.  Not sure why some manufacturer has not called him and put together another 'Peter Parfitt success' story.

Thanks! Still waiting for the call [smile]
 
Back
Top