HL 850 E depth adjustment disassembly help needed

jameslangford

Member
Joined
Mar 10, 2026
Messages
6
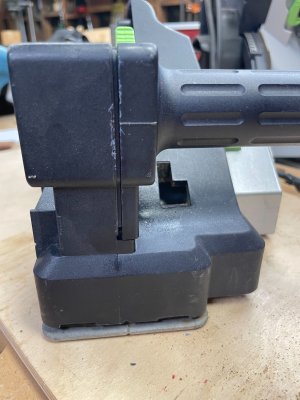
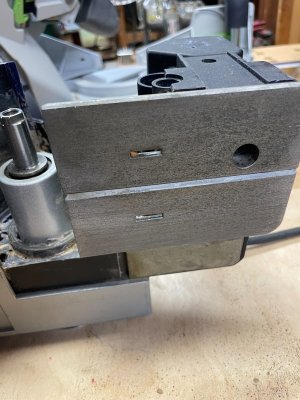
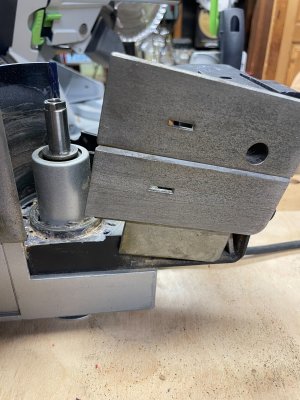
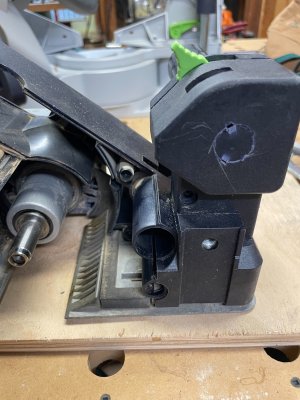
I discovered this forum while searching for help disassembling an old HL 850 E planer to find out why the depth adjustment spins freely. The case comes apart easily with the exception of the housing around the depth adjustment. I can't figure out how to get to the internals. If this is the wrong place to post this, please redirect me to the right spot. Thanks in advance.
 
There's a couple of really deep seated screws you need to remove that are sort of a little bit hidden, I'll try and find a pic I posted last time someone was doing this.

I'm still looking, but the sticking issue at getting it apart is you need to remove the green depth adjustment lever assembly to allow the body to fully come apart. from memory it's a screw in the end of the lever that allows you to pull that whole section apart with another screw that gets exposed. Something like that anyway.

I remember it didn't seem at all obvious around that section when I pulled mine apart.

Ok I found the link for what I posted about opening it up some time back, start here: https://festoolownersgroup.com/threads/festool-hl-850-power-cord-replacement.72656/post-702830
 
Last edited:
Many thanks for responding. Nice to have a human after several attempts with AI's inconsistent and often contradictory answers.

I'm attaching a few photos to make my situation clearer. I think I have all the screws out and the housing around the depth adjustment partially opens, just not enough to get to the mechanism. I thought maybe I needed to remove the front plate but though it will pivot, as shown in the photos, it doesn't drop down or move at all in any forward or backward direction. The green depth adjustment lever is removed.
 

Attachments

  • IMG_1122.jpeg
    IMG_1122.jpeg
    1.7 MB · Views: 5
  • IMG_1121.jpeg
    IMG_1121.jpeg
    1.9 MB · Views: 5
  • IMG_1120.jpeg
    IMG_1120.jpeg
    2.2 MB · Views: 6
  • IMG_1119.jpeg
    IMG_1119.jpeg
    1.9 MB · Views: 6
You need to pull the whole front depth section apart as there's a single bolt that goes up through the front base plate.

Did you get the screw I showed with a red plastic tube out?
 
Yes, I removed that screw and then the whole side of the casing as well as the bolt that goes up through the center of the base plate.
 
The front plate should pull out if the screws and bolts have all been removed, it looks like maybe there's a missed screw?
 
It seems like it should slide off, but no luck. It's stuck tight. I bought it used and there are signs now that I've taken it down to this point that it overheated at some point. I think it had pretty rough use.

Does sliding the front plate off allow the casing around the adjustment mechanism to come apart?
 
Another clue. I put the long bolt back through the front plate with the allen wrench inserted in it and discovered that the depth gauge adjust actually moves it up and down. The plate just doesn't move. I can tighten the bolt all the way and it moves the plate up
 
There's a thin mylar type material wrapped around the shaft from the front plate going up into the body, sounds like maybe yours has disintegrated inside. If all the bolts and screws have been identified and removed, pull the front plate of with force and the mylar/anti-friction material should come loose.
 
There's a thin mylar type material wrapped around the shaft from the front plate going up into the body, sounds like maybe yours has disintegrated inside. If all the bolts and screws have been identified and removed, pull the front plate of with force and the mylar/anti-friction material should come loose.
That sounds reasonable and may be the case. It requires quite a bit of force on the central bolt to pull it up tight, so something is binding. Maybe it's the mylar.

I've pulled the plate with quite a bit of force, even whacked it with a mallet to break it loose, but nothing budges. It was a carpenter who owned it and he had the curved head that gouges wood to make it a board look hand hewn, so there may be some resin buildup as well. Either way, I appreciate your efforts to help. At some point, I'll throw caution to the wind and use some leverage on it.
 
Back
Top