- Joined
- Jan 22, 2007
- Messages
- 1,486
Have you ever had one of those projects that you set aside for a while, and the next thing you know, a decade has elapsed? I started these hollow spiral columns way back in 2006, and they sat untouched for 4 years until I worked out a deal to acquire a Dynabrade Dynafile sander. Even then, I only finished the first column and didn't touch the second one until this past weekend. But with all the time that has passed, it really wasn't that difficult of a project. This last column took only a couple hours per night for just a few nights.
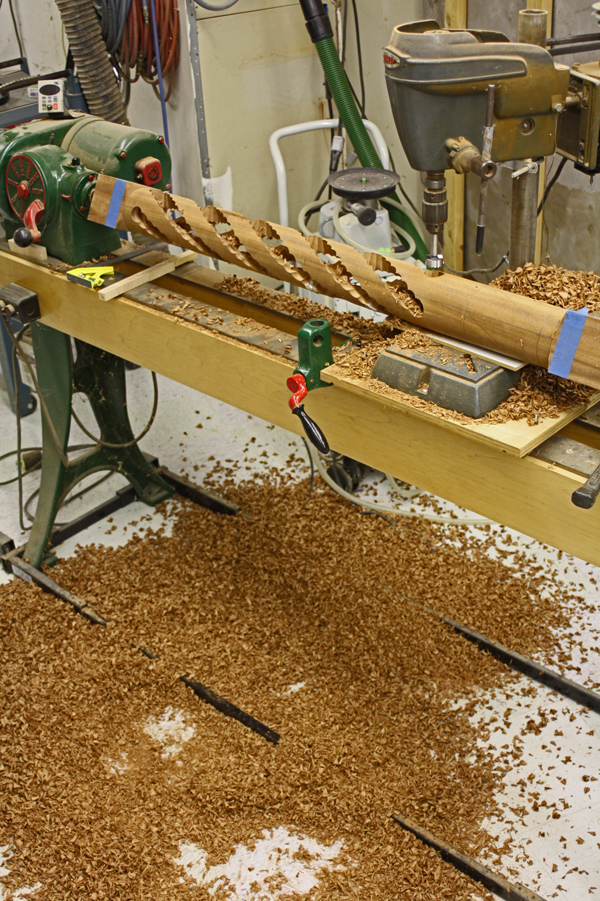
I started out with turning the raw 4x4 blanks on the lathe from hand selected African Mahogany. The top and bottom of the columns were left square, and the blue painter's tape was to warn me of the square parts while smoothing out the long center.
For the lathe setup, I built a carriage that could hold my drillpress. It uses machine bearings for wheels, threaded rod for axles, and aluminum tubing around the axles to keep the wheel spacing equal to the width of my lathe bed. I set up the drill press so the bit was exactly centered on the centerline of the lathe. That is the critical key for making the spirals--the forstner bit must pass directly through the center of the column.

I drew out a grid around the column with 8 lines down the length and 4 lines around the circumference. I probably should have drawn 9 lines down the length to get 2 full revolutions, but 1-3/4 revolutions was fine with me. Then with a flexible ruler, I drew curved lines through each of the intersections.

Using a 1-3/8" forstner bit, I roughed out the spiral. I drilled overlapping holes with the forstner bit piercing the spiral layout line. Because the drill press wants to drift back toward the previous hole, I used the lathe's banjo to lock the carriage from moving back. Each spiral took 50 holes to drill, so there are 200 holes total.
As I got about 1/4 of the way into the drilling, I noticed I was getting excessive vibration. So I stopped and rechecked everything, and discovered the drill press was no longer centered on the lathe. I re-centered it, but after 2 more sets of holes it was off again. That's when I discovered that one of my axle nuts had loosened up and the drill press carriage was ready to fall off the tracks. Yowza, that was close! (Thankfully there is a set of roller bearings under the lathe bed to keep the carriage from tipping or coming loose.)
Then came the arduous task of initial shaping. This is what originally put these columns on hold way back in 2006. I tried doing this with a drum sander in the drill press and it just wasn't working well. It was working, but just taking forever to get smooth curves. That's when I made an advertising deal with a Dynabrade dealer. I'd write an article that linked to their website, and they would give me a Dynafile mini belt sander and 3 cases of belts.
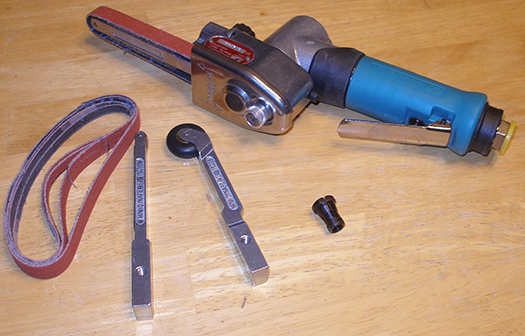
The Dynafile worked fantastically, but it still got a little mind numbing leveling out 400 nibs between the 200 drilled holes. Because the spiral is 3-dimensional, the sander had to be held skewed to the center of the column, and pointing uphill to the spiral curve. Getting just the right skew angle without gouging the edges of the belt was the tricky part.
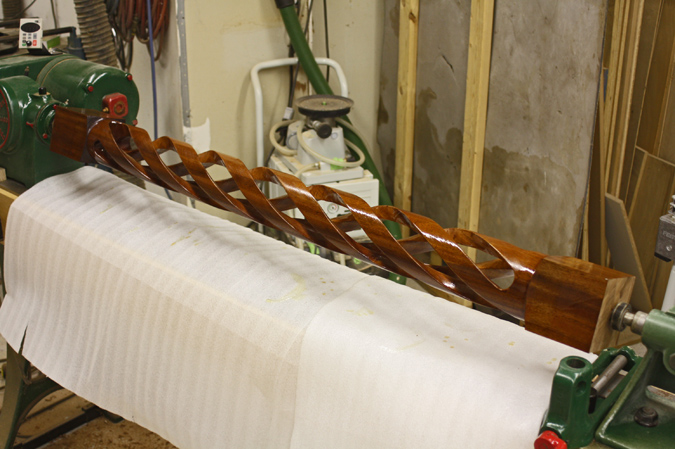
I knocked down the nibs with 80 grit, then did the smoothing with 120 grit. A final pass with 220 grit cleaned up the marks and also revealed the rough spots that weren't well leveled. Even then the grits were too aggressive, and a worn belt worked better than a fresh belt. I sanded the up-facing flutes first, and then flipped the column around in the lathe to sand the other side.

I didn't feel like messing around with the airless sprayer for such a quick job, so I decided to brush the lacquer on. It worked surprisingly well compared to the original column that was sprayed, because trying to get product into the center ended up spraying too much on the exterior. I retarded the lacquer (Butyl Cellosolve) to give it more time to level out the brush strokes.
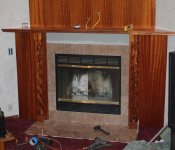
One thing I didn’t mention back at the beginning is that each column has an opposite rotation. This has to be done during the spiral line layout. You can't simply turn one around to give it an opposite spiral. To decide which way the spirals should turn, I placed them next to the fire place to see which way looked better. Because the columns are generally viewed slightly above horizontal, I chose a clockwise rotation for the right and counterclockwise for the left. This is actually the opposite of what is shown in the picture below, but that is because the picture is taken looking "up" instead of "down". So the appearance will be the same when reversed.
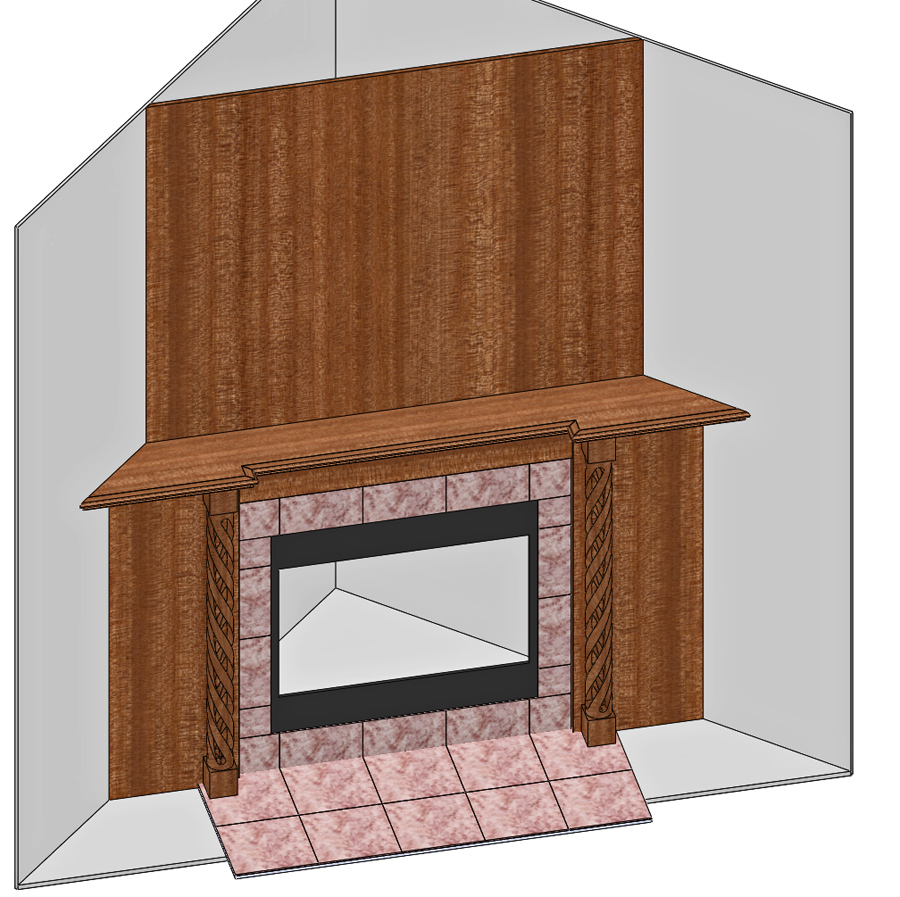
Because this project was started so long ago, I never had complete plans created before making the columns. I've done enough fireplace surrounds to have a basic layout in my mind, but now that I have SolidWorks available, I completed the total layout to better visualize the look. Because the spiral columns are already visually complex, I wanted to keep the rest of the surround fairly simple. The marble is a soft tan with slight pink and gold veining. It is a good complimentary appearance against the reddish hues of the mahogany.
At one point I had contemplated using smaller 1/2-columns above the mantle, but after seeing part of this on the wall already (for several years) I realized it would get too busy. So I am going to keep the main visual focus toward the bottom and let artwork and knickknacks carry the visual weight up above. The room has a 9-foot ceiling, so the surround already carries a substantial visual weight as it is, and additional complexity would make it overpower the rest of the room.
I started out with turning the raw 4x4 blanks on the lathe from hand selected African Mahogany. The top and bottom of the columns were left square, and the blue painter's tape was to warn me of the square parts while smoothing out the long center.
For the lathe setup, I built a carriage that could hold my drillpress. It uses machine bearings for wheels, threaded rod for axles, and aluminum tubing around the axles to keep the wheel spacing equal to the width of my lathe bed. I set up the drill press so the bit was exactly centered on the centerline of the lathe. That is the critical key for making the spirals--the forstner bit must pass directly through the center of the column.
I drew out a grid around the column with 8 lines down the length and 4 lines around the circumference. I probably should have drawn 9 lines down the length to get 2 full revolutions, but 1-3/4 revolutions was fine with me. Then with a flexible ruler, I drew curved lines through each of the intersections.
Using a 1-3/8" forstner bit, I roughed out the spiral. I drilled overlapping holes with the forstner bit piercing the spiral layout line. Because the drill press wants to drift back toward the previous hole, I used the lathe's banjo to lock the carriage from moving back. Each spiral took 50 holes to drill, so there are 200 holes total.
As I got about 1/4 of the way into the drilling, I noticed I was getting excessive vibration. So I stopped and rechecked everything, and discovered the drill press was no longer centered on the lathe. I re-centered it, but after 2 more sets of holes it was off again. That's when I discovered that one of my axle nuts had loosened up and the drill press carriage was ready to fall off the tracks. Yowza, that was close! (Thankfully there is a set of roller bearings under the lathe bed to keep the carriage from tipping or coming loose.)
Then came the arduous task of initial shaping. This is what originally put these columns on hold way back in 2006. I tried doing this with a drum sander in the drill press and it just wasn't working well. It was working, but just taking forever to get smooth curves. That's when I made an advertising deal with a Dynabrade dealer. I'd write an article that linked to their website, and they would give me a Dynafile mini belt sander and 3 cases of belts.
The Dynafile worked fantastically, but it still got a little mind numbing leveling out 400 nibs between the 200 drilled holes. Because the spiral is 3-dimensional, the sander had to be held skewed to the center of the column, and pointing uphill to the spiral curve. Getting just the right skew angle without gouging the edges of the belt was the tricky part.
I knocked down the nibs with 80 grit, then did the smoothing with 120 grit. A final pass with 220 grit cleaned up the marks and also revealed the rough spots that weren't well leveled. Even then the grits were too aggressive, and a worn belt worked better than a fresh belt. I sanded the up-facing flutes first, and then flipped the column around in the lathe to sand the other side.
I didn't feel like messing around with the airless sprayer for such a quick job, so I decided to brush the lacquer on. It worked surprisingly well compared to the original column that was sprayed, because trying to get product into the center ended up spraying too much on the exterior. I retarded the lacquer (Butyl Cellosolve) to give it more time to level out the brush strokes.
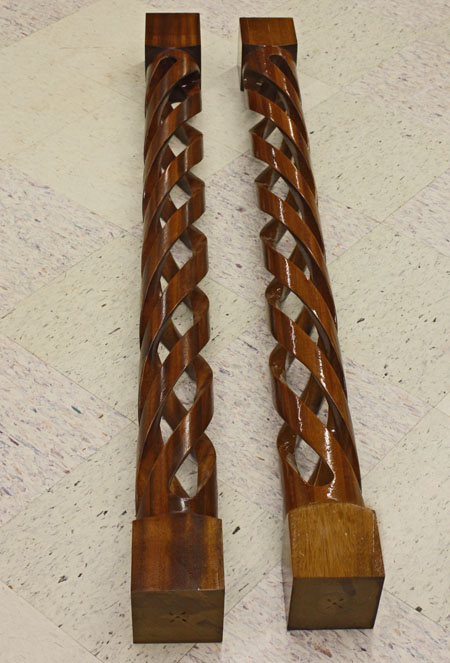
One thing I didn’t mention back at the beginning is that each column has an opposite rotation. This has to be done during the spiral line layout. You can't simply turn one around to give it an opposite spiral. To decide which way the spirals should turn, I placed them next to the fire place to see which way looked better. Because the columns are generally viewed slightly above horizontal, I chose a clockwise rotation for the right and counterclockwise for the left. This is actually the opposite of what is shown in the picture below, but that is because the picture is taken looking "up" instead of "down". So the appearance will be the same when reversed.
Because this project was started so long ago, I never had complete plans created before making the columns. I've done enough fireplace surrounds to have a basic layout in my mind, but now that I have SolidWorks available, I completed the total layout to better visualize the look. Because the spiral columns are already visually complex, I wanted to keep the rest of the surround fairly simple. The marble is a soft tan with slight pink and gold veining. It is a good complimentary appearance against the reddish hues of the mahogany.
At one point I had contemplated using smaller 1/2-columns above the mantle, but after seeing part of this on the wall already (for several years) I realized it would get too busy. So I am going to keep the main visual focus toward the bottom and let artwork and knickknacks carry the visual weight up above. The room has a 9-foot ceiling, so the surround already carries a substantial visual weight as it is, and additional complexity would make it overpower the rest of the room.