Home Office Remodel

DynaGlide

Member
Joined
May 16, 2017
Messages
1,697
I got into woodworking with the goal of being able to make stuff for the house. Last year I tackled Plantation Shutter Madness. This year's project is taking it up another notch with lots of remodel and cabinetry which are also firsts for me. We have a home office where I work full time. With the uncertainty of returning to the office for my wife in the foreseeable future I set out to convert it into a more usable space that we could both share.

i-G8W6qG4-XL.jpg


I've spent the last few weeks taking out the closet and re-running electrical. Mistakes were made but I've been learning as I go. I ran a new outlet where I plan on having a corner computer cabinet and raised two existing outlets to above where the counter will sit when installed.

i-6vQ4kDt-M.jpg


Today I had to patch the floor where the closet used to be. .that was difficult. I ended up ripping the tongue off some of the pieces that I found in the basement when we bought the house 2 years ago. Then there was about a 5 degree taper along the width of the opening. I took light passes with the track saw until I could shove the patch flooring into place.

i-tfLMPTk-XL.jpg


i-7Jh7x32-XL.jpg


I have been up to the attic so much during all of the wiring that I feel like I could walk around up there blindfolded. The room is almost done being prepped so I can get started on building the cabinets this weekend.

Phase 1 is the base cabinets and countertop. I'll be doing frameless cabinets and using the LR32 system for line boring. I hope to update this post as I get going.

i-wQSgvVD-X2.png


Stay tuned.

Matt
 
[member=65062]DynaGlide[/member] - usual good planning job, Matt!
GReat way to recover poorly utilized closet space. Your right: that floor remodel will not be noticed on an the furnished space.

Here are some random order brainstorming topics:

How much detailed planning have you given to each workspace usage needs?
SKYPE Meetings vieod surrounding and video face llighting
Ergonomics - laptop? - keyboard tray? monitor viewing distance to seated position? monitor height adjustable desk atands or repositionable wall arms?
Rounded  bullnose edges on worksurfaces
Thougts given to sit-stand desk surfaces?
cable management access below
110 Volt outlet run on the walll 30 - 42 inches high all around?
Powered USB outlets
Cable trays accessible from above
easy access to the back of desktop PC's living on the floor
Printer location for easy access from each swivel chairs
Desk Space with task lighting for workpapers
Remember that 24" deskspace is greatly reduced by two monitors and a keyboard plus perhaps a Laptop arm (email)
Long days at the desk - where do the feet stretch
Speakers
SKYPE video camera/mic between monitors

the size of the room or door and window locations?
Have you considered other non-corner layouts before choosing the finalist?

Where are heating and airconditioning outlets relative to person's seating? - blowing air is not comfortable for extended periods

Finally: flexibility to reconfigure as your needs (will) change :)

We'll vicariously enjoy your progress here via the FOG!
Hans
 
I don't know how many electrical appliances you plan on having in that office, but I highly recommend a power switch. Years ago I made a small 19 inch rack for my computers and added space for a network patch panel and a power switch. I still am glad I did that.

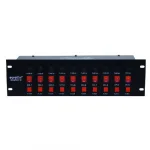
Something like this:

[attachimg=1]

Of course, you might not have any 19 inch IT stuff, but a power switch still is ideal. And you can connect any powered device to it, not just IT stuff. Some even have USB outlets. I bought mine at a store for DJ's. Not sure where you could buy them in the States. To sum up some benefits: easy access to power buttons, a visible queue to whether something is powered on or not, saving energy (because you don't have the transformers on stand-by all the time), reduced risk of fire (for the same reason), (possibly) reduced clutter on or below your desk.

If you have low frequency units for a sound system and don't want to kick against them with your feet all the time, make sure you don't forget to create an "out of the way" place for them as well.

[Edit: sorry, that picture was meant to go inline...]
 

Attachments

  • power_switch.jpg.webp
    power_switch.jpg.webp
    9.1 KB · Views: 485
Matt, another item to consider is Ethernet cabling and router placement.  Now is the time to consider cable routing.  If you plan on having your main router in the office, consider placing it high on a shelf so that little affects the Wi-Fi signal strength.  Consider also how you'll get the Ethernet or coax cabling from the ONT (assuming you're using FiOS) to your router.  Get those cable paths established before construction,  Also consider placing some cable grommets in the countertop to help rout cabling out of sight.  If you and SWMBO plan on sharing a printer, that will add cabling between the router and the printer, and to each computer (docking station).  We can chat some time about the setup. 
 
TSO_Products said:
[member=65062]DynaGlide[/member] - usual good planning job, Matt!
GReat way to recover poorly utilized closet space. Your right: that floor remodel will not be noticed on an the furnished space.

Here are some random order brainstorming topics:

How much detailed planning have you given to each workspace usage needs?
SKYPE Meetings vieod surrounding and video face llighting
Ergonomics - laptop? - keyboard tray? monitor viewing distance to seated position? monitor height adjustable desk atands or repositionable wall arms?
Rounded  bullnose edges on worksurfaces
Thougts given to sit-stand desk surfaces?
cable management access below
110 Volt outlet run on the walll 30 - 42 inches high all around?
Powered USB outlets
Cable trays accessible from above
easy access to the back of desktop PC's living on the floor
Printer location for easy access from each swivel chairs
Desk Space with task lighting for workpapers
Remember that 24" deskspace is greatly reduced by two monitors and a keyboard plus perhaps a Laptop arm (email)
Long days at the desk - where do the feet stretch
Speakers
SKYPE video camera/mic between monitors

the size of the room or door and window locations?
Have you considered other non-corner layouts before choosing the finalist?

Where are heating and airconditioning outlets relative to person's seating? - blowing air is not comfortable for extended periods

Finally: flexibility to reconfigure as your needs (will) change :)

We'll vicariously enjoy your progress here via the FOG!
Hans

Hans - There sure is a lot to digest with your post. Luckily I don't do video conferences with my work on a regular basis. I will be in the corner to allow placement of up to 3 monitors. My wife does a fair share of video calls but her computer camera will not include me. These are valid considerations that I didn't even take into account.

The desk is more or less standardized using guidance from the Blum Process32 manual for an office desk. That is - 30.5" final height and 24" deep base cabinets. Luckily I have an IKEA desk currently with similar height dimensions that I've used for several years so I have a good feeling of what is "right" for me.

For wiring I will have cable trays underneath each work area and cutouts in the cabinets where required. The outlets have all been relocated to above desk height an appropriate distance save for the one outlet I added which will be brought into the corner computer cabinet. No door will go on that cabinet as I plan on building a PC and locating it inside along with some minor network equipment.

The printer will be up on top of the desk and under a bookshelf (later stage of the project) above where the corner computer cabinet will sit.

We went through several iterations to get to the final design working within the constraints of the doors for the room and the available space. Initially we planned a sort of double L extending into the middle of the room but abandoned the idea when we realized the room wasn't wide enough. The corner desk isn't ideal however the double wide cabinets to the left and right of the corner were necessary for storage of larger items that wouldn't do well in a single width cabinet.

I hope to have some sort of rounded profile for the counter. I'm still researching the laminate. It's tough with COVID-19. I am unable to see any product in person because of restrictions in place.

[member=66485]hdv[/member] Interesting I've never come across that before. For my needs that would be overkill. At most there will be a handful of items in the PC cabinet. I'm not a networking engineer and will have any patch panels or switches located in the basement.

I setup my cutting station yesterday prior to delivery of the sheet goods. It's the Veritas Panel Platform Kit https://www.leevalley.com/en-us/shop/tools/workshop/workbenches/work-surfaces/76830-veritas-panel-platform-kit

clamped to a pair of Tracktubes on DeWALT lightweight horses. What I love about this setup is it's so easy to break down into a small storage space and setup a rock solid sacrificial and comfortable cutting surface. Oh and the sacrificial boards are ripped down cedar from a shelf I had at the time so I get to smell that every time I use it.  ;D

i-qKzWJCq-X2.jpg


i-pxTqHXn-X2.jpg


i-DckDX2w-X2.jpg


Stay tuned.

Matt
 
FWIW...Doug Mockett sells tons of architectural hardware for the office.

Cable grommets  https://www.mockett.com/grommets-wire-management#page=1&top=295&

Power grommets and recessed receptacles  https://www.mockett.com/power-communication-systems/#page=5&top=468&

Desk accessories  https://www.mockett.com/ergonomics-table-work-surface-accessories/

Besides, Doug is another motor-head. He runs, as in drives, a 1954 Oldsmobile Super 88 in the Carrera Panamericana and the Pikes Peak hill climb every year. I know he's won both of the races at least once.

[attachimg=1]

[attachimg=2]
 

Attachments

  • Doug Mockett 1954 Oldsmobile Super 88.jpg
    Doug Mockett 1954 Oldsmobile Super 88.jpg
    81.1 KB · Views: 2,975
  • Doug Mockett.jpg
    Doug Mockett.jpg
    294.3 KB · Views: 3,007
Matt,

I have some brown grommets leftover from long ago.  You can have them if you want them. The brown color might not work for your design, however.

Cheese,

I recall that my Grandfather had a mid-50's ( I think it was a '55) Olds 88.  I'm pretty sure he didn't have flames on the front end.  [big grin]
 
It's been a busy few days. I broke down all of the sheets in the garage using TSO squares and parallel guides. It worked out pretty well. It would be best suited for someone with several longer rails to avoid swapping hardware back and forth and joining rails between rip and cross cuts. But I made do. I think the pictures explain everything but I'm happy to elaborate if needed:

i-rXb8cnZ-X2.jpg


i-HzkzLsd-X2.jpg


i-MR9JsHL-X2.jpg


i-QvvZ6w8-X2.jpg


i-NmSrLdR-X2.jpg


i-C2pQ8qv-X2.jpg


i-jZHD7Pc-X2.jpg


Using that cutting table affirmed my decision to avoid the upcoming STM 1800. It's just too clunky trying to line panels up so they're properly supported when you're switching back and forth from rip and cross cuts and moving a guide rail around and trying not to walk into the support arms of the cutting table. Next time I'll likely do everything on the MFT tables.

I gave a new product (to me) a shot for edgebanding. The Fastedge white PVC edging. I was all prepared to use my MFK 700 to trim it but it's so easy to cut with quad trimmers that I didn't even get it out. I was pleasantly surprised by how nice this product applied and trimmed that for painted projects I don't think I'd use anything else.

i-ccMvP7n-X2.jpg


i-CGhLtqF-X2.jpg


i-RdnMmRg-X2.jpg


And now onto something I cobbled together around February but haven't had the chance to put to use. I borrowed some ideas from way back on this forum to modify my LR-32 parallel guides. Longer hexagon rods with easier to read adhesive tape and different knobs (levers?) for attaching to the guide rail. On top of that I got to try out the vacuum guide rail clamps from [member=66875]simonh[/member] . One of the benefits of the longer parallel guides is I can setup for the 261mm center row of holes without any goofy measuring and eyeballing. I've included a video of how the whole setup works. I apologize for the quality, it's from my security camera. I am extremely pleased with the setup.

i-SkLvBv7-X2.jpg


i-8q8zCRg-X2.jpg


i-NCsPPTm-X2.jpg


i-k7r6szH-X2.jpg


i-tZK9dzF-X2.jpg


i-H45PqdL-X2.jpg


i-fpGZkzH-X2.jpg


i-gcFhFcZ-X2.jpg


i-P2zn4Vx-X2.jpg


And finally, on Father's Day my brother helped me run Cat6 to my Office from the basement:

i-F6kGCDH-X2.jpg
 
Love the vacuum rail clamp idea! Ill have to implement something like that myself!
 
DynaGlide said:
And finally, on Father's Day my brother helped me run Cat6 to my Office from the basement:
i-F6kGCDH-X2.jpg

Just a random question.  How did you cut the hole in the plywood floor/ceiling for the Cat6 blue cable?  It looks like you took a spade bit and drilled about 20 holes around the edge of the area you wanted cut out.  It does not look like any saw, that cuts a straight line,  was used to cut the hole.
 
[member=13115]RussellS[/member] That is a fair question. .the answer is I didn't do it. The only way we could get the Cat6 to the attic was to use an existing Coax run that was installed after the house was built. Some other hack did that hole.

I started assembling some boxes and when I got to my second one I ran into an issue on one side of the bottom of the cabinet:

i-Mp3p5fD-X4.jpg


Some of the screws are bulging out the bottom. I know part of it was operator error (me) not drilling perfectly straight before driving them in. I marked 9mm from the bottom as a guide but I was working in a weird spot on this particular box. But I figured I'd stop and ask: Are #8 the standard for this application? If so I'll just be more careful moving forward. My first thought was that I was hitting the Dominos with the screws but I checked and that wasn't the case.

Thanks,
Matt
 
Hey Matt

Looks like a good start to your project.  I don't think the use of a #8 screw is a problem in 3/4"/18 mm material.  That is what I used on all those bookcases I built recently. I did drill a pilot hole before driving each screw.  Did you size the pilot hole so it worked with the size of the shank of the screw?
 
Matt, pre-drill the screw holes just slightly under the screw shank dimension.  On the hack job, you'll do well to cut some left-over 3/4" material to completely cover that area, but bore a hole just big enough to fit the cable bundle.  Split that cover piece right through the hole so that you can install the cover without having to re-run the cabling.  Once it's installed tightly around the cable bundle, use fire-stop caulk around the edges, the split, and around the cable bundle.  Also, caulk around the ductwork beside the cable hole.  [smile]
 
Rob Z said:
Hey Matt

Looks like a good start to your project.  I don't think the use of a #8 screw is a problem in 3/4"/18 mm material.  That is what I used on all those bookcases I built recently. I did drill a pilot hole before driving each screw.  Did you size the pilot hole so it worked with the size of the shank of the screw?

Very timely response. .I am using a #8 snappy countersink bit. I re-did the bulged screws and had no issues when I focused more on going in straight. I guess I was just careless with my drilling.
 
Great project and progress Matt!  Cableorganizer.com has some pretty good materials for grommets, under mount cable management, cable ties from Velcro, etc.

Looking forward to the progress!
 
[member=65062]DynaGlide[/member] - your project pictures along with pointers from the likes of Sparktrician are a big helpo for many facing this kind of work.

Your LR-32 Hex bar extension pictures the same solution we developed last year when we ran into the same limitations with the short standard bars and the awkward tightening/releasing of the FESTOOL attachment. We hesitated to put it into production because we were not sure if the market is big enough to justify the effort.

Maybe some other LR-32 users, who would rather do woodworking than building shopmade fixtures, will speak up ? ?

Hans
 
TSO_Products said:
[member=65062]DynaGlide[/member] - your project pictures along with pointers from the likes of Sparktrician are a big helpo for many facing this kind of work.

Your LR-32 Hex bar extension pictures the same solution we developed last year when we ran into the same limitations with the short standard bars and the awkward tightening/releasing of the FESTOOL attachment. We hesitated to put it into production because we were not sure if the market is big enough to justify the effort.

Maybe some other LR-32 users, who would rather do woodworking than building shopmade fixtures, will speak up ? ?

Hans

[member=167]neilc[/member] Hey Neil. Thanks for the link I think I'll check those out. I'm still dreading doing the countertop. But one thing at a time!

[member=61691]TSO_Products[/member] Hans that's interesting to hear. I'd love to check out what you cooked up. My setup works but you know I have an affinity for the blue stuff. .which leads to:

i-pft9cm2-X2.jpg


i-jrX47hm-X2.jpg


i-cxJtKNg-X2.jpg


i-rgxRDHW-X2.jpg


The Big Foot has been invaluable here for vertical plunges with this winged contraption. The Domino is a bit unwieldy without it but I was able to do two cabinet sides and the bottom all on the tight setting and fit them together (bad idea, it was hard to assemble and have since switched to first tight for alignment, rest of the mortises on medium). You get such a good purchase with the Big Foot that you can hold the Domino firmly in place and plunge with your other hand. Very happy with this product. Thank you again Hans.

Matt
 
TSO_Products said:
[member=65062]DynaGlide[/member] - your project pictures along with pointers from the likes of Sparktrician are a big helpo for many facing this kind of work.

Your LR-32 Hex bar extension pictures the same solution we developed last year when we ran into the same limitations with the short standard bars and the awkward tightening/releasing of the FESTOOL attachment. We hesitated to put it into production because we were not sure if the market is big enough to justify the effort.

Maybe some other LR-32 users, who would rather do woodworking than building shopmade fixtures, will speak up ? ?

Hans

[member=61691]TSO_Products[/member] Hans I'm interested but primarily due to a pending project July-ish. If you had something available now I'd buy, absent that I will probably whomp up a DIY set.

[member=65062]DynaGlide[/member] Matt - where did you obtain the hex bar stock, MMC?

Thanks,

RMW
 
Back
Top