How do you laminate a router table top?

cider

Member
Joined
Dec 6, 2015
Messages
118
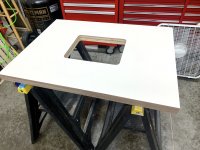
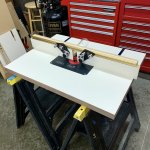
I'd like to laminate a router table top with HPL, but I've never worked with it before.  A few questions:
  • Should I cut the hole for the router lift before or after laminating?
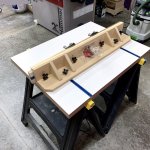
  • I'm using plywood for the core (scraps I had on hand) and I'm going to edge-band with solid wood.  Should I put the laminate over the edge banding or edge band last?
  • Any concerns with routing some slots into the laminate for t-tracks?
Thanks in advance for your advice.  There's a ton of knowledge and experience here!
 
Most commercial router tables start with particle board or mdf since the surface has be very flat. Plywood usually isn’t flat enough.

Another guy is planning to laminate a tablesaw extension.

In both cases you want the thing to be and remain flat. If you put a hydrophobic coating one one side you’ll have to balance the panel with a similar coating on the opposite side or it will warp. They sell thinner cheaper non-decorative laminate as backing sheets specifically for this purpose.

Back to your question, I’d cut the hole and do the edge band first then route the groove for the t-track after the laminate has been on for a day or so.
 
Right on, thanks for the advice!  I laminated two pieces of plywood, and they're already pretty flat (not perfect though).  I was hoping I could get that last fraction straightened out by screwing it to a cabinet
 
A really cheap Home Depot door is a perfect flat reference surface. I glue up two boards back to back clamped to a door and they come out perfectly straight. I do put a sheet of waxed paper under the glue-up. You have to be careful with the clamps so as to avoid damaging the door.

This should work for glueing up two plywood sheets.
 
That's a good idea.  I threw them in a vacuum bag, just cause I had one handy, and it was quick-and-easy.
 
Just to close the loop here: I had materials on hand (except for the HPL), so I laminated two pieces of plywood, edged with some hardwood, glued the HPL in the vacuum bag (both sides), and then cut the hole with a router.  It's not flawlessly flat, but it's pretty dang flat, and the hole came out nice and clean.  I'll update if I run into any long-term issues with my approach, but seems OK so far.

[attachimg=1]
 

Attachments

  • IMG_1742.jpeg
    IMG_1742.jpeg
    480.5 KB · Views: 406
Michael Kellough said:
What glue?

Cold press.  I know it's not traditional, but I did a couple test pieces, and I couldn't pry it up with a chisel without splitting/cracking it to pieces.  And I happened to have some on-hand  [big grin]
 
I built my table from commercial grade melamine faced 1 1/8” thick particle board.  My table is 49” x 30”.  I did this close to 35 years ago.  I used a Bench Dogs lift marketed to small shops that needed multiple basic stations for dedicated tasks.  I bought it from Tool Crib of the North.  Tool Crib was bought by Amazon and after the non compete stipulation expired they are now Acme Tool. This lift was long before all these other manufacturers started. The lift has. Cast iron top and huge bronze bushings. I have a PC 7518 in it and an Incra Super Fence.  Dust collection is a Dust Router and extraction thru a Festool dual CMS hose connected to my vacuum.  My router is not enclosed and I get very little chips or dust escaping the vac setup. PS, I have another 7518 I can sell as it used to be my forehand go to but now I use a 2200.
 
Still don't have a router table, but I revisit this guy on-and-off between other projects.  I added a fence to it, and it's usable now on a pair of sawhorses.

View attachment 1

View attachment 2
 

Attachments

  • IMG_1785.jpeg
    IMG_1785.jpeg
    435.5 KB · Views: 1,257
  • IMG_1790.jpeg
    IMG_1790.jpeg
    438 KB · Views: 58
cider said:
Still don't have a router table, but I revisit this guy on-and-off between other projects.  I added a fence to it, and it's usable now on a pair of sawhorses.

View attachment 1

View attachment 2

Way easier to access the router when it is on saw horses than in a table.  My first router “table” was a single sheet of plywood on two saw horses.  I thinned out the area where the router attached to about 1/4” thickness, so no router plate either.  My fence was a piece of stock c-clamped in place.  It worked fine and was easily transportable. (And it was cheap.)

I’m not sure my workmanship suffered because of that setup.  I’ve since upgraded.  The main problem with the plywood was that the stock did not slide easily over the plywood.

Contact cement is the normal way to laminate Formica and the equivalents.  But Woodworkers II or III, will make a stronger bond.  The issue is how are you going to clamp it?  A second piece of plywood over the surface and enough sand bags to equally distribute the weight will work fine.  A vacuum bag will work fine too.
 
Yeah, this thing isn't going to magically make me a better woodworker.  It looks nice though and is fun to fiddle with when I find the time.
Packard said:
But Woodworkers II or III, will make a stronger bond.  The issue is how are you going to clamp it?  A second piece of plywood over the surface and enough sand bags to equally distribute the weight will work fine.  A vacuum bag will work fine too.

Indeed!  A vacuum bag is what I used  ;D
 
Back
Top