How many/which dominos to use for a window frame assembly

furēku

Member
Joined
Jan 18, 2023
Messages
8
Hello,

I am new here and hoping I can get a wise piece of advice as I have been stuck in a loop for a few hours now.

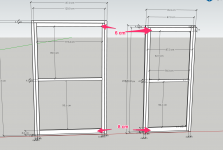
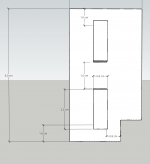
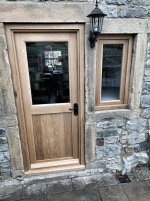
I am building casement windows (hinged) that are quite big and am therefore looking to stiffen the frame as much as I can with glue and dominos (I own the 500). The panes of glazing should weigh ~28kgs (14 each) for the bigger window (screenshot attached).

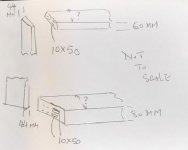
The top stretcher dimensions are 6 cm (height)  x 4.4 cm (thickness) and the bottom one is 8 cm x 4.4 cm.

View attachment 1
View attachment 2

I have been wondering whether I should keep it simple and use only one domino (10 x 50) on each end, or I should aim at placing two on each end, and if so, which ones, and in which layout (stacked or side by side).

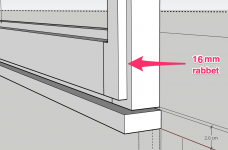
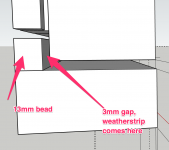
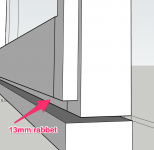
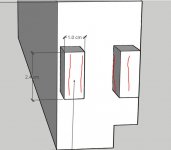
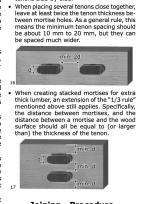
The dimensions of my stretchers seem at first generous enough for me to place two dominos (either stacked or side by side) but if I  take into account the "rule" that the spacing between 2 dominos should be at least twice the thickness of the dominos, that then bring my dominos really close to the edges (1 cm or less) or the small rabbet I have at the back of the stretchers, which in turn does not seem to be a good idea either.

The material is a door blank (plywood).

Hope this all makes sense!

Thanks in advance for any guidance on the matter,

F.


Attachments

  • Pasted_Image_18_01_2023__12_16.png
    Pasted_Image_18_01_2023__12_16.png
    184.1 KB · Views: 93
  • Pasted_Image_18_01_2023__12_18.png
    Pasted_Image_18_01_2023__12_18.png
    51.4 KB · Views: 87
If this sketch correctly represents what you're dealing with, I'd recommend the use stacked or double 10x50 dominoes for both the top and bottom stretchers. But you can even put three rows of 10x50 (instead of two) in the bottom stretcher, if so desired (assuming I was reading your diagrams right).

[attachimg=1]

You didn't provide the width, so I've left out the number of dominoes you can put across the width. That you can figure out using more or less the 1/3 rule. Do note that the 1/3 rule is a guideline only, and not a strict rule that you must comply with.

P.S. Mortise width setting: tight/narrow for all mortises. For any slight misalignment found during dry-fitting, simply trim the edges of the Dominoes concerned with a block plane or sandpaper. If the width of the frame allows it, mill all the mortises with the aid of the trim stop for better precision.


Attachments

  • window frames.JPG
    window frames.JPG
    21.5 KB · Views: 364
Hi Chuk,

Thanks. I think that there is some confusion with what has been named height, width etc.

Please find an updated schema of my bottom stretcher.

You will see that I can't fit several 10x50 in a stacked layout as I wouldn't be able to have twice the thickness of the domino between the two dominos and the dominos.

View attachment 3

Conversely, if I were to go the inline route, while sticking to the 2x thickness of the domino between the 2 dominos, I will end up with my dominos only 6mm away from the edges. Which seems very close.

View attachment 4

Thanks

[attachimg=1]
 

Attachments

  • Pasted_Image_18_01_2023__14_48.png
    Pasted_Image_18_01_2023__14_48.png
    72.3 KB · Views: 349
  • Pasted_Image_18_01_2023__14_54.png
    Pasted_Image_18_01_2023__14_54.png
    73.4 KB · Views: 86
I know I'm not always good at reading other people's drawings or sketches. With your clarifications, the joints can be done with 8 x 50 dominoes as twin tenons (first sketch - the spacing between the twin tenons is about 9mm), or with 10x50 dominoes as double tenons (second sketch). For this particular case, I'd go with the double tenons (DT - 10x50 dominoes).

[attachimg=1]

[attachimg=2]
 

Attachments

  • window frames2.JPG
    window frames2.JPG
    20.9 KB · Views: 336
  • window frames.JPG
    window frames.JPG
    30.8 KB · Views: 344
Thanks Chuck.
While re reading the manual I found a key section that I did not remember at all, which is quite helpful to this discussion.
For anyone else coming here from Google and interested in the topic, I have attached the said section of the doc.

For the bottom stretcher I have decided to go with the DT approach with 8 x 50 tenons as that allows me to comply with all the general recommendations highlighted in the documentation (distance to the edge, distance between the dominos etc.). 
As for the top stretcher I will go with the TT (Twins) with the 8 x50 as, same, it plays nicely with all the general recommendations (1/3,  distance to the edge, distance between the dominos etc.)

Thanks Chuck for taking the time to answer and guiding me through these different options.

Cheers

F.
 

Attachments

  • Pasted_Image_18_01_2023__15_52.png
    Pasted_Image_18_01_2023__15_52.png
    305.3 KB · Views: 90
  • Pasted_Image_18_01_2023__15_58.png
    Pasted_Image_18_01_2023__15_58.png
    66 KB · Views: 83
Welcome to the FOG !!!

As a professional who's built and installed many, many hundreds of doors and windows, I wanted to chime in and share my opinion that anything constructed for external use holding up a 14kg section of glass needs to be built like a tank. Despite their undoubted virtues - dominos just won't cut it in this application, unless you're dealing with much more substantial material and a DF700 - this is a different ball game. I personally wouldn't trust anything other than a deep-set (75% of the way through) traditional mortise & tenon joint.

I'd add that a 2m x 1m window frame also needs to built using material which is way thicker than 44mm - this thickness of material just won't provide enough surface area for any kind of joint to survive in an external application - and for this size of window, I'd be looking at 60mm material thickness as an absolute minimum. You haven't shown any material depth on your plans, but 100mm frame depth is also the realistic minimum for something of this size, with a corresponding reduction in window depth to accommodate the casement rebate and weatherseal - plus a corresponding increase in depth for the sill if you're using one. And having said that - those dimensions would assume solid hardwood - oak, sapele or similar. For weaker material, you need to go even thicker - double the thickness for 50% of the material strength.

I also want to warn you that a plywood door blank is the worst possible material to build a window from - it will expand, contract, move, and flex like you wouldn't believe, it has virtually zero resistance to moisture, and the nature of the material is such that subsequent delamination is only a matter of time, no matter how many coats of finish you throw onto it. You'll expose the laminated layers as soon as you cut into it.

I'm sorry that this won't be what you want to hear - but I'd rather be honest, and give you the benefit of three-decades-plus spent building and installing these things - often whist replacing existing windows which have been thrown together using screws and softwood, and have which catastrophically failed within 18 months. Just as a visual reference, here's a simple double-glazed door and small casement I built for a customer in oak, and installed yesterday. You can see how chunky the dimensions are (100 x 60 for the frame) - and this just is a little window made from solid oak. Stuff's this size for a reason.

I hope you get fixed up.
Kevin

[attachimg=1]
 

Attachments

  • FullSizeRender-compressed(2).JPG
    FullSizeRender-compressed(2).JPG
    461.9 KB · Views: 336
furēku said:
Thanks Chuck.
While re reading the manual I found a key section that I did not remember at all, which is quite helpful to this discussion.
For anyone else coming here from Google and interested in the topic, I have attached the said section of the doc.

For the bottom stretcher I have decided to go with the DT approach with 8 x 50 tenons as that allows me to comply with all the general recommendations highlighted in the documentation (distance to the edge, distance between the dominos etc.). 
As for the top stretcher I will go with the TT (Twins) with the 8 x50 as, same, it plays nicely with all the general recommendations (1/3,  distance to the edge, distance between the dominos etc.)

Thanks Chuck for taking the time to answer and guiding me through these different options.

Cheers

F.

Share with us some of your progress photos. We love seeing action shots. [big grin]
 
[member=75780]woodbutcherbower[/member] you really chose some nice looking wood for the door and window. Looks great with the stone texture.

I assume that is white oak or similar so it is pretty durable inherently. The grain is lovely to look at but will it be painted? Is there a finish on the wood at all? I like to see the rustic textures of solid materials after weathering for many decades. Is the owner okay with that? I really admire them if they are.
 
Absolutely stunning door and window Kevin... [not worthy] [not worthy] [not worthy]

I also assume that is white oak the original boat material.  [big grin]
 
[member=297]Michael Kellough[/member] [member=44099]Cheese[/member] Thanks for your kind words. I also built three further windows and a front door for this house - but this isn't my thread and I don't want to invade it with more pictures. The timber is kiln-dried European oak (almost always grown and harvested in either France or Italy) which can vary in colour from dark brown to almost white, depending upon where it came from in the tree. Grain and figuring ranges from virtually non-existent to insanity-level HOLY S**T LOOK AT THAT !!!!!!!!  [eek] This door was maybe a 5/10.

Finish was 4 x coats of Sadolin flat polyurethane with an inbuilt UV filter.

Kevin
 
Hi [member=75780]woodbutcherbower[/member], many thanks for your detailed input, much appreciated.

The windows I am currently building will actually be used as a secondary inner glazing. The plywood will therefore not be exposed at all to any external condition and kept dry at all times.

The glazing is not ordered yet and I still have the option to either go slimmer on the glazing (3mm instead of the 4mm for which the weight indications above have been calculated) or go down the Perspex route.

Actually, using another online calculator, turns out that the first calculation might have been wrong. I have now 11kgs instead of 14 for the same dimensions for the bigger windows.

So quite a significant difference.

Thoughts...?

Thanks!

 
[member=79381]furēku[/member] You are very welcome - and thanks for taking my post in good spirit. It's always disappointing when someone says 'don't do that .....'

Aha !!! You didn't mention that small important part [smile] For a secondary internal frame where the glass is a little bit lighter, a 44-50mm material thickness and multiple 10 x 50 dominos as suggested by [member=57948]ChuckS[/member] will be totally OK - but I still wouldn't use plywood. Spend a little extra and at least use decent-quality solid softwood - I can promise you that it's money well-spent. Do you have sets of long sash clamps for frame assembly? If not - flood the joints with plenty of glue, then put a screw into the joint to clamp it together super-tight whilst the glue dries. Make absolutely sure that your screw passes through the gap between your dominos and doesn't touch the dominos themselves. Drive the head of the screw a few mm below the surface of the timber, and leave it in there for reinforcement, filling and sanding as appropriate to conceal the hole made by the screw head. For your job, I'd go with a 3.5mm pilot hole and a 5 x 80 screw per joint.

Regarding glass thickness - I'd ideally go with 6mm for something this size, but 4mm will be OK. Not ideal - but OK. Make sure it's solidly bedded onto the frame with the correct silicone across its entire periphery - I'd recommend Dow Corning 799, which sets solidly enough to act as a partial reinforcement adhesive, and this will help to compensate for any thermal expansion/contraction of your window. Use 2 coats of good quality acrylic primer and 2 top coats of finish - and fully-finish the frames before you install the glass.

In the UK, our regulations stipulate that any piece of glass located below 800mm from the floor height must be tempered/toughened for safety - so check your local regulations, too. Just a few more questions so I can help you get fixed up:

1 Are the casements going to be hung onto the frames using butt hinges?
2 How are you planning to fix the frames to your walls?
3 What about seals against draughts/cold etc?

Finally - update your profile to show which country you are from. It helps other forum members to give you advice using materials and components which are available locally to you.

Best wishes
Kevin

 
[member=79381]furēku[/member] You are very welcome - and thanks for taking my post in good spirit. It's always disappointing when someone says 'don't do that .....'

We don't know what we don't know and I am on the contrary really pleased to have a chance to exchange with people who know better.
I am a DIYer, not a pro, and this project aims at saving literally thousands compared to ordering inner glazing from a glazing professional, so, yes, thanks again for taking and making the time to share your wisdom, genuinely appreciated. 

Spend a little extra and at least use decent-quality solid softwood
The project is already underway and I cannot change gear at this stage regarding the material unfortunately.

Do you have sets of long sash clamps for frame assembly?
I don't but I was planning to use tensioning belts ratchet straps to tighten the assembly.

I'd recommend Dow Corning 799, which sets solidly enough to act as a partial reinforcement adhesive, and this will help to compensate for any thermal expansion/contraction of your window.
Duly noted, thanks!

and fully-finish the frames before you install the glass.
That was my plan, so all good there!

In the UK, our regulations stipulate that any piece of glass located below 800mm from the floor height must be tempered/toughened for safety
The windows will be above that, but I was planning to err on the side of caution and have toughened glass in any case.

1 Are the casements going to be hung onto the frames using butt hinges?
Yes. Ball bearing ones (Eclipse), (76x51x2). I was planning to use at least 3 by window. Might be overkill?

2 How are you planning to fix the frames to your walls?
Screws + plugs. Any valuable piece of advice here?

3 What about seals against draughts/cold etc?
The gap between the frame and the walls will be filled with some door and window expansive foam (Soudafoam Window & Door)
As for the window and the frame, I have cut a 16mm rabbet on the outer periphery of the back of the window and will be fitting 13mm beads onto the frame itself, leaving a 3mm gap for weatherstrips. I have attached schemas showing this.

Finally - update your profile to show which country you are from
Done! UK too ;)

Many thanks!
 

Attachments

  • Pasted_Image_18_01_2023__18_14-2.png
    Pasted_Image_18_01_2023__18_14-2.png
    63.6 KB · Views: 89
  • Pasted_Image_18_01_2023__18_21.png
    Pasted_Image_18_01_2023__18_21.png
    85.1 KB · Views: 81
[member=79381]furēku[/member] All understood. You're completely on the right track in all regards, so well done.

Hinges - 3 Eclipses per casement as per your plan. Not strictly necessary strengthwise, but a middle hinge is a great way to combat frame flexure.

Fixings - Fischer 8mm x 40mm multi-plugs (links below). The strongest and the best. Screw length needs to be your material thickness + 40mm. Tighten your screws so that the heads drop 2mm or so below the timber surface, then fill/sand.

Ratchet straps are OK, but they can pull joints out of square very easily if the tension is not exactly the same at both ends of the workpiece. Keep checking your joints for square as you tension up, and tighten up each strap a little bit at a time. Protect the workpiece with cardboard under where the ratchet mechanism sits - these sharp metal things are buggers for introducing nice dents and scrapes onto your beautiful new frames.
https://www.screwfix.com/p/fischer-duopower-wall-plugs-8-x-40mm-100-pack/1820p
https://www.screwfix.com/p/dow-799-glazing-silicone-clear-310ml/66307

Wishing you the very best of luck, and a successful outcome with your project.
Kind regards
Kevin

EDIT - #Tip of the day - you'll get some squeeze-out of the 799 when you bed the glass on. Don't try to remove it whilst it's wet, you'll just end up with a grotesque mess as nothing seems to dissolve it properly. Wait until it's set the following day. The now-solid-but-still-flexible squeeze-out can easily be sliced off using a utility knife blade. Use a new, sharp one.
 
Two more questions if I may:

Both [member=57948]ChuckS[/member] and you have recommended using 10x50 dominos.
This however does not meat the Festool reco to leave twice the thickness of a domino between 2 dominos. Just curious as to what is the best practice here?
Knowing that the overall practice with plywood and dominos is to go slightly undersize rather than oversize, shouldn't I be better off sticking to 8 x 50 instead?

This one might be a silly question but how many screws would you use on the lengths and widths of the frame to secure it to the wall?

Cheers,
 
For simplicity and avoidance of unnecessary errors (such as milling 8mm mortises with a 10mm cutter), go all with 8x50 tenons.
 
[member=79381]furēku[/member] I'm not a DF500 owner/user, so I don't have the appropriate knowledge to respond properly - I'm sorry. But [member=57948]ChuckS[/member] 100% knows his stuff - so go with his advice regarding anything domino-related.

For a 2m high window, I'd recommend fixings one at the top, one at the bottom, and two additional ones spaced evenly between them - so 4 fixings per jamb. There's no need to use any additional fixings on the head or base of the frame - the vertical jambs are the components carrying all of the weight and tension, especially when the windows are open.

Don't assume your wall aperture is level, flat, plumb or square - dry-fix the frame into the aperture first, and have a look at how it sits. Make any necessary adjustments using glazing packers (your local builders merchant will sell you a pack containing multiple different thicknesses for a few quid). Once everything's packed and exactly in the right place, drill pilot holes through the frame jambs, and make sure that your drill bit is long enough to transfer the hole position onto the inside of your masonry aperture. Remove the frame, drill and plug the holes, insert the Fischer plugs, re-site the frame, pop the screws through your holes and hand-tighten. Before you fully tighten, make absolutely sure that the jambs are completely vertical, that your frame is square, and everything's exactly where it should be. It's alarmingly easy to just go steaming in tightening screws - and end up with a jamb which is either snake or banana-shaped as the screws pull the timber tight to the same meandering line as your wall.. If your aperture verticals deviate and wander - glazing packers are once again your best friend. Leave them in there, tighten your screws up, then cut off any exposed packer sections with a chisel or a utility knife.

Kevin
 
woodbutcherbower said:
But [member=57948]ChuckS[/member] 100% knows his stuff - so go with his advice regarding anything domino-related.Snip.
Kevin

If one day I ran a Domino Joiner clinic and charged people for a fee, I'd definitely make a big color poster out of this quote, and hang it in my office!  [big grin]
 
Thanks [member=57948]ChuckS[/member] and [member=17381]woodbutcher[/member] for your answers. Will post a pic when the windows are fitted.

All the best,
 
Back
Top