How to buff out scratches resulting from big tree limb falling on car

DrD

Member
Joined
Mar 29, 2013
Messages
416
A cheaper alternative to paying the deductible for my insurance, I have been told, is to buffer the scratches out.  MOST of the surface damage to my car from the really large falling tree limb is just scratches. 

I've got both the RO150 and the ETS 150/3, but no buffing pads, nor buffing compound.  And, I've never done anything like this before.  So, what do I need, so long as it is less than the deductible, in terms of pads, compound, etc.  What is the sequence in buffing, starting with what, ending with what, etc.  Maybe another small order to Uncle Bob.

All help appreciated.
 
Getting together all the stuff can be a bit costly for a one time job.  You said "if it less than the deductible basically" so what is your budget?

Peter
 
Can you post a picture?  Do your fingernails catch on any of the scratches?

Menzerna polishes are my go to.  I like the heavy cut compound 400.  It is capable of polishing down 1500 grit scratch patterns and leaves a nice finish.  You will either need a medium cut pad or a heavy cut pad depending on how bad these scratches are.  I would recommend a second step using menzerna super finish 3500 with a fine polishing pad which will bring out the gloss.  You might not think you need to go this far after the first step, but trust me, just do it.  The bad news is when you see how reflectivethat clearcoat is, you might spend the next 8 hours doing a two step polish on the entire car.

Clean the finish to remove any oils (isopropyl alcohol works, or just soap and water), then wax or sealant of your choice.

If you have a detailing supplier you want to use, post t and I'll find suitable pads.

Move 1"/sec in overlapping strokes in each direction working an area 2'x2' applying medium pressure at speed 6.  Finish with light pressure at speed 4.  If you think you need rotex mode for the first step, turn the speed down to 4.  Second step should not require rotex.

The polishes will run about $50.  The pads will be $25.  So not too bad.
 
Di what [member=21249]RKA[/member] says to do and watch  YouTube.  Skip the insurance deductible and for about $150, you can get pads and good compounds that can be used again.
 
[member=1674]Peter Halle[/member]  the deductible is $500.00

[member=21249]RKA[/member]  Yes my finger nails do catch on some of the scratches, though most don't catch the nails.  I'll post pics tomorrow.  Is Menzema available at auto supply stores, AutoZone, Advanced Auto, WalMart, we don't have hugh selections here in NE Mississippi.  Not at all familiar with "Medium Cut Pad", "Heavy Cut Pad" but am anxious to learn.  Will these pads fit on an RO150 and an ETS 150/3?  There are some pads in the Festool catalog, are these what you're talking about.  Boy, I am totally out of my knowledge base here.  But, I have polished wood and acrylics before.

[member=24824]pillguy[/member]  I'm totally with you here.  I see the deductible as totally throwing away $$$.  The car is a really nice (to me at least) ride, an Infinity G35 coupe, and I want it to look nice.  If it were one of my off-road vehicles - oh well, some more scratches, but it isn't.

Thanks all for the help, and [member=21249]RKA[/member], if you don't mind, I'm going to learn what I can from you.
 
[attachimg=1]

I would probably start with 40 grit on the rotex and work up to 240 before using a clear coat to keep the natural colours of the wood.
 

Attachments

  • tree fallen on car.jpg.838x0_q67_crop-smart.jpg
    tree fallen on car.jpg.838x0_q67_crop-smart.jpg
    75.5 KB · Views: 940
Sorry for your situation with the tree limb striking your car. I hope you can restore the finish on your own.

I am interested in this thread because I have a serious scratch (at least I think it is) of my own thanks to a shopping mall incident. Came out from a visit to my local Costco to find a ~5 inch long horizontal scratch in the drivers door which just happens to be at the same height as the top a shopping cart that was loitering nearby. Dragging the cart over sure enough it was a match.

My truck is black and the door panels are some type of plastic. The color does not go all the way through the plastic so the scratch shows and since it's the drivers door I see it every time I approach. Truck is a 2012 Raptor and in excellent shape otherwise with no other damage inside or out.

Not wanting to hijack this thread but curious if the same technique can be used to remove this on other than metal door skins or do I need to take it to a body shop and have the door painted. I have heard that black is difficult to match and painting just the door panel will be obvious against the rest of the truck. Don't know if that's true but would like to know if I have a chance of fixing this with some elbow grease/hand work or if it needs a masters touch to make it right.
 
[member=19075]DrD[/member] I'm not familiar with Festool's polishes, but I suspect Menzerna is their OEM.  You can use Festool polishes, but the reason I picked those two out of Menzerna's product line is they can each cover a range from defect removal up to a fine polish and they compliment each other well.  The products also have a long working time which means it's not going to cake up on you creating problems.  It's very user friendly with the only downside being that it works a bit slow (also a good thing as rapid removal brings other dangers for beginners).  If you prefer to stick with Festool, hopefully Bob or someone else can give you guidance and the pads are color coded to the polish, so that's easy. When I get to a computer later this morning, I'll pull up links on a detailing site and post them in case you still want to go that way.  And about the scratches your nail catches on, they might be diminished a little through the process, but they will remain.  Don't try to remove them or you'll burn through your clearcoat.  Focus on cleaning up the areas that your fingernails don't catch and you will be fine.

[member=60461]Bob D.[/member] I'm not clear what you mean by the color not going through the plastic, but odds are it's clear coated, which means the same routine would apply.  Is it shiny or matte finish?  One note about plastic parts is they heat up quickly which isn't good.  This can soften the clear or gum up he polish.  To compensate, turn the polisher down 1-2 notches from each of the settings I previously mentioned.  You can check the surface with your hand, and if it feels warm to he touch, back off on speed, pressure and/or move the polisher faster than 1"/sec.  I'm in central NJ and I would be happy to knock this out for you if you don't want risk it.  It shouldn't take more than 20 mins to clean it up, just bring your favorite wax and I'll do the rest.  But I won't be responsible for he rest of he truck when that panel comes out better than new!  You might be purchasing some detailing supplies when you see how easy it is.

I've been he victim of those costco carts with a 60 mph wind.  The only good thing I can say is they put nice thick plastic bumpers on them to reduce the damage hey inflict, but man can those things carry some inertia.  In my case, no scratches, but the panel had a nice corrugated dent.
 
[member=21249]RKA[/member]

I've think I have found a source for Menzerna polishes, thanks for the heads up.  Now, what about the pads?  Do the pads you mentioned attached to the Rotex?  Where do you recommend getting these pads?

Thanks for your help!

[member=52790]jjowen[/member]

Yup, that'll take some polishing!  Fortunately, we had a glancing blow rather than a direct hit, which is perhaps fortunate for us, as the limb that we had fall was about twice that diameter - from a 200+ year old, 50+ foot oak. 
 
Remember that polishing will remove material. Easy to go too far too fast. For paint I always go easy with hand application first before reevaluating if machine is required. 3M handglaze is a great product and if that doesn't do it then rubbing compound followed up with a good wax like blitz for an every day car. Carcareonline.com is a good place to find products.
 
[member=19075]DrD[/member]
Standard foam pads for auto detailing have velcro backs that should attach to the rotex pad.  I have a dedicated polisher, so I don't use my rotex.  You'll find 6-6.5" pads that should work fine on the 150mm backing plate on the rotex. 

Most of the detailing sites have holiday sales around 10-20% off and free shipping over a certain amount, so adding the polishes into one order for a memorial day sale might work to your advantage.  Get on their mailing list and you'll be notified.  The links below are from one of the larger sites. 

Pads - Order the orange pad for use with the 400 compound and order the white pad for use with the 3500 finishing polish. 
http://www.autogeek.net/lc-ccs-6inch-pads.html

Here is a chart of the Menzerna polishes for reference:
http://www.autogeek.net/menzerna-of-germany.html.

400 compound:
http://www.autogeek.net/menzerna-fast-gloss.html

3500 polish:
http://www.autogeek.net/menzerna-super-nano-polish.html

I've linked to the smallest quantities available (8 oz).  They do have larger, but don't get larger than 16oz unless you plan to do this a lot.  A little goes a long way with this stuff.  Typically, once you have the pad well-primed with polish, you'll use 2-3 nickel size drops per 4 sq ft area. 

You'll also need a pad cleaning brush.  This is nothing more than a stiff bristled nylon brush.  I can't find it on that website, but I'm sure they have it.  You could substitute a scrubbing brush from your local grocery store.  You just want to run it over the face of the pad with the machine running to clear out any dried residue after doing each panel.  The dried polish residue can re-introduce scratches into the paint.  5-8 seconds should do it. 

Regarding the imperial hand glaze, for all purposes, it's not abrasive enough to perform a paint correction.  It does contain fillers to make the paint look shiny and solvents that will cleanse the paint, but that will wash away after the next car wash.  It won't actually fix the problems on the paint surface, you need to remove some clearcoat to fix it.  The products have come a long way in the last 15-20 years.  Prior to that, polishing was achieved with a rotary polisher and a wool pad, which could burn through the clear really quick if you weren't careful.  These remain the mainstay of body shops and car dealers that have to get things done quickly, and you'll often see the holograms left by these machines under full sun, even on a brand new car worked by an experienced detailer (imagine what happens when they hire an inexperienced kid to do the work).  The foam pads, orbitals and superfine abrasives today remove far less material and can jewel the paint to a level you won't achieve with your hands. They have progressed to the point where any DIYer can pick them up and do a fantastic job with a very short learning curve and little risk for damage (meaning you have to try really hard to do damage). 
 
[member=21249]RKA[/member]

Thanks a lot or as we say hear in NE Mississippi, thanks heaps!  I took some photos this morning and will try to post them later today.  It is really raining, so not sure how much the photos will show.  One of my sons is a European car buff and he recommends AmmoNYC.  So, I'm looking up Autogeek and AmmoNYC.

You recommend the orange and white pads, which is great because I saw yellow, orange, blue, white and black pads in Festool catalog - very confusing to me, and their pads alone get close to $500, depending on qty ordered.  I suspect I should need no more than 2 each of the orange and white, correct?  What are your thoughts about the Sheepskin pad?

And, lastly, for now anyway, what about a final, protective coat?

Thanks to all who have contributed!  Any further thoughts/ideas are appreciated.
 
[member=19075]DrD[/member]
Don't go by color across different manufacturers, they are all over the map.  The descriptions generally tell you what they should be used for.  You can break the rules, for instance if I needed a little more cut on a final polish I would step up to a slightly firmer pad, so you can mix and match as needed, but for what you need right now, what I suggested will do fine.  1 pad of each of the two varieties I suggested is enough for this job.  When you're done, wash it with dishwashing detergent, spin it out on the polisher to get the water out and let it air dry really well before stowing. You'll be able to reuse these a lot. 

Sheepskin is too abrasive, skip it.  The foam will do what you need, perhaps with a second application if the first isn't completely successful. 

I've heard of AmmoNYC, but haven't used them.  There are so many niche brands these days it's tough to follow them all.  Menzerna has been a stand out for a very long time.  Recently I tried a CarPro polish (Reflect) which was outstanding, better than Menzerna's equivalent in the sense it worked faster with less residue to clean after, but both could get me to the end result.  That's what I suspect you'll find looking across different quality brands - small differences in usability. 

The protective coat is another can of worms.  Carnauba waxes can't be beat for the shine and gloss.  P21S is one of my favorites going back a number of years.  It doesn't dust or cake into crevices like Blitz wax, very easy to buff off.  Durability sucks though.  Synthetic sealants offered more durability without the same quality shine and gloss from carnaubas.  Menzerna offers powerlock (branded under the name Jescar now) which has been around for a long time - continually improved.  It was good 10 years ago and remains one of my go to's but there are better one's today.  Don't go crazy here, the final coating is just a sacrificial layer.  90% of the shine comes from the polishing and prep you did before the final layer (sound familiar?).  Lately people are migrating to SiO2 and ceramic coatings, which are semi-permanent coatings.  I would put these in a completely different category vs. waxes and sealants because the application and maintenance is a bit different.  Longevity is measured in years typically, but they are tricky to apply and you should not polish the paint afterwards or you'll remove that layer.  I'm just mentioning it so you don't get tripped up when doing your reading.  I think in a few more years they will improve the usabilty of these coatings, right now they are for advanced DIYers and pro detailers. 
 
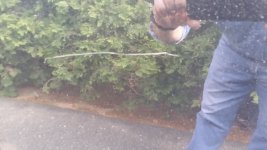
Here is the scratch. About 4 inches long. I can't catch my fingernail in it so is it just the clearcoat?


Attachments

  • 20170504_scratch.jpg
    20170504_scratch.jpg
    301 KB · Views: 355
The camera focused on the shrubs not the scratch, but if your fingernail isn't catching, it's just a surface blemish.  Easy to work out. 
 
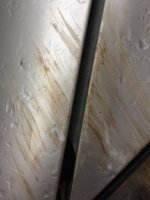
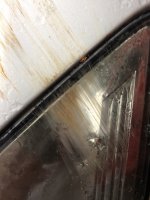
Only 2 came out, and here they are.  Theses are the deepest.  One is of the top/door intersection next to the windshield; the other  shows the scratches going into the head light lens cover.

Thanks for all assistance.
 

Attachments

  • 013b4152ffb2fc8279725c672fa8f32543cddc3315.jpg
    013b4152ffb2fc8279725c672fa8f32543cddc3315.jpg
    808.2 KB · Views: 405
  • 0107542255863bcb813919a5456ac2287b628095bf.jpg
    0107542255863bcb813919a5456ac2287b628095bf.jpg
    738.3 KB · Views: 355
[member=19075]DrD[/member]
I would guess 80-90% of that can be cleaned up.  The deeper stuff will remain, but will be less noticeable.  Take some WD40 on a clean towel and wipe out whatever organic residue you can.  Some of that stuff might have been catching your nail too.  But you need that stuff gone and the paint clean before you tackle it with a polisher. 

The headlight can follow the same advice I gave for plastic painted surfaces above.  If you still have scratches that don't come out, you can wet sand with 500-1000 grit, work your way up to 1500 grit.  I would do the entire light and you will be removing the UV coating by wet sanding the polycarbonate.  Once it's polished up, you will need to add another UV coat to the headlight.  Optimum makes a product called Opti-Lens, but it's a bit pricey at $60-70.  You'll be able to cover about 6 headlights with the kit, so if you have other cars with cloudy headlights, wet sand them down, polish them and line them up!
 
Just a thought, but by the time you buy everything to do the job you could have paid someone to polish it that knows exactly what they are doing. There is a lot to know, speeds, pressure, which polish to use, how fast to keep it moving. If you do want to undertake it watch a bunch of videos from youtube.

 
Back
Top