How to build tree bookcase

ttf5003

Member
Joined
Aug 17, 2015
Messages
63
Hi,

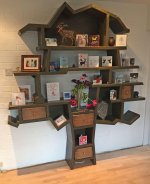
We've got a little boy on the way on March 1st and I want to do something special for the nursery. I like this photo I found online but I'm trying to think of the best way to construct it, specifically all the angled pieces. I'm also thinking about building it into a corner of the room, further complicating things. I know I can use the domino at different angles, but how would you clamp the angled vertical partitions in place?

I guess I could use the Kreg jig as well but I feel they'd be very visible in this application.

Thanks for any ideas. 
[attachimg=1]
 

Attachments

  • tree-bookcase-large.jpg
    tree-bookcase-large.jpg
    80.7 KB · Views: 2,775
If I were going to attempt a bookcase like that I would be using these for clamping this for the odd angles:


Peter
 
I think my first concern, especially with young kids, would be how this would be anchored to the wall. That's a narrow base and a wide top. With young kids (especially when they are learning to stand and walk), I would be worried about it tipping over.
 
[member=56946]ttf5003[/member]

I'd cut the angles with a tablesaw and a sled or miter gauge.  They need to be perfect and the bevel function of most miter saws (including the Kapex) allows for slight deflection in the cut from user applied pressure.  Joinery by domino or perhaps splines.

[member=1674]Peter Halle[/member]

Thanks for pointing out a tool that I don't have.  That's getting harder and harder to do.  I'll be ordering a couple of sets today.

[member=68391]PeterJJames13[/member]

You are spot on with your advice.  Anything like this (including dressers and some appliances) that can tip over on a climbing child needs to be anchored to a wall. 
 
The photo gets a little blurry if you try to blow it up, but it's certainly not fine cabinetry, and looks as if it was made of 2X lumber.
If you break down the assembly, it's basically a number of "horizontal" sub-assemblies joined by vertical members. I would build all the horizontal sub assemblies first, and I'd honestly just look at glued (construction adhesive?) and screwed joints (the screw heads can be covered with face grain plugs) - don't have a feel for the size, but looks as if it could be made from 2X6 stock so you could get 3 screws across the width. When it comes to adding the vertical members, you would have to do a little planning to determine the order as the screws could become inaccessible - definitely would have to pre-drill some of the holes - but it looks doable, with the top assembly being installed last. All screw holes can be plugged and the plugs trimmed and sanded flush before finish.  Draw it up in SketchUp as components, blow it apart and then plan the assembly on paper (screen) before starting.
 
Thanks for the responses by all. I was thinking I could attach everything to a plywood back, and then screw the plywood back to the wall, so no tipping issues.

Good points about it not being fine work. I have so much to do right now it makes it more realistic to build if it's 2x material. Also easier to stomach when the boy outgrows it one day and it's gotta go.

Probably won't be able to start on it before he arrives but I'm still churning it over in mind. Thanks for the ideas.
 
Congratulations!  Will this be your first kid?
Seems like it... lol

I remember when my second kid was on the way I didn't have the same panic I did with the first.

My suggestion is don't build something like that.  Spend the extra time with your wife.  Ask her if there are things she needs built for the nursery.

If you really really really want to build something like that for the nursery you could make all those niches as separate boxes that you mount to the wall.  And have the base of the 'tree' be a little wider and have some drawers.
I like building things but I always try to think of long term.  Build something that he won't outgrow.
If something is worth doing then it's worth doing right, to paraphrase my dad(who got me interested in woodworking).
 
Back
Top