semenza
Member
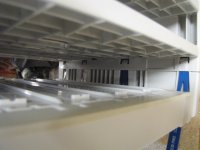
I have found a method by trial and error to completely take apart a Classic type Sortainer in about 15 - 20 minutes (after the first time). This handy if you want reassemble the modular parts into a custom size or drawer configuration. The best access to get started is from the bottom. The best way I have found is to pry the slot portion over the tab end as opposed to pushing the tab down. In the process you might crack one or two. But the plastic is surprisingly strong (I'd avoid doing this in cold environment). Even if one is broken , especially an inner one the reassembled unit will show very little weakness.
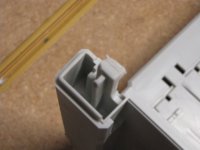
There are two types of tabs that keep these together. The outer tabs (narrower ones) and the inner tabs (wider). The outer tabs have a projection on the back side that keeps them from being pushed down. The inner do not.
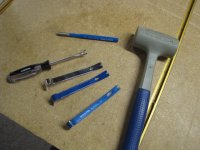
Tools needed - mallet, punch, four small pry bars and or tack pullers, shims, clamps.
[attachimg=1]
Showing outer tab rear projection.
[attachimg=8]
-----------------------------------------------------------------------------------------------------------------------------------------
Two types of tabs.
[attachimg=2]
------------------------------------------------------------------------------------------------------------------------------------------
First use the mallet and punch to give a couple good cracks on each outer tab just to get it started past the slot lip and to weaken the projection on the backside. Even if these projections (not the tab itself) are broken it will reassemble just fine.
[attachimg=3]
------------------------------------------------------------------------------------------------------------------------------------------
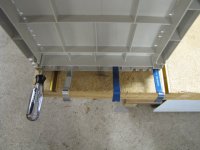
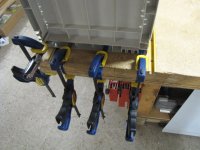
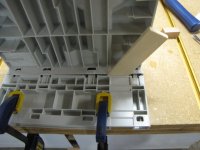
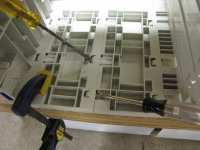
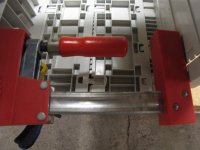
Place the sys on its side with the bottom along the edge of a work bench. Use a clamp to hold the other end (top) down so that it won't move around while working on it. You need to pry all four tabs at the same time. Work them gradually until you can push / pull the tabs out. Might need to give a smack inside the unit with the mallet to get them completely free. Place one pry bar into each opening at the bottom. Use clamps to add force and hold them all at the same time. You will be prying the edge of the slot up so that the tabs can be pulled free.
[attachimg=4] [attachimg=5] [attachimg=6]
----------------------------------------------------------------------------------------------------------------------------------------
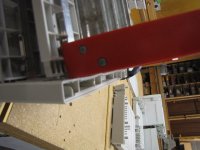
Once you are able to get a tab to start sliding out put a shim in to keep them from reconnecting as you work your way across pulling the others free.
[attachimg=7]
--------------------------------------------------------------------------------------------------------------------------------------------
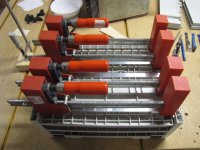
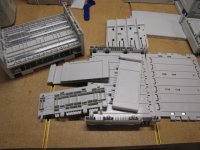
Basically you just repeat this procedure as needed. You can also use the same idea in a slightly different orientation as shown in the pictures below to take apart a center connection if you have access. A clamp turned spreader can be used to help push sections apart too.
[attachimg=9] [attachimg=10] [attachimg=11]
------------------------------------------------------------------------------------------------------------------------------------
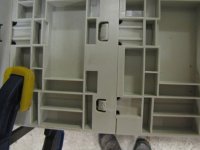
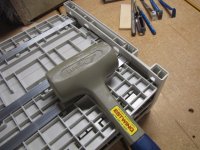
Once you have the bottom off the next procedure is to remove the "shelf" . These are just force fit into the side sections. They are hard to get out but using some clamps as spreaders makes it pretty easy to remove them by pushing the sides apart. Combined with some wacks from the mallet.
[attachimg=12] [attachimg=13] [attachimg=14]
-------------------------------------------------------------------------------------------------------------------------------------------
Depending on the alterations being done you may or may not have to disassemble the whole thing but it can be done pretty quickly once you have done at least once. Putting them back together is a snap and takes only a few minutes.
[attachimg=15]
Seth
There are two types of tabs that keep these together. The outer tabs (narrower ones) and the inner tabs (wider). The outer tabs have a projection on the back side that keeps them from being pushed down. The inner do not.
Tools needed - mallet, punch, four small pry bars and or tack pullers, shims, clamps.
[attachimg=1]
Showing outer tab rear projection.
[attachimg=8]
-----------------------------------------------------------------------------------------------------------------------------------------
Two types of tabs.
[attachimg=2]
------------------------------------------------------------------------------------------------------------------------------------------
First use the mallet and punch to give a couple good cracks on each outer tab just to get it started past the slot lip and to weaken the projection on the backside. Even if these projections (not the tab itself) are broken it will reassemble just fine.
[attachimg=3]
------------------------------------------------------------------------------------------------------------------------------------------
Place the sys on its side with the bottom along the edge of a work bench. Use a clamp to hold the other end (top) down so that it won't move around while working on it. You need to pry all four tabs at the same time. Work them gradually until you can push / pull the tabs out. Might need to give a smack inside the unit with the mallet to get them completely free. Place one pry bar into each opening at the bottom. Use clamps to add force and hold them all at the same time. You will be prying the edge of the slot up so that the tabs can be pulled free.
[attachimg=4] [attachimg=5] [attachimg=6]
----------------------------------------------------------------------------------------------------------------------------------------
Once you are able to get a tab to start sliding out put a shim in to keep them from reconnecting as you work your way across pulling the others free.
[attachimg=7]
--------------------------------------------------------------------------------------------------------------------------------------------
Basically you just repeat this procedure as needed. You can also use the same idea in a slightly different orientation as shown in the pictures below to take apart a center connection if you have access. A clamp turned spreader can be used to help push sections apart too.
[attachimg=9] [attachimg=10] [attachimg=11]
------------------------------------------------------------------------------------------------------------------------------------
Once you have the bottom off the next procedure is to remove the "shelf" . These are just force fit into the side sections. They are hard to get out but using some clamps as spreaders makes it pretty easy to remove them by pushing the sides apart. Combined with some wacks from the mallet.
[attachimg=12] [attachimg=13] [attachimg=14]
-------------------------------------------------------------------------------------------------------------------------------------------
Depending on the alterations being done you may or may not have to disassemble the whole thing but it can be done pretty quickly once you have done at least once. Putting them back together is a snap and takes only a few minutes.
[attachimg=15]
Seth
Attachments
-
 IMG_5970.JPG126.2 KB · Views: 4,077
 -
 IMG_5955.JPG85.2 KB · Views: 3,986
 -
 IMG_5972.JPG103.7 KB · Views: 4,041
 -
 IMG_5968.JPG99.8 KB · Views: 3,936
 -
 IMG_5971.JPG116.5 KB · Views: 3,973
 -
 IMG_5969.JPG76.8 KB · Views: 3,895
 -
 IMG_5965.JPG102.1 KB · Views: 3,980
 -
 IMG_5962.JPG72.7 KB · Views: 4,011
 -
 IMG_5959.JPG109.5 KB · Views: 4,003
 -
 IMG_5958.JPG99.8 KB · Views: 3,885
 -
 IMG_5960.JPG96.5 KB · Views: 3,897
 -
 IMG_5975.JPG125.6 KB · Views: 3,870
 -
 IMG_5976.JPG98.2 KB · Views: 3,875
 -
 IMG_5979.JPG128.3 KB · Views: 3,889
 -
 IMG_5980.JPG115.2 KB · Views: 3,867