How to save early 90's Redwood decking?? - Rotting framing, rusting screws stuck

Vtshopdog

Member
Joined
Aug 30, 2018
Messages
325
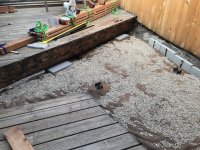
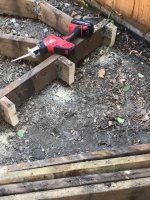
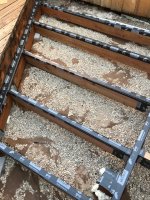
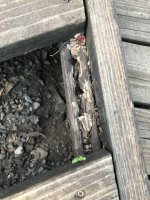
The framing on my early 90's Redwood deck is rotting.  It is near ground and I have no access to framing from below.  The redwood itself is 2x6 old school really good stuff, almost clear, knot free and totally worth saving.  One cannot easily buy this kind of Redwood today.  Have been avoiding/ignoring issue for a few years, but plan to have at it late August once it cools down a bit here.

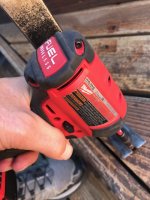
The plan is to remove decking and plane it down about 1/4", but (there's always a "but" with remodel projects) the old yellow zinc screws are toast and don't want to come out.  I'm not dealing with bit spinning and stripping screw heads, but screws breaking in place.

I did a quick test on 6 screws with my impact driver:
1 screw I stripped the head.
1 screw backed out around 1.5" then snapped.
4 screws simply turn in the wood without backing out.  These likely fractured and shanks are imbedded in redwood or possibly threads have no purchase in the rotting wood and can't push the shanks up.  If they fractured then sound of impact masked the snap.  Right now it's very hot and dry here so I will try getting the wood to higher moisture and see if screws might come out easier, but that's doubtful.

I can go at this with a sawzall and pull deck/framing sections to get access from below to remove decking from framing, but I assume I will end up with lots of busted screws imbedded in the Redwood and will need a way to get them out before planing and reinstalling the deck on new framing. 

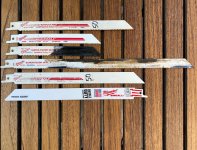
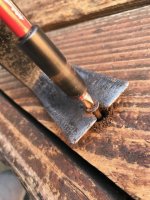
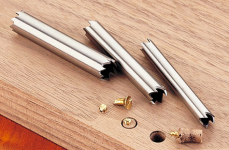
Best option I can come up is a hollow screw extractor (see photo) followed by some sort of plug repair before planing, but we're talking hundreds of holes and my experience is the hollow extractors are kind of fragile.  This will be beyond tedious, but I can go there if needed.

Anybody have better ideas for getting screws out intact or a better way to extract busted remnants??
 

Attachments

  • Screen Shot 2020-07-14 at 1.42.13 PM.png
    Screen Shot 2020-07-14 at 1.42.13 PM.png
    283.3 KB · Views: 370
Hi,

You could try heating a screw with a soldering iron for about one minute and then unscrew it. It's a trick restorers/conservators use on old furniture. Heat softens the lignin and that frees the screw.

Careful not to keep it on too long, or it will burn the wood.

If that works, it might be the solution you're looking for.

Those that turn freely, carefully lift the head a little with a small pry bar and unscrew with pliers.

Kind regards,
Oliver
 
Thanks for suggestion Oliver, I’ll give it a try (but not with my good Hakko!!)  Burning the wood won’t be an issue since I will plane once removed.

I ran a bike & ski shop for 30+ years, stripped, busted, frozen screws were semi daily event year round and we frequently used heat gun and/or torch to free things up, but never a soldering iron.  (You haven’t lived until you extract a seized titanium bolt galvanicly corroded to an alloy fitting in somebody’s $8k carbon bike)

For near term, plan is to try test extractions with any and all methods suggested here.  Your idea got me thinking that if issue is screw shafts are bonded to wood I might try drilling a couple small port holes to apply some penetrating oil on a screw or two plus maybe heat them too.
(In other words, I’m desperate!!)
 
Another option, get one of the big wrecking bars that has a fork that fits around the joist so you can lever the redwood plank up and keep the screw intact.

Then turn the plank over and heat the protruding rusty screw with a propane torch until you get a little smoke and then give it a whack with a hammer. Another option is to grab the screw with a vice-grip plier and crank it. The idea is that you’ll crumble the wood around the screw shank so after turning the plank over again you can try the screw gun again. It might be better to let the screws in one plank cool down and shrink before trying to unscrew them.

If the screw gun doesn’t work stand the plank on an edge and use the hammer until you get the head far enough above the surface to fit a pry bar. Use a wide putty knife under the pry bar to protect the wood surface.

You’ll probably only need to take off an eighth inch.
 
My redwood deck is far older than that, and I too had to rebuild parts of my structure and replace about 200SF of redwood decking, but I have access. Trying to save boards is not easy, since redwood is so soft.

Assuming the screws are straight up rusted out, I would just try to remove as many as possible, then pry the rest of the redwood boards off of the pressure treated wood, and address them once removed. There is a point where board replacement is needed. Stainless is the best hardware for pressure treated wood.
 
Vtshopdog said:
4 screws simply turn in the wood without backing out. 
This suggests pry/wrecking bar or thin wedge: 4 out of 6 would simply pull out from the frame.
Heating each screw on a deck with soldering iron for a minute?  [scratch chin] Let us now how it's going in about two years ...  [big grin]
 
Svar said:
This suggests pry/wrecking bar or thin wedge: 4 out of 6 would simply pull out from the frame.
Heating each screw on a deck with soldering iron for a minute?  [scratch chin] Let us now how it's going in about two years ...  [big grin]
That made me laugh!

In meantime I made an extra espresso after lunch, wandered out on my deck in flip flops with intention of trying to remove a couple screws just to see what's going on and proceeded to extract an 8' segment of decking. First piece was very slow going but now that it's opened up will be easier.  Much of the framing is surprisingly intact.  Screws are mostly fracturing at deck/joist interface and bottom halves stay put and are basically welded to the framing.  Top halves seem to be severely corroded within the Redwood and very loose once removed from framing so my fear of having a bunch of busted up screws imbedded in the deck planks is unfounded.

Demolition job should involve a prybar, sawzall, dust masks and some unknown quantity of beer....
 
Wait, if it is just the screws failing why would you demo the deck at all? If it were me, and I did just this on my own deck in places where the nails were loose, was to drive new screws at odd angles into the framing. Pre-drill and drive some long screws in. Might as well just use coated steel deck screws with a torx head. If plugging the holes after is your thing, go for it.

The big question that I should have asked in my first post...is the deck painted? What kind of finish does it have? My deck was already painted when I bought the house so putting more holes in is a non issue, as I needed to paint after installing so many new boards anyhow.
 
I'd approach this issue by removing 3-4 decking boards in succession and if the redwood boards become trashed...so be it. Then with a Sawzall and a long, thin, flexible blade with minimum tooth offset, just go down the structural support and run the Sawzall blade between the decking board and the treated structure. You'll shear all the screws, probably save the treated sub structure and you'll still have hundreds of red wood decking boards that you can eventually salvage over many years of retirement.  [big grin]

Look for earlier Milwaukee Sawzall blades that were longer and had a thinner blade thickness and also a smaller tooth offset.
 
I would get a couple of boards up by whatever means, and continue using a reciprocating saw, to cut between joist and board, severing the screws.
The remains of the screw in the deck board could be punched out easily from the underside.
The joists could be removed, and any rot and screw remains could be removed running them through a band saw with bi-metal blade.

They could then be treated, and re-installed upside down.

This is a fair bit of work but, probably quicker than messing with screws, and a lot less tedious.

We have taken a few decks up, and just spun the joists over, as the customers didn’t want the expense of us tidying them up, even doing this, will give many years of life, depending on the extent of rot.

We installed a deck last year, it had aluminium posts, aluminium joists, and composite deck boards. It was finished with glass balustrades and looked really nice and contemporary but, didn’t have the character of tradition decking, and would only suit certain properties.
One thing’s for sure, it won’t rot in a very long time.
However, it did cost an absolute fortune.

I’m told they are developing composite joists and posts now. I still like a tradition deck but, not the rot or maintenance.
 
I probably should have written that "some of the joists" were in good condition.  Many are not, (see photo)

I think the general plan of pry bar + sawzall will work fine, then sanding with 40 or 60g to try and spare my planer the inevitable  imbedded dirt and rocks. (I have a Cutech with nice segmented carbide blades, probably worth it to buy a cheaper set of HSS inserts and trash those instead of the carbide)  Also power washing at some point.

Thanks all
 

Attachments

  • IMG_5322.jpeg
    IMG_5322.jpeg
    130.3 KB · Views: 484
I pulled up a old growth clear read wood deck that was nailed down.  Just used a nail puller, wrecking top side, thinking I’d flip boards and plane staining from joists on bottom side.  I ended up not using the decking.  The problem for me, the deck was framed 16” o.c. Sort of.  So trying to match up holes and new framing was not worth the trouble.  Once you trim ends it throws everything off more.  Plus the nails were often staggered in joist. 

Maybe you’re not going to try and use same holes?  It looks like your decking is 2X6?  Depending how it was screwed/nailed down, Maybe cut off nailed sides and use the wood between the nails?  Maybe end up with 3”+ wide boards?  Either way, tons of work vs new decking.

I still have my decking I took off stored under my house. ;)

Use some sort of peel and seal on top of new deck framing.
 
Here's a photo of the style of Sawzall blades I was talking about. The first 4 blades are 5/8" wide and only .040" thick. The last 2 blades are 3/4" wide and are also .040" thick.

They're very flexible especially the 12" long version. Once you've removed several deck boards it will be very easy to slip the 12" blade between the deck board and the support structure and cut the screws. There will be very little damage to the support structure.

[attachimg=1]
 

Attachments

  • 9191.jpg
    9191.jpg
    620 KB · Views: 1,521
I’m with Cheese on this, as it’s probably the quickest and most efficient way of dismantling the decking.

Once all your boards are up, you will be in a better position to decide how to go forward. Are there any support posts in the structure, if so, and they’re shot it throws another spanner in the works.
 
So the weather turned nice and this project is now underway.  First up a picture of a giant tree in Redwood National Park.  I've been lucky enough to visit various Redwood groves over the decades and this shot was from a trip a few years ago. 

What I'm doing on this project does not make sense from work or cost efficiency standpoint, I simply love these trees and am trying to have a go at saving some 30 year old wood.  This tree is near Lady Bird Johnson grove and likely close to 300' tall (impossible to photograph!!)

[attachimg=7]

The deck is about 30 years old and has 4 elevations.  I making a trial run on this smaller section as underlying framing is more rotted than the other sections. General plan is pull Redwood, replace framing, drill out screw holes in redwood, fill holes with plugs and then plane down the decking to have some sort of reclaimed semi new looking surface. I'm embracing the reclaimed vintage look and fully expect the plugs to show and some wear to be visible.  If this trial section goes well and decking holds up over the winter I will proceed with the bigger section at a later time.

Decking Removal:
As anticipated I had lots of broken screws imbedded in the R-wood.  Roughly 40% of the screws came out intact with some massaging with my Milwaukee Fuel impact.  This is the hydraulic drive unit and I was really happy with the control and torque.  Some of the screws needed help with a pry bar while turning with the impact. All the others broke near bottom of decking and I gently pounded them out from the bottom with a nail set.  In general, pry bar and cold beverage were my best friends spread out over several evenings.

[attachimg=2]
[attachimg=3]

Crunky Framinig Removal:
Half an hour tops, never even got out my corded Sawzall, did everything with Hackzall

[attachimg=4]

Fixing Rusty Post Bases:
Wire brush, Naval Jelly, some rust stopping primer, self etching primer and a top coat;

Before:
[attachimg=5]

After:
[attachimg=6]

Site prepped and ready for framing:
Spread a bit of pea gravel over permeable landscape fabric.  Figure it will keep a bit of mud away from the new framing

Next up will be sanding, plugging and milling the Redwood plus replacing framing.


Attachments

  • IMG_3344.jpeg
    IMG_3344.jpeg
    171.1 KB · Views: 1,392
  • IMG_5480.jpeg
    IMG_5480.jpeg
    189.6 KB · Views: 1,376
  • IMG_5481.jpeg
    IMG_5481.jpeg
    126.1 KB · Views: 1,377
  • IMG_5465.jpeg
    IMG_5465.jpeg
    169.6 KB · Views: 1,376
  • IMG_5462.jpeg
    IMG_5462.jpeg
    190 KB · Views: 1,363
  • IMG_5427.jpeg
    IMG_5427.jpeg
    140.3 KB · Views: 1,357
  • IMG_5428.jpeg
    IMG_5428.jpeg
    120.5 KB · Views: 320
Finish line in sight, but first sharing some links regarding fastener corrosion in treated wood.  Wanted to apply a joist tape product to protect tops of my framing from water damage, but in searching learned that it's also beneficial to use this tape to isolate hangers from treated wood by wrapping treated joists at any contact points with steel hangers. The stuff is basically roofing snow and ice shield in 4' wide rolls.  Besides protecting from water and insulating the hangers it seals fastener penetration points and generally slows the whole framing process down quite a bit (I think I spent almost as much time futzing with the tape as cutting and nailing the wood)

I haven't done framing for maybe 15 years and I didn't know that there are heavy duty galvanized hangers (designated "Z-Max" in Simpson Strong Tie world) for use with modern treated lumber.  I likely would have just used standard hangers to detriment of my project's durability.  BTW, ground contact treated wood was really hard to find in my town, another Covid shortage thing, go figure.

Here's a link to Vycor deck tape:https://gcpat.com/en/solutions/products/vycor-weather-barrier-flashing-tapes/vycor-deck-protector
Vycor installer's guide:https://www.powerhousebuildingsolut... Protector Installation Contractors Guide.pdf

Simpson Strong Tie Link (lot's of stuff here)https://www.strongtie.com/products/...ormation/materials-and-coatings-for-fasteners

Really good deck fastener article link (this is where I first got a clue about treated wood and corrosion)https://buildingadvisor.com/materials/decks-porches/deck-fasteners-connectors/

Last a couple photos of my framing. Project is pretty much done and redwood reclaimed better than I expected.  Will post some photos of that process later.

Hangers with deck tape and HDG fasteners

[attachimg=1]

[attachimg=2]
 

Attachments

  • IMG_5503.jpeg
    IMG_5503.jpeg
    135.5 KB · Views: 1,278
  • IMG_5502.jpeg
    IMG_5502.jpeg
    179 KB · Views: 1,275
My days of doing redwood deck and siding replacement ended when we sold our vacation/rental home on the Northern California coast. I loved the redwood; didn’t love trying to match up the old dimension siding with the new smaller dimensioned but called the same size. And as OP said, the new stuff is also of inferior quality.
 
That's coming along nicely. [smile]

The Vycor tape doesn't appear to be as thick as regular adhesive flashing...and that's a good thing for this application.

I'll be interested in seeing the finished deck boards.
 
Cheese said:
I'd approach this issue by removing 3-4 decking boards in succession and if the redwood boards become trashed...so be it. Then with a Sawzall and a long, thin, flexible blade with minimum tooth offset, just go down the structural support and run the Sawzall blade between the decking board and the treated structure. You'll shear all the screws, probably save the treated sub structure and you'll still have hundreds of red wood decking boards that you can eventually salvage over many years of retirement.  [big grin]

Look for earlier Milwaukee Sawzall blades that were longer and had a thinner blade thickness and also a smaller tooth offset.
 

But don't even think of running the boards through a planer!  [scared]
 
Back
Top