Grasshopper
Member
- Joined
- Oct 6, 2014
- Messages
- 595
I am in the process of building out craftsman style headers, and have one odd little hallway where three headers will converge.
To try and make it as seamless and simple as possible, I was thinking about building all 3 headers separately, but fully assembled. I'd leave the inside corner long, and dial the angle in and cut the entire header "on the flat" using my Kapex as it it were a large baseboard (being careful not to have any nails near where I'd be cutting on the inside corners).
Typically, I'd want to cope the inside corners which is an option if I wanted to butt the middle header, and cope the inside corner on both sides. I'm not sure how easy that would be with the profile.
Originally, I was going to build everything in place piece by piece, but I worry it will not look as seamless as if I did each header separate on the ground, and joined it in place.
How would you approach this?
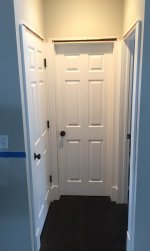
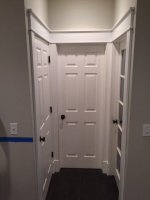
See photo of existing hallway with casing and plinths installed (I joined the plinths using butt joints and dominos to ensure a 90 degree corner and butted the casings together, shimming to match the 90 degree corner on the plinths):
[attachimg=2]
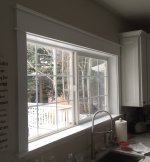
See example of header I'll be adding (1x6 frieze board, with a small stop piece on the bottom and a 1x2 on top with an eased edge):
[attachimg=3]
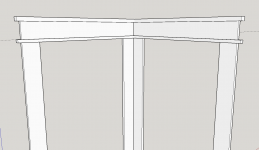
See sketch of how I envision the headers coming together in a seamless fashion on the inside corners:
[attachimg=1]
Ok, now how would you join the headers? ;D
To try and make it as seamless and simple as possible, I was thinking about building all 3 headers separately, but fully assembled. I'd leave the inside corner long, and dial the angle in and cut the entire header "on the flat" using my Kapex as it it were a large baseboard (being careful not to have any nails near where I'd be cutting on the inside corners).
Typically, I'd want to cope the inside corners which is an option if I wanted to butt the middle header, and cope the inside corner on both sides. I'm not sure how easy that would be with the profile.
Originally, I was going to build everything in place piece by piece, but I worry it will not look as seamless as if I did each header separate on the ground, and joined it in place.
How would you approach this?
See photo of existing hallway with casing and plinths installed (I joined the plinths using butt joints and dominos to ensure a 90 degree corner and butted the casings together, shimming to match the 90 degree corner on the plinths):
[attachimg=2]
See example of header I'll be adding (1x6 frieze board, with a small stop piece on the bottom and a 1x2 on top with an eased edge):
[attachimg=3]
See sketch of how I envision the headers coming together in a seamless fashion on the inside corners:
[attachimg=1]
Ok, now how would you join the headers? ;D