How would you patch this bathroom vent opening difference?

squall_line

Member
Joined
Feb 17, 2021
Messages
2,921
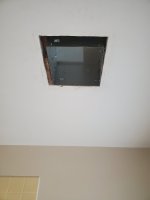
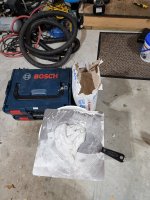
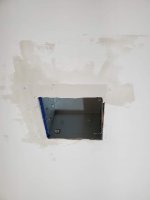
Long story short, I'm replacing the vent fan in our bathroom after the new bath and shower were put in.

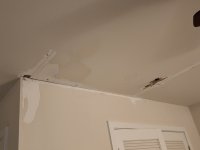
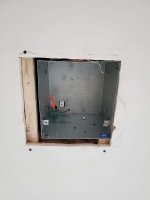
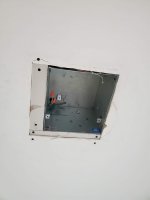
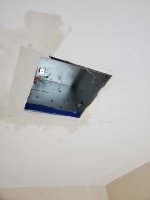
The new fan box is about 2" shorter in one dimension and 1" shorter in the other dimension, leaving an L-shaped gap around the fan.  I dry-fitted the plate and it definitely doesn't cover the opening, besides all of the cold air spilling down from the attic.

[attachimg=1]

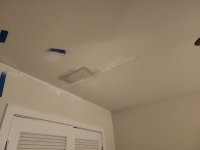
My current plan is to buy a 24"x24" drywall "patch" and cut it to shape/size (maybe slightly under-sized).  Then screw two pieces of lath/strapping/furring strips inside the attic but through the ceiling as a backer that I can screw the drywall patch to, and then mesh tape and mud the whole kit-n-kaboodle (this is how those "This Old House" guys showed it for square openings, at least).

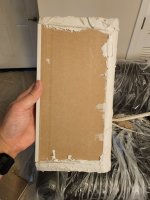
My main concern is that the current ceiling is 3/8" drywall, wire mesh lath, then 3/8" plaster, for a total thickness ranging from 3/4"-7/8".  I don't know if I need to get 1/2" and 1/4" drywall both, to compensate, or if I should use furring strips to compensate, or what.  I definitely don't want to build up 1/8"-1/4" of joint compound just to make up the thickness.

Thoughts?
 

Attachments

  • 20221129_192319.jpg
    20221129_192319.jpg
    131.4 KB · Views: 397
You could do this a number of ways.  I've filled 2" gaps with 20 minute setting compound and it holds up ok. It just takes a while and uses a fair bit of mud.

Another approach would be to screw a backer behind the gaps (1 x 2 would work well here) and then screw some 5/8 against that.  Then lay on a heavy coat or two of 20 minute durabond or ez sand to bring it just flush with the surrounding ceiling, maybe a little under..  Paper tape that and a couple wide coats to feather it in to the existing ceiling. I'd use 20 minute for tapping and feathering it, and use AP or topping for the final coat.  Sand, prime, point up, spot prime, and a couple coats of paint on the whole ceiling should make it disappear.

Be sure to use a good light while sanding.  When you go to paint it, it will make all the difference.
 
Or apply a wide trim with mitered corners.  I cannot tell how much you have to cover from the image.  But if it is about 3” or so, then make the trim as a frame, all glued and ready to put up.  Use construction adhesive. 

If you do a tidy job it will look intentional and not as a patch. 

Patching drywall is not difficult, but the repair extends over 3 or 4 days pretty much like taping drywall does.  My experience is that if you try to condense the process the results are less satisfactory.
 
I would definitely use a setting compound rather than the pre-mixed normal evaporation-type stuff. I find it to be much easier to control because it acts much more like a 2-part body-filler. You can continue to work with it right up to the point where it locks up. The regular drying stuff, not so much, plus it's a lot slower to dry.
 
I'd want some backer board.  You can probably CA glue it in place using an activator if you don't have room to screw it in.  Then I see a trick where they cut the circle, rectangle in this case, and leave the paper longer than the main drywall section which then gets mudded down and feathered out.  I'm not a pro but seems that's how I'd do it to avoid lines or it being susceptible to cracks.
 
I'm a far cry from a drywall expert, but this past spring I did a drywall patch with EZ Sand 45 after the dishwasher solenoid valve leaked.  I used EZ Sand 45 for my application:

[attachimg=1]

[attachimg=2]

[attachimg=3]

[attachimg=4]

[attachimg=5]

For your situation, I think I'd go with the thinner drywall and then use a setting mud (hot mud) like EZ Sand 20 or 45 to pre-fill/build up.

I purchased these drywall clips for a potential future project, but haven't used them yet.  Maybe you could use these in conjunction with a California patch approach for your scenario.
 

Attachments

  • 20220508_103649.jpg
    20220508_103649.jpg
    159 KB · Views: 280
  • 20220504_134813.jpg
    20220504_134813.jpg
    216.8 KB · Views: 278
  • 20220504_133946.jpg
    20220504_133946.jpg
    338.9 KB · Views: 286
  • 20220504_133631.jpg
    20220504_133631.jpg
    658.9 KB · Views: 283
  • 20220503_140529.jpg
    20220503_140529.jpg
    163.3 KB · Views: 282
Thank you all for the suggestions!

I ended up going with the 1x2 backer,

[attachimg=1]

5/8 drywall (what a horrific mess to cut it in 1" and 2" narrow strips),

[attachimg=2]

and regular compound in a tub.

[attachimg=3]
[attachimg=4]

If I had it to do again (or the next time I have to do it), I'll buy the 20-minute or 45-minute mix and mix it myself; I was too nervous and lazy to try mixing my own mud.

Speaking of lazy (or overkill), I wanted to practice using my new DWC 18-4500, so I busted that out for the 7 screws I had to drive.  I think I used more screws practicing than I did on the actual project.  That's also how I found out that my Recon DWC had the wrong bit holder in the Systainer for use with the Depth Stop Chuck, as it left all screws at least 1/4" proud, even at its deepest setting.  I've already submitted that info to the fine folks in Lebanon to rectify...

At the depth I had to fill and with the lower temps in that room, it took the better part of 48 hours to dry all the way through.

First sanding was last night with an ETS125 and CT-MIDI-I, and applied a second coat to level it all out.  The STL-450 came in really handy as a raking light (go figure).  Although, to be honest, the regular Sys-Lite KAL II does a pretty good job all on its own.

Thanks again, everyone!
 

Attachments

  • 20221203_150014.jpg
    20221203_150014.jpg
    93 KB · Views: 231
  • 20221203_150232.jpg
    20221203_150232.jpg
    85.5 KB · Views: 211
  • 20221203_163046.jpg
    20221203_163046.jpg
    71.6 KB · Views: 241
  • 20221203_163058.jpg
    20221203_163058.jpg
    85.2 KB · Views: 228
Unless you've got a lot of experience with it, getting that last application of setting compound really smooth is very difficult. Far more forgiving to go with the pre-mixed stuff for smaller projects that you aren't in an enormous hurry on.
 
Lincoln said:
No tape on the joints?

In retrospect, I could/should have taped them.

This work will be 90% covered by the fan and shroud once it's installed, but I needed the air seal/insulation catch just as much as I needed to not see a gap when the fan was up.

Honestly, if you saw any of the plaster ceilings in this house with a raking light, I could do some of this work with my eyes closed and it would be nearly impossible to discern from existing age/stress cracks and bows and waves.
 
Were it me I would cut out a larger area of the existing drywall and use a large piece that you can precut to the size of the vent. I am not great at drywall so simplifying that patch works best for me.
 
If this were purely drywall, I may have considered it.  Unfortunately, it's drywall, metal lath, and plaster.  The last time I watched someone deal with cutting it was my father-in-law working on his mother-in-law's house, and it was misery on top of misery.  The contractors that took out the tub and replaced the tile weren't particularly fond of working with it, either.

Add to that the patch being in the ceiling, the insanity of mounting the new fan housing, and the vast amount of insulation that has already fallen into the bathroom, and I was ready for this part of the project to be done.  I still have to go back up in the attic (for what feels like the fiftieth time) and decipher the rat's nest of wiring so that I can pull a length of 14/2/2 to separate the light, fan, and night light.
 
Looks like the repair job is coming along well.  I've glued strips of plasterboard inside opening using PU glue and quick clamps.  Then glued more plasterboard to those strips, using PU glue.  A quick sand with the rotex will get everything nice and smooth.

If you repositioned the fan box so it was central in the opening, could you have used PU foam to fill the gap, then skim with plaster.  It sounds as though the fan cover was almost big enough to hide the repair.

Regards
Bob
 
Back
Top