RockstarRemodel
Member
- Joined
- Nov 3, 2015
- Messages
- 23
Hey FOG,
Long time Festool fan, short time FOG lurker, first time poster.
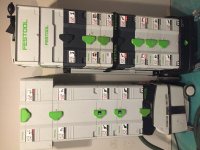
I just went through the process of labeling all of my systainers. I've won a few empties and bought a few for other brand tools, and I was tired of seeing my sharpie scribbles of whatever the tool was.
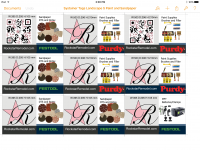
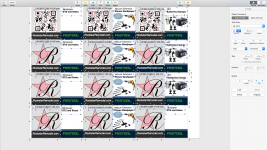
I took Festool's templates (https://www.festool.com/Service/systainer-labels), dropped them right into Pages on my Mac, and added tool art work and text to match the look and feel of the factory labels. (I have some tricks to make this easier if you'd like, just ask in the replies)
I added the dimensions of the systainers to the top of the label for reference if I'm using them as lumber support. Per systainer, 3 of the 4 have my logo and one has a QR code.
It took a while to find the card stock I wanted to use for this. I called around and looked online to order plastic cards, but they all wanted to do large runs of a single image. I looked for printable plastic but mostly those were for laser printers, or transparencies for projectors and too flimsy. Eventually I looked up "waterproof paper" and found my solution. I got a 10 pack of this: Inkjet Teslin Synthetic Paper - 10 Sheetshttps://www.amazon.com/dp/B004PX7ZTC/ref=cm_sw_r_cp_awd_CZk4wb1GET0VW
It's only 10 mil so it's still a little flimsy, and would pop out if I slammed the systainers closed, so I used double stick Scotch tape on the top and bottom.
I love them. I feel a lot more professional and orderly. No more grabbing the wrong white box!
Thanks for reading and I hope you enjoyed.
View attachment 1
View attachment 2
Long time Festool fan, short time FOG lurker, first time poster.
I just went through the process of labeling all of my systainers. I've won a few empties and bought a few for other brand tools, and I was tired of seeing my sharpie scribbles of whatever the tool was.
I took Festool's templates (https://www.festool.com/Service/systainer-labels), dropped them right into Pages on my Mac, and added tool art work and text to match the look and feel of the factory labels. (I have some tricks to make this easier if you'd like, just ask in the replies)
I added the dimensions of the systainers to the top of the label for reference if I'm using them as lumber support. Per systainer, 3 of the 4 have my logo and one has a QR code.
It took a while to find the card stock I wanted to use for this. I called around and looked online to order plastic cards, but they all wanted to do large runs of a single image. I looked for printable plastic but mostly those were for laser printers, or transparencies for projectors and too flimsy. Eventually I looked up "waterproof paper" and found my solution. I got a 10 pack of this: Inkjet Teslin Synthetic Paper - 10 Sheetshttps://www.amazon.com/dp/B004PX7ZTC/ref=cm_sw_r_cp_awd_CZk4wb1GET0VW
It's only 10 mil so it's still a little flimsy, and would pop out if I slammed the systainers closed, so I used double stick Scotch tape on the top and bottom.
I love them. I feel a lot more professional and orderly. No more grabbing the wrong white box!
Thanks for reading and I hope you enjoyed.
View attachment 1
View attachment 2