boycabdesign
Member
- Joined
- Oct 13, 2024
- Messages
- 5
HEY THERE!
I am a long-time reader and first-time poster to these forums.
I have seen so many cool innovations from the creative minds of Festool Users around the world and I gotta say... it has been truly inspiring for a young maker.
Today I am hoping to show my design for a 3D-Printed Track Saw Guide Rail Hinge.
A little bit of backstory...
I bought my track saw around 2-3 years ago now and, since that time, I have noticed one glaring drawback. While the first cut always seems to go well, I always run into issues when trying to make repeat cuts on my track saw. After unclamping, adjusting my work piece, placing the rail into position, and reclamping, I always seem to introduce a slight amount of error which definitely compounds over the course of multiple cuts.
I have seen metal guide rail hinges and I really wanted one, but couldn't justify the cost as I wasn't making income from my hobby. To combat this, I looked at alternative options. I quickly found Peter Millard's Guide Rail Hinge and built it. Honestly one of the best affordable options out there, but I wanted additional functionality as well as something that looked good too. I saw Lukeinthegarage's 3D-Printed Guide Rail Hinge, which definitely had a fun design and was plenty sturdy, but it didn't sit at the right height for my MFT setup.
At this point, I came to the conclusion that the only way to be certain I got everything I wanted in a Guide Rail Hinge was to just design my own. So... with zero prior experience in 3d design, I felt I was capable to taking on this task haha.
Over the course of the next several months, I made prototypes, revised designs, figured out tolerances, and taught myself a bit about modern design. The culmination of my efforts was a Track Saw Guide Rail Hinge that I am really proud of. So without any further fanfare, I would love to show off my take on a Track Saw Guide Rail Hinge.
View attachment 1
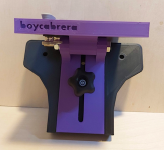
this is my original attempt. it is quite plain in comparison and it is not reversible
View attachment 2
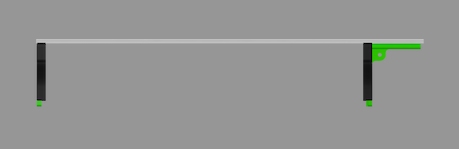
this is a Shapr3D rendering showing the type of Hinge I wanted to create
View attachment 3
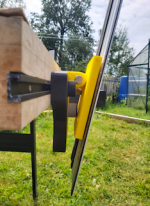
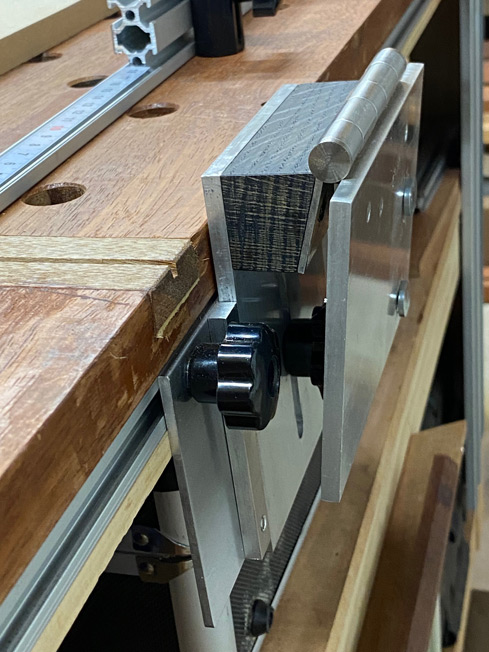
this would be the End Acceptor to secure the opposite end of the Guide Rail
View attachment 4
when combined with a Guide Rail
View attachment 5
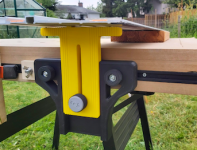
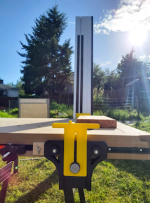
here is the Guide Rail Hinge in its upright position!
View attachment 6
this is the view head-on
View attachment 7
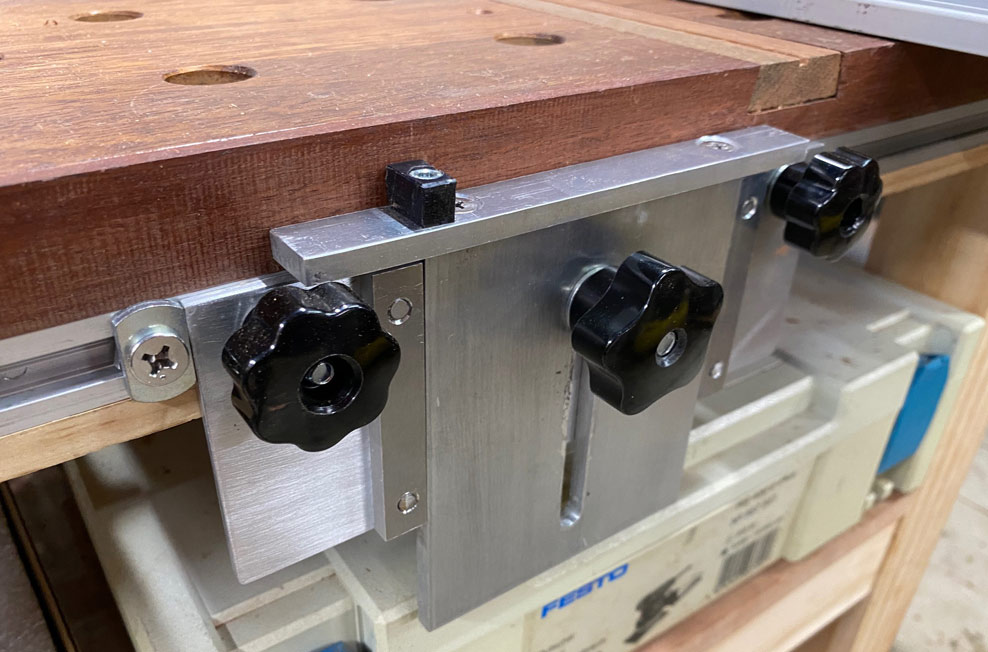
here is the End Acceptor mounted to my MFT
View attachment 8
Aaaand one of the entire set up!
So as you can see, this design works really well and I have made several upgrades to it to increase functionality.
The main revision I made was to make my design Reversible. On the Hinge, this was achieved by first removing the alignment channel at the top of the Hinge Top. After removing it I added extra holes in the middle and at the far side. Likewise, I also introduced a mirrored design on the End Acceptor. The result of these additions/subtractions was a Guide Rail Hinge that could hold a guide rail in any orientation. This essentially means you can secure your Rail to cut on the left OR the right side of the Hinge. This is crucial as not everyone has the same setup as myself. Some people want the Hinge to flip up and away, rather than up and towards the user.
I also added a second hole in the back-middle, which would allow users to gain approximately an extra inch in height when fully raised. The original hole was definitely sufficient, but someone asked how they could make cuts on oversized workpieces.
Unlike many other Guide Rail Hinges, mine features wings on either side of the Hinge's sliding piece. This increases stability and allows for smooth raising/lowering of the Guide Rail.
As a new forum member, I would love to make some friends, hear your feedback, and see what I can improve on. I would love to make this Guide Rail Hinge as packed with features as possible.
Wishing you all the best!
Milton (boycabrera)
I am a long-time reader and first-time poster to these forums.
I have seen so many cool innovations from the creative minds of Festool Users around the world and I gotta say... it has been truly inspiring for a young maker.
Today I am hoping to show my design for a 3D-Printed Track Saw Guide Rail Hinge.
A little bit of backstory...
I bought my track saw around 2-3 years ago now and, since that time, I have noticed one glaring drawback. While the first cut always seems to go well, I always run into issues when trying to make repeat cuts on my track saw. After unclamping, adjusting my work piece, placing the rail into position, and reclamping, I always seem to introduce a slight amount of error which definitely compounds over the course of multiple cuts.
I have seen metal guide rail hinges and I really wanted one, but couldn't justify the cost as I wasn't making income from my hobby. To combat this, I looked at alternative options. I quickly found Peter Millard's Guide Rail Hinge and built it. Honestly one of the best affordable options out there, but I wanted additional functionality as well as something that looked good too. I saw Lukeinthegarage's 3D-Printed Guide Rail Hinge, which definitely had a fun design and was plenty sturdy, but it didn't sit at the right height for my MFT setup.
At this point, I came to the conclusion that the only way to be certain I got everything I wanted in a Guide Rail Hinge was to just design my own. So... with zero prior experience in 3d design, I felt I was capable to taking on this task haha.
Over the course of the next several months, I made prototypes, revised designs, figured out tolerances, and taught myself a bit about modern design. The culmination of my efforts was a Track Saw Guide Rail Hinge that I am really proud of. So without any further fanfare, I would love to show off my take on a Track Saw Guide Rail Hinge.
View attachment 1
this is my original attempt. it is quite plain in comparison and it is not reversible
View attachment 2
this is a Shapr3D rendering showing the type of Hinge I wanted to create
View attachment 3
this would be the End Acceptor to secure the opposite end of the Guide Rail
View attachment 4
when combined with a Guide Rail
View attachment 5
here is the Guide Rail Hinge in its upright position!
View attachment 6
this is the view head-on
View attachment 7
here is the End Acceptor mounted to my MFT
View attachment 8
Aaaand one of the entire set up!
So as you can see, this design works really well and I have made several upgrades to it to increase functionality.
The main revision I made was to make my design Reversible. On the Hinge, this was achieved by first removing the alignment channel at the top of the Hinge Top. After removing it I added extra holes in the middle and at the far side. Likewise, I also introduced a mirrored design on the End Acceptor. The result of these additions/subtractions was a Guide Rail Hinge that could hold a guide rail in any orientation. This essentially means you can secure your Rail to cut on the left OR the right side of the Hinge. This is crucial as not everyone has the same setup as myself. Some people want the Hinge to flip up and away, rather than up and towards the user.
I also added a second hole in the back-middle, which would allow users to gain approximately an extra inch in height when fully raised. The original hole was definitely sufficient, but someone asked how they could make cuts on oversized workpieces.
Unlike many other Guide Rail Hinges, mine features wings on either side of the Hinge's sliding piece. This increases stability and allows for smooth raising/lowering of the Guide Rail.
As a new forum member, I would love to make some friends, hear your feedback, and see what I can improve on. I would love to make this Guide Rail Hinge as packed with features as possible.
Wishing you all the best!
Milton (boycabrera)
Attachments
-
 Screen Shot 2024-10-14 at 10.45.03 AM.png159.4 KB · Views: 420
 -
 Screen Shot 2024-10-14 at 10.35.25 AM.png57.1 KB · Views: 223
 -
 Screen Shot 2024-10-14 at 10.34.58 AM.png66.7 KB · Views: 160
 -
 Screen Shot 2024-10-14 at 10.35.49 AM.png13.3 KB · Views: 168
 -
 Screen Shot 2024-10-14 at 10.37.36 AM.png189.5 KB · Views: 465
 -
 Screen Shot 2024-10-14 at 10.37.06 AM.png155.1 KB · Views: 298
 -
 Screen Shot 2024-10-14 at 10.39.26 AM.png199.2 KB · Views: 299
 -
 Screen Shot 2024-10-14 at 10.39.48 AM.png232.6 KB · Views: 359
")


")