Installing cabinets...

tjbnwi

Member
Joined
May 12, 2008
Messages
7,042
I'm never sure where to put what I do. Not our home, not a member project. 

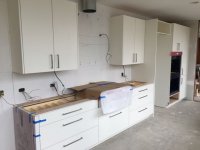
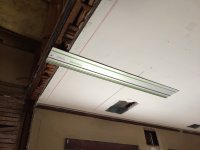
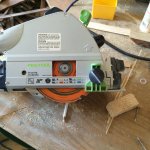
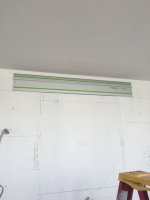
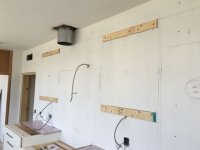
The things that have to be done.....
 

Attachments

  • IMG_0516.jpg
    IMG_0516.jpg
    19.7 KB · Views: 623
  • IMG_0532.jpg
    IMG_0532.jpg
    25.1 KB · Views: 605
  • IMG_0531.jpg
    IMG_0531.jpg
    27 KB · Views: 609
  • IMG_0530.jpg
    IMG_0530.jpg
    20.4 KB · Views: 501
  • IMG_0529.jpg
    IMG_0529.jpg
    18.4 KB · Views: 509
  • IMG_0528.jpg
    IMG_0528.jpg
    45.2 KB · Views: 630
  • IMG_0527.jpg
    IMG_0527.jpg
    43.8 KB · Views: 560
  • IMG_0526.jpg
    IMG_0526.jpg
    30 KB · Views: 559
  • IMG_0523.jpg
    IMG_0523.jpg
    28.7 KB · Views: 562
  • IMG_0518.jpg
    IMG_0518.jpg
    22.9 KB · Views: 567
  • IMG_0519.jpg
    IMG_0519.jpg
    15.9 KB · Views: 514
  • IMG_0520.jpg
    IMG_0520.jpg
    16.8 KB · Views: 544
  • IMG_0521.jpg
    IMG_0521.jpg
    31.1 KB · Views: 573
  • IMG_0522.jpg
    IMG_0522.jpg
    23.8 KB · Views: 607
Details man, we want details..... [poke]
You added 3/4" thick nailing/screw supports across several studs to help keep the upper cabinets..up  [big grin]... yes?
Added a vent for what looks like a stove top or countertop burner in the middle of the cabinet run...
The only part I was confused about was the hole in the upper right picture/support.
Exploring the wall a bit or running wire and need an access hole that would be covered up by the cabinet support?  [popcorn]
 
 
You do clean work tjbnwi!  Thank you for sharing how not to cut wires, plumbing

and other behind the wall surprises.
 
leakyroof said:
Details man, we want details..... [poke]
You added 3/4" thick nailing/screw supports across several studs to help keep the upper cabinets..up  [big grin]... yes?
Added a vent for what looks like a stove top or countertop burner in the middle of the cabinet run...
The only part I was confused about was the hole in the upper right picture/support.
Exploring the wall a bit or running wire and need an access hole that would be covered up by the cabinet support?  [popcorn]

The GC had installed 5/8" drywall over what appears to be a cast plaster. The core reminds me of Flexicore floors/ceilings.

The hole existed behind the drywall. I exposed it by chance when I removed that section of drywall.

I posted a close up of the view through the hole so one can see the shape of the wall cores. There is no wood in these walls anywhere I had found/seen. The original wall product crumbled when installing Tapcons or Spax Multi Material screws. Without good screw purchase the cabinets install would have failed. I choose to remove the drywall so I could use construction adhesive directly to the plaster wall.

I tried toggle bolts, but the wings would not open in the wall, also tried Togglers, could not get them to open either. Time for Rawl/Powers Calk-In anchors. I choose 1/4-20 over 10-24 due to embedded depth and pullout. I used the ratings for clay brick masonry which is fairly fragile form Powers chart. The high low patten was used to limit the chance of the the 2x twisting.

The setting tool for the Calk-Ins is a must. It holds the threaded inner core (which is tapered), has a collar the sets the lead sleeve over the tapered inner core when you strike the tool with a hammer, locking the anchor in the hole. I've used Calk-In anchors on other things, never had one fail. I tried pulling one of these out with a pry hooked to a bolt threaded in it, the anchor did not move at all.

The upper cabinets were spaced for a Wolf 48" vent hood that will go in after the 3cm gauge solid stone back splash is installed by the stone fabricator. I have a feeling we'll end up using the Calk-In anchors in the stone also.

The backer is a 2x4, 1.5" thick, bolts are 3" long.

Tom
 
The oven wall cabinet install complete.

Tom
 

Attachments

  • IMG_0537.jpg
    IMG_0537.jpg
    33.2 KB · Views: 563
Your posts are always very informative.  This one is particularly useful as I'm about to do some office cabinets where I definitely need to cut into the drywall to fish a wire, and I may need to cut out a section for blocking.

What did you use to keep the rail on the wall? 

I'll have to start cutting drywall like this as I can control the depth of cut and the dust.  Thanks for sharing this.
 
Kodi Crescent said:
Your posts are always very informative.  This one is particularly useful as I'm about to do some office cabinets where I definitely need to cut into the drywall to fish a wire, and I may need to cut out a section for blocking.

What did you use to keep the rail on the wall? 

I'll have to start cutting drywall like this as I can control the depth of cut and the dust.  Thanks for sharing this.

In this situation I used nylon anchors in the drywall and screws through the hanging holes. I have used hot melt glue and 2 sided tape before.

This "anti gravity" rail is held to the ceiling with a screw at one end and a clamp at the other. On this job I'm cutting plaster with the CMT blade.

Tom
 

Attachments

  • IMG_3129.jpg
    IMG_3129.jpg
    956.4 KB · Views: 385
  • IMG_3131.jpg
    IMG_3131.jpg
    659.8 KB · Views: 360
  • IMG_3132.jpg
    IMG_3132.jpg
    1.1 MB · Views: 434
Residential building????  Haven't seen a wall structure like that.  [eek] Was it something a builder in that area was known for or a fad for awhile?
 
Back
Top