You are using an out of date browser. It may not display this or other websites correctly.
You should upgrade or use an alternative browser.
You should upgrade or use an alternative browser.
Is ripping narrow stock the TS achilles heel?
- Thread starter amt
- Start date
Corwin
Member
- Joined
- Jan 22, 2007
- Messages
- 2,612
Well, if you go to my thread at talkFestool you can get a sneak peek. You may even notice the inspiration I got from you. [tongue] [big grin] Enjoy. And you know I'm just pulling your chain, don't you? [cool]
Or, I could just post a sneak peek here:
[attachimg=1]
Or, I could just post a sneak peek here:
[attachimg=1]
Attachments
sancho57
Member
- Joined
- Jan 13, 2011
- Messages
- 6,903
jacko9 said:This all sounds like a whole lot of work just to avoid using a table saw which is (in my opinion) safer for ripping thin strips and a whole lot quicker.
Jack
It depends. If you have to make a lot of repeated cuts for the same width, say for rails and stiles then Tom Bader came up with a great jig.
http://festoolownersgroup.com/festool-jigs-tool-enhancements/how-i-rip-ff-and-door-pieces/
For shorter length pieces I use what woodwork wizard does. easier the rolling out and setting up a table saw. ya just need a second angle stop.
To easy
Bohdan
Member
Had to cut a pile of 6mm plywood x 20mm wide and needed a clean edge that would not require any rework. Table saw was out as the edge on ply is not good enough so I looked at the MFT for a solution.
The lengths required were longer than the normal capacity of the MFT so I took the rail guides off the MFT and rotated them, and a FS1400 rail, -90 degrees.
Set the rail 22.2mm from the existing fence. Used the stop on the fence to prevent the offcut shooting forward and cut my pieces. No chipping on either side of the cut and the job was done.
If you cut a particular size regularly it would be an easy option to fit a set of stops like those used to locate the rail in the normal position. This setup also enables you to do an initial trim cut if required.
Corwin said:Well, if you go to my thread at talkFestool you can get a sneak peek. You may even notice the inspiration I got from you. [tongue] [big grin] Enjoy. And you know I'm just pulling your chain, don't you? [cool]
Or, I could just post a sneak peek here:
[attachimg=1]
@ Corwin,
I seem to missing the point of my inspiration for your rather ingenious, yet very simple method. Perhaps it is the “simple” part where I have come in.
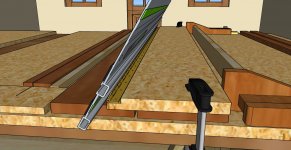
All kidding aside, you seem to have all bases covered, especially the missile protection. That stop method is basically the same method I am using at the end of my cuts when the off cut is very thin.
I like your idea of hinging the rail to a rabbeted piece of plywood that is lying loose against blocking (I am sure the blocking IS clamped down. I think that either the backside of the sheet with the piano hinge, or the front side of the backing should have some amount of bevel so the plywood does not shift forward as it rises to self adjust for the height of the guage blocking underneath the rail. Is the edge the piano hinge attached to beveled as well?
I am wondering why the space under he rail. I will just have to wait [popcorn]
I have to go out a spread grass seed on a couple of jobs this morning, but will play around with your idea when i get home. i have been using RMW's guides for narrow ripping, but am always looking at other ideas. Yours seems to be almost fool proof. Maybe that eliminates me. Oh well >>>>>>> 'nuff said. [unsure]
Tinker
Corwin
Member
- Joined
- Jan 22, 2007
- Messages
- 2,612
Tinker said:@ Corwin,
I seem to missing the point of my inspiration for your rather ingenious, yet very simple method. Perhaps it is the “simple” part where I have come in.
All kidding aside, you seem to have all bases covered, especially the missile protection. That stop method is basically the same method I am using at the end of my cuts when the off cut is very thin.
...
Tinker
No, you haven't missed the point about your inspiration at all. I was thinking of giving you a call and ask if a I could include your photo of a board going through your shop wall in my model. [scared] [unsure] [big grin] I was thinking of panning up to view that photo hanging on the virtual shop's wall then panning down and installing that backstop. Lots of silly ideas come to me while in the shower. [tongue]
Corwin
Member
- Joined
- Jan 22, 2007
- Messages
- 2,612
Tinker said:@ Corwin,
...
I like your idea of hinging the rail to a rabbeted piece of plywood that is lying loose against blocking (I am sure the blocking IS clamped down. I think that either the backside of the sheet with the piano hinge, or the front side of the backing should have some amount of bevel so the plywood does not shift forward as it rises to self adjust for the height of the guage blocking underneath the rail. Is the edge the piano hinge attached to beveled as well?
I am wondering why the space under he rail. I will just have to wait [popcorn]
...
Tinker
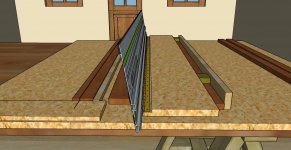
Does this screen shot help? In this shot you can see the cut line on your left with the workpiece up against the short 'work' fence. Between the work fence and the back fence we have two (2) additional (same thickness) workpieces to support both the rail and its attached hinged backboard (which I show clamped in place here). This 'scaled' version doesn't require such a tall back fence, as the scales only require the back fence when initially calibrated -- don't worry, I'll show that in the final version too.
[attachimg=1]
This is why I begin with a most basic version to illustrate the concept. Each version adds elements. Show someone something that appears too complex and they will likely just move on. I thought this approach would keep everyone on track, so to speak. [tongue]
Anyway, we'll expect to see some narrow rips soon after you are home. [wink] [big grin]
Attachments
Holmz
Member
- Joined
- Oct 11, 2014
- Messages
- 3,876
The Bosch rails have a clamp about 10-mm back from the splinter guard. I think is where a rail connector is at in your sketch.
So one can clamp pieces as narrow as about 10-mm, although I only have done ones around 1" wide.
The sketch above looks complicated.
So one can clamp pieces as narrow as about 10-mm, although I only have done ones around 1" wide.
The sketch above looks complicated.
Corwin,
Sp g;lad to see you back posting! No matter what some posters say, I say after watching your video a couple of times: [thumbs up] [thumbs up] [thumbs up]
Peter
Sp g;lad to see you back posting! No matter what some posters say, I say after watching your video a couple of times: [thumbs up] [thumbs up] [thumbs up]
Peter
Corwin
Member
- Joined
- Jan 22, 2007
- Messages
- 2,612
Thanks Peter. I do appreciate that.
I haven't been able to use my tools that much since I became disabled back in the summer of '07. But doing a little fence project earlier this summer inspired me to undertake this yet-to-be-completed SketchUp animation. I wanted to fill three sections of fence with narrow strips spaced a few inches apart, rather than the privacy boards that fill the neighboring sections. So, I needed to cut about 50 narrow strips (1-1/4" or so) from wider fence boards and make a template to assist with their installation. During the process I thought back on how I had wanted to document this operation in the past, and it was a shame that I wasn't able to document what I was doing then. But later I thought about doing this using SketchUp. I could start simple and build upon that. However, I had to learn SketchUp, and this was a great project to use to learn the program. As for my fence project, those narrow boards came out wonderful and having both the tools and jigs that are easy to setup and use made that project a pleasure. Especially for someone that is disabled. Makes me want to go clean the shop. And it is probably a good thing that Festool no longer sends me tool catalogs anymore... [tongue]
I do hope to show you all more soon. [big grin]
Holmz
Member
- Joined
- Oct 11, 2014
- Messages
- 3,876
Peter Halle said:Corwin,
Sp g;lad to see you back posting! No matter what some posters say, I say after watching your video a couple of times: [thumbs up] [thumbs up] [thumbs up]
Peter
I agree - it is nice to see cleaver solutions and do not want to take anything away from the great ideas.
Corwin
Member
- Joined
- Jan 22, 2007
- Messages
- 2,612
Holmz said:The Bosch rails have a clamp about 10-mm back from the splinter guard. I think is where a rail connector is at in your sketch.
So one can clamp pieces as narrow as about 10-mm, although I only have done ones around 1" wide.
The sketch above looks complicated.
If you are referring to my SketchUp drawing, then I would ask if you had watched the animation that I posted earlier? The setup in the illustration is explained by, and works exactly like the one in the animation, except it has the hinged-backboard, or wing, that speeds up the operation. This more advanced version does require that the back fence be spaced further -- the sum of the widths of rail and the backboard, to be exact -- to account for that backboard. And anyone interested in making one of the examples I illustrate will likely want to make something that uses this hinged feature.
With my large panel jig (I used to have photos of that here, but took them down after an exceptionally rude post from an apparently extremely irritated [then] new member) and a sacrificial base (that I used to use when I owned two (2) MFT1080s that I liked best conjoined along their long profiles) used together can, and has worked exactly like the jigs that I've drawn for this instructional animation. And with that arrangement, I have cut 50 or so strips in about an hour's time - keep in mind that I'm disabled and not as young as I once was, so you most likely will be much faster [wink]. Do you think there is any way to compete with that with a rail that requires clamping in place for each cut? I just don't see that Bosh rail being all that great. But, that's just my opinion based from my experience. Your experience may vary.
Holmz
Member
- Joined
- Oct 11, 2014
- Messages
- 3,876
Corwin said:... I have cut 50 or so strips in about an hour's time - keep in mind that I'm disabled and not as young as I once was, so you most likely will be much faster [wink].
I think I might be slower [unsure]. It is clearly fast when you have multiple parts.
Do you think there is any way to compete with that with a rail that requires clamping in place for each cut? NO
I just don't see that Bosch rail being all that great. But, that's just my opinion based from my experience. Your experience may vary.
And I totally am off on the minimum size, as it is closer to 30-mm.
But for one-offs it works well.

It frustrates me that Festool, Bosch, etc, etc , etc all have NAINA and NA-elsewhere.
That is not the fault of the end user, but it make life difficult for a lot of people.
I am not sure I will need to cut a lot of parts, but you jig is making me wonder how to apply it.
The more I look at it the more it's good.
Corwin
Member
- Joined
- Jan 22, 2007
- Messages
- 2,612
Holmz said:...
I am not sure I will need to cut a lot of parts, but you jig is making me wonder how to apply it.
The more I look at it the more it's good.
Is my animated video not clear enough? I'm sorry. Sometimes it is difficult knowing how much I need to explain something to others, as I already understand, and maybe too often think that someone else is able to follow along. So, that may be my inability to communicate well enough. But, if you say it looks better with each look, by all means print up a copy to look at some more. Ha, ha, ha, now I'm just kidding. Anyway, I do hope you will understand once I present the final version that will continue on to show how to make the hinged version, how it operates and then add accessories; the 'Tinker' backstop [blink] and an example of how you could add scales to replace the use of spacers that are used in the earlier examples.
No one jig or method of operation is likely to suit all users. Some people have different needs, or conditions in which they work, or a variety of other reasons and considerations. So, I do take no offense if someone doesn't like my methods. That's fine with me. But it does bother me to learn that I cannot express myself in a way in which others can readily understand. This is then my failure. And here I thought this animation would be clear. Hmmm. I'll have to work on this. [sad]
CrazyLarry
Member
- Joined
- Sep 14, 2010
- Messages
- 264
Corwin said:Is my animated video not clear enough? I'm sorry. Sometimes it is difficult knowing how much I need to explain something to others, as I already understand, and maybe too often think that someone else is able to follow along. So, that may be my inability to communicate well enough. But, if you say it looks better with each look, by all means print up a copy to look at some more. Ha, ha, ha, now I'm just kidding. Anyway, I do hope you will understand once I present the final version that will continue on to show how to make the hinged version, how it operates and then add accessories; the 'Tinker' backstop [blink] and an example of how you could add scales to replace the use of spacers that are used in the earlier examples.
No one jig or method of operation is likely to suit all users. Some people have different needs, or conditions in which they work, or a variety of other reasons and considerations. So, I do take no offense if someone doesn't like my methods. That's fine with me. But it does bother me to learn that I cannot express myself in a way in which others can readily understand. This is then my failure. And here I thought this animation would be clear. Hmmm. I'll have to work on this. [sad]
It might be a me thing (very likely) but I invariably find animations as clear as mud (and sometimes irritating!) was there a link to the model itself or just static images then I might have a bit more clue what on earth is going on because at the moment I neither grasp the method or the point!!! Looks like some sort of game where you have to keep 6 pieces of wood still while operating moving machinery... probably ok as a spectator sport!
Corwin
Member
- Joined
- Jan 22, 2007
- Messages
- 2,612
Oh, now that is disturbing. Well, I can't think of any jig that I've made to use with our Festool Guide Rails that doesn't index off the backside of the rail rather than make an attempt to locate at the cutline using the Guide Rail's splinter strip. Indexing off the backside of the Guide Rail then requires one to establish the offset from the location where the saw cuts the Rail's splinter guard to the outward most pint along the Rail's back edge. The juggling of pieces in the beginning is simply cutting a sheet in half, not the best start, but it then follows by cutting that all-important strip that will match the width of your Guide Rail -- the width of this piece is your offset. After that I cut another piece that is twice that width to use in the layout of the back and front fences that these jigs all sport -- this may become more clear when you see the Hinged version being built. After that, the two fences follow before proceeding on to assemble the first most basic jig. That jig should be considered our instructional example, as will become obvious later. Yet, one could make one like this in the field when the circumstances allowed. Even three floors up you may find the materials to make a basic jig on hand. Or not. [blink]
To use my jigs, you place the board you wish to cut up against the shorter 'work' fence and then place another piece (or two for the later versions that have the hinged backboard) to support the Guide Rail on the left-hand side (between the back and front fences.) This method of using another piece or two of the same, or at least same thickness material to support the Guide Rail is a common method and many methods of cutting narrow strips require this. My jigs are no different. Anyway, with the board you are to cut in place against the fence and the support board(s) on the other side of that fence, you could then place your Guide Rail on top of those boards (it will sit level due to the support pieces below) and up against the back fence and find that the splinter guard now aligns, or should, with the left edge of the piece you want to cut -- a cut with the saw should then remove only the kerf line from the workpiece, and the blade should just skim along the 'work' fence. That's ZERO. So, pulling the Rail away, and placing a spacer (the desired width of the cut you wish make) against the back fence first, and then place the Rail up to the spacer yields a Rail at the proper location. What a lengthy explanation. [scared] Sounds intimidating just writing this. But it definitely is not in real time. If you'll try it, I'll try and sit quietly... [blink]
If you still are having trouble following along, might I suggest you spend a few minutes and simply make the jig as I have shown. I've covered most details. It truly will not be difficult and not take very much time. And when you've completed it, you will wonder why you hadn't thought of it yourself. Well, that's probably how I might feel if the shoe was on the other foot. And I wear size eleven's. [big grin]
Corwin
Member
- Joined
- Jan 22, 2007
- Messages
- 2,612
Maybe this is a waste of my time. Heck, if I cannot explain this in a way in which others can understand and my animation is considered clear as mud, then I certainly have failed. It just takes far too much time to continue with this animation if nobody will understand how this works. I am disappointed. Oh, well. [sad]
Bohdan
Member
[member=182]Corwin[/member] Just because some don't follow your animation it doesn't mean that the rest of us don't understand perfectly.
I find that your animation way of explaining the construction is one of the best methods that I have seen.
My only comment is that had you included a verbal description of what you were doing, rather than written notes, it would have been much better.
I find that your animation way of explaining the construction is one of the best methods that I have seen.
My only comment is that had you included a verbal description of what you were doing, rather than written notes, it would have been much better.
Similar threads
- Replies
- 15
- Views
- 548
- Replies
- 1
- Views
- 454
- Replies
- 40
- Views
- 2K
- Replies
- 22
- Views
- 2K
- Replies
- 8
- Views
- 613