Is ripping narrow stock the TS achilles heel?

jacko9 said:
I don't think we disagree and I'm old enough to remember turnip trucks!

Just as long as you're quick enough to get out of their way, as I'm not too sure about the guy behind the wheel.  [tongue]

And, no, I don't think we disagree either. I wish they had such safety equipment on all table saws back when I used them. I was always a little on the cautious side using them. Now they are out of the question for my specific disability. But the track saw is doable for me. Well, except when used in conjunction with certain medications, that is. One of my FS1900/2 Rails has three slight cuts in it, all three cut one after the other making the same error three (yes, 3) times in succession. Wasn't it Einstein that considered that to be the definition of insanity? Heh, heh. Anyway, I didn't continue to take those meds for long.  [blink]
 
That nails it really.
You're doing what you like, and while a table saw is the traditional go-to tool, you are come up with a process that allows you to get the results you want with a table saw being out of the question.
And sharing that makes it possible for others to chin-scratch for ways to apply it.

My hat is off to you.
 
There is no way, in a small area shop, that a table saw can be easier, safer than the track saw.  For small jobs, ripping and crosscutting might be quicker.  Anything that takes up anymore space than the table saw and its walk-around-area, the track saw is in a class of its own. 

@ Corwin, thanks for all of your effort.  my computer has spam block, so it cut out as soon as it noticed your rip setup.  [wink]
Tinker
 
I had a big stationary saw, but after I started using festools, I very seldom used it. I gave it away to a buddy.. I did use it occasionally for thin strips but it was to much of a hassle to roll it out, set it up make the one or 2 quick cuts and take everything off and push it back. The track saw is so much easier.

Now that I got a CMS module I do use it for thin strips, but again it depends, if I have to break down the router table to Put in the TS the guide rail is so much faster and easier.
 
Corwin,
Glad you continued with the animation.  Looking forward to seeing the finished product.  If you come up with some plans I'll buy a set.

Thanks for all your work on this.

Rusty
 
Rusty Miller said:
Corwin,
Glad you continued with the animation.  Looking forward to seeing the finished product.  If you come up with some plans I'll buy a set.

Thanks for all your work on this.

Rusty

Thanks, Rusty. There will not be any plans for sale. But I am happy to provide any plans you like free of charge.

You see, the jigs I show in the video really were designed specifically to be simple to construct. These are meant to be 'entry level' jigs. You will NOT need a tape measure, square, marking tools, or anything other than your guide rail and saw, along with some sheet material (MDF) to make the first version I show. The 'hinged' version only adds the requirement of a router to route the rebate for the piano hinge, and optionally the dados for the fences, and, of course, a piano hinge and the associated hardware.

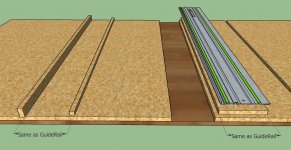
These jigs can be made to any length you want. Depending on your narrow-ripping needs, you may want to make yours 4' to 5' in length, for use with a FS1900/2 rail, or a full 8' for use with a long rail or joined rails. The width can be around 36" or less, depending on if you use the hinged wing and the width of that wing. You can figure what you need -- consider that the rail is around 7-1/4" in width, and you can see that we don't need too much more than that to the right of the shorter 'work' fence, as we are using this jig when cutting material that is already narrower than the width of the rail to start with, aren't we? And you can see what you will need to the left of the fence...

The fences do impose a limit of sorts. The shorter 'work' fence establishes a lower limit, as the height of this fence must NOT exceed the thickness of the material that you wish to cut. So, the distance that this fence stands proud of the base establishes a minimum thickness of material you can cut. However, you could always add some, say, 1/4" sheet material on either side to accommodate thinner material.

The taller 'back' fence need not be any taller than the maximum material thickness your saw can handle, plus the thickness of your rail. So, for the TS55, anything taller than around 2-3/4" is deadwood.  [huh]

I don't offer dimensions for a reason. If you try to construct these jigs by measuring, you may easily make a mistake. Instead, make them as illustrated in the animation. It really is 'almost' as easy as it looks. But, you have to give it a try to know first hand...  (It is much, much harder to create this animation than it is to create any of my jigs -- So, I've done my part, now you will have to do your part. heh, heh  [wink])

[attachimg=1]

Oh, and I've updated the video, yet again. Just a little more progress, that's all.  [smile]

Latest Update of my Animation

So, Rusty, it is Sunday. I gather you have the day off work? Or were you doing something else today? Pick a day -- any day -- when you have some spare time [only a little time is needed] and try making the hinged version, if you like, and I will be happy to answer any questions you may have with the process. Just be warned; jig making may become addicting. Just saying'.  [big grin]
 

Attachments

  • Basic Jig - Empty.jpg
    Basic Jig - Empty.jpg
    564.9 KB · Views: 2,275
Corwin,
This is absolutely top-shelf.  A wonderful idea and artfully presented.

I sold my table saw ten years ago to make room for house-barf in our garage, and pretty much walked away from the hobby.  The TS55 and Domino 500 are bringing me back, but I've not been happy ripping narrow stock.  You've shown how to do it safely and, in contrast to some of the other solutions, without much fuss.

If you'd like to respond or PM your favorite charity, I'll make a modest donation in recognition of the huge effort you put into explaining the fabrication of this simple but clever jig.  Pay it forward. 
 
JimSpence said:
Corwin,
This is absolutely top-shelf.  A wonderful idea and artfully presented.

I sold my table saw ten years ago to make room for house-barf in our garage, and pretty much walked away from the hobby.  The TS55 and Domino 500 are bringing me back, but I've not been happy ripping narrow stock.  You've shown how to do it safely and, in contrast to some of the other solutions, without much fuss.

If you'd like to respond or PM your favorite charity, I'll make a modest donation in recognition of the huge effort you put into explaining the fabrication of this simple but clever jig.  Pay it forward.

Thank you so much for your kind words. They are payment enough. If you do take the time to try out my methods and learn more on how to use your guide rails, I will be pleased. And if learning these simple steps leads you to take it all to the next level, them my mission here will have been a success.  [big grin] [big grin] [big grin]

I have it in mind to do a somewhat complete overview of the guide rail and its use. This narrow rip jig would be, oh, maybe chapter 3 or 4, after having first established methods for square and parallel. Then some MFT stuff that just might cause some to kick their dog(s)...  [scared]
 
Corwin,
Thanks for the reply and the new video.  It is definatly clearer now.  For the hinged model I assume you are setting the router bit depth to kiss the top of the ridge on the rail that the hinge will be fastened to.  What size router bit are you using? 3/4"
And yes I'm off today but I have a lot going at the moment (trying to clean out our garage and make some selving. Also I don't have any extra sheet goods at the moment to make the jig out of.
I know what you mean about making jigs, they make a lot of jobs so much easier and much more accurate.
Again thanks for all the work you put into this, I will definatly try to make one of these soon.

Rusty
 
Rusty Miller said:
Corwin,
Thanks for the reply and the new video.  It is definatly clearer now.  For the hinged model I assume you are setting the router bit depth to kiss the top of the ridge on the rail that the hinge will be fastened to.  What size router bit are you using? 3/4"
And yes I'm off today but I have a lot going at the moment (trying to clean out our garage and make some selving. Also I don't have any extra sheet goods at the moment to make the jig out of.
I know what you mean about making jigs, they make a lot of jobs so much easier and much more accurate.
Again thanks for all the work you put into this, I will definatly try to make one of these soon.

Rusty

I figured it would become clearer. And yes, I am depicting setting the final depth of cut to match the top of the T-track portion of the guide rail -- that way the wing and rail sit flat once the hinge is installed. The bit size doesn't matter [yes, I used a 3/4" in multiple passes] as it is the depth of the rebate that matters. The width should be wider than the portion of the hinge that will be mounted there. I don't intend for the hinge to index off the inside edge of the rebate, so extra room is my preference. I use 1-1/2" piano hinge with my jigs - the piano hinge in the animation was downloaded from the SketchUp warehouse and was supposed to also be 1-1/2", but there's a longer story there... Mounting holes need to be drilled out as needed. The hinge doesn't align 'exactly' over the top of the T-track, but so what; there is an amount of slop with my hardware, and that works fine -- just pull rail tight to the wing before tightening down.

No pressure (or is that -- oh, never mind [tongue]) with making your own jig. I'm just kidding. Well, kind of...  [big grin]

Sorry to dominate this thread. But then again, it is threads like this that have prompted me to take the time on this project. Maybe in the future we can instead be discussing how to, rather than if we can cut narrow stock with our track saws.
 
Corwin,

I would love to do an un-edited video to show your original idea in real life - giving you credit or course?  I don't have the time to do your flip down jig.

Peter
 
Peter Halle said:
Corwin,

I would love to do an un-edited video to show your original idea in real life - giving you credit or course?  I don't have the time to do your flip down jig.

Peter

I would love that too!  [big grin] [big grin] [big grin]

Once you've made the basic 'instructional' version, I think you may just find the time... Well, sometime, that is.  [wink]

With the first version, one need consider the height of the spacer (or piece you are attempting to duplicate) between the fence and rail. The saw's motor housing sticks out to the left of the rail and anything too tall, and too close (as it would be in this case,) may interfere -- the saw's depth of cut enters into this... The winged version eliminates this issue. This same consideration comes into play when cutting, for instance, sheet material using the method shown in the beginning of the animation. There, I could have used the first piece I cut -- the one that matches the width of your rail -- below the rail, to cut the narrow strips for the fences IF I had a spacer that was shorter and wouldn't be in the way. Same type situation solved the same way.
 
Here's the final version of my animation:

Narrow Strip Jig

Hope you enjoy it. Kind of a BIG file. Takes over 4 minutes to load SketchUp...  [scared]  So, this is as far as I'll take this animation.
 
Corwin,
Fantastic job! I will be making one of these.  Thank you for all the hard work you put into the video and just coming up with the jig itself.  You're a "Good man Charley Brown"!

Rusty
 
Corwin
Thanks for posting your jig idea.
I've made one using scrap ply this week on a job site.
I've used it for ripping parquet blocks and also managed to cut a ramp threshold strip from an off-cut of square stock.

All tasks I would have previously used a table saw for. 
Having bought the TS55 for cutting parquet borders initially, I've found myself finding different tasks that the saw can safely complete,  and I've got to say I'm very happy so far. 
Your Jig has opened up a whole raft of other tasks that I can use the saw for so thank you once again.
 
Welcome to the FOG, Dave! And thank you for your comments.  [big grin]

 
Hello,

This is a very interesting discussion, but I can't seem to see any of the the youtube videos (all private or removed)

Can any one re-post?

Cheers
 
The link on reply #93 works.  The previous ones do not.  But #93 is his latest and it's really good.  Makes me rethink about the space my table saw is taking up. 

 
air19 said:
The link on reply #93 works.  The previous ones do not.  But #93 is his latest and it's really good.  Makes me rethink about the space my table saw is taking up.

Thanks!

The previous links were for versions of the same animation, but at progressive levels of completion. So, you aren't missing anything in the older links.

You might also like to check out my [hugely unpopular] A Different Parallel Guide and MFT Zero-Clearance Fence & Fenced Sled threads.  [unsure]
 
Back
Top