I’ve seen grumbling about milling thin stock with an MFT

Pacwind3

Member
Joined
Dec 17, 2018
Messages
3
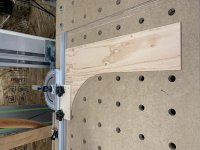
Here is my solution. At the moment, this isn’t pretty. I was testing the functionality of it.  I’ve milled as thin as about 1/8”.  Obviously you can only mill about 22 inches, which is the cutting capacity of the MFT.  Once I get some birch ply, I’ll pretty it up. A bonus, the wooden part that the knobs attach to, acts as a stop agains the left side of the rail. So, when you want to mill a part to the same thickness as another part, you place the original between the rail, and that board, slide it up snug. I measured a sample and it was only a couple thousands off. More then accurate for woodworking.
 

Attachments

  • ADB1DA9C-17D9-475A-A34D-5166D1AA0838.jpeg
    ADB1DA9C-17D9-475A-A34D-5166D1AA0838.jpeg
    3.4 MB · Views: 1,113
If anyone has questions on how to make one, just ask.  It’s not terribly complicated.
 
You can use the same basic idea to rip much longer stuff off the MFT.

Back in the early days of FOG 2.0 (after it moved from Yahoo), someone asked about ripping long narrow strips. This post is from Jan. 2007;

“Not to mention that a guide rail long enough to rip 12 feet costs $375. Repeatedly moving two joined guide rails is even more annoying that moving one.

However, one of the guys on the Yahoo forum made a rig which use a guide rail attached to a long hinged board. The stationary side of the hinged board was attached to a cutting bench so that the guide rail was held above the cutting bench the same thickness as the wood to be ripped. Stop blocks under the guide rail (screwed or pinned to the cutting bench) set the width of the ripped piece and provide support to stabilize the guide rail since only a little bit of the workpiece was under the guide rail.

In operation you lift the business side of the guide rail and shove the workpiece against the stop blocks and lower the guide rail position the saw and rip. Then you have to remove the saw, lift the guide rail and remove the ripped strip, and push the stock against the stop blocks for the next rip.

He reported that it worked well but it's obviously a lot of work compared to using a table saw.”
 
What am I not understanding?

If milling means ripping, why not just use rails and a track saw or a table saw?

If milling means thicknessing, why not just use a planer?
 
This is a ripping jig. Designed to be used on pieces that fit in this direction on the MFT.  Tom has posted often about how he used patterns and a similar technique to cut face frames, etc with his track saw.  This is a variation of that technique.  Corwin has also posted about jigs to help out in similar situations.

Peter
 
Peter Halle said:
This is a ripping jig. Designed to be used on pieces that fit in this direction on the MFT.  Tom has posted often about how he used patterns and a similar technique to cut face frames, etc with his track saw.  This is a variation of that technique.  Corwin has also posted about jigs to help out in similar situations.

Well thanks for that info Peter... [smile]  I don't own an MFT so I rely on the old school track saw or table saw.
 
The point of the jig is to rip down thin stock.  I’ve ripped as small as 1/8 of an inch. I don’t own a table saw because I’ve read about too many accidents. I’d prefer to keep my fingers. Milling pieces less then the width of the guide rail, doesn’t work well because the non-skid strips don’t contact the wood.  Think of this like a stop block, or table saw fence. You set your fence on the table saw, and mill thinner strips.  This does the same. If I need to mill something longer, like say 4 feet.  I use my bandsaw.  This obviously doensn’t leave an ideal cut quality, but I can usually run it through the planer to get the wood smooth. That’s a two step process however.  This jug works great. Yesterday I needed some strips, 1/2” wide, in lumber 1/8” thick. I stack four pieces on top of each other and milled away. All the strips came out great.
 
What is the accuracy number for? Is it parallelism, straightness or simply how wide the piece was from target width (btw you are making pieces narrower in the width dimension, not thin in the thickness dimension)?

I think this setup is especially bad for parallelism because you are compounding the squareness error of the mft with the squareness error of the jig. For example if one uses dogs to square the rail we could in general expect the thing to be (https://www.youtube.com/watch?v=2i8-CJO9EsE) out of square by 0.03147 degrees. Then the jig will be either 89.96853 or 90.03147 degrees. That means the reference edge  of the jig will be 0.06294 degrees out of parallel with the rail or in other words if you want to cut 2 inch wide piece of 24 inches in length, one end will be 2 inches wide and another end will be 2.026 or 1.974 inches wide.

That's not great, it's the same level of inaccuracy as factory edges. I have tried this approach and never could get it cut parallel and I think the error compounding is the reason.
 
Back
Top