In the sawblade manufacture thread, a sawblade video is shared. I noticed that the sacrificial fence on the mitre gauge was installed on the end of the gauge, not on the face. I will study it further to see if it is a better way of attaching a wooden fence for the mite-r ii when received.
You are using an out of date browser. It may not display this or other websites correctly.
You should upgrade or use an alternative browser.
You should upgrade or use an alternative browser.
JESSEM Table Saw Miter Gauge
- Thread starter Mario Turcot
- Start date
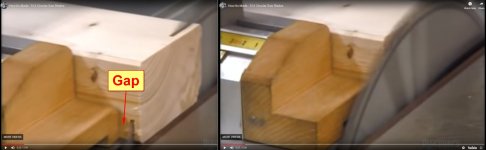
ChuckM said:...the sacrificial fence on the mitre gauge was installed on the end of the gauge...
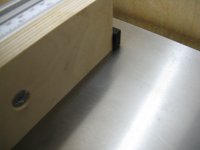
This intrigued me so I took a look. Turns out the wood end-piece is not sunk into the blade. It's odd shape suggests it served some other purpose and they just leave it installed.
View attachment 1
Great video nonetheless, 'How It's Made' grabs like 315 hide glue and they're extremely addictive!
FYI - in Youtube videos, "spacebar" and/or "K" on your keyboard will Pause and "" (don't press shift) step forward and backward frame by frame...very handy for analysis and screen captures.
Attachments
Mario Turcot
Member
- Joined
- Nov 26, 2017
- Messages
- 1,247
The Jessem Miter Gauge is built to receive a front sub fence. If I'm not wrong the t-bolts are part of the package. It is doable to put a end zero clearance but like Gary highlite with his picture there was a gap. Perhaps it's to prevent the sawstop safety to trigger?
Mario Turcot said:...If I'm not wrong the t-bolts are part of the package...
They provide two 1/4–20 flat head screws (#3 Phillips) and two square nuts.
Mario Turcot
Member
- Joined
- Nov 26, 2017
- Messages
- 1,247
gary_va said:Mario Turcot said:...If I'm not wrong the t-bolts are part of the package...
They provide two 1/4–20 flat head screws (#3 Phillips) and two square nuts.
Thanks for confirming. I had a look at the manual and sacrificial fence part. The fence need to be 2" 1/2 high and between 22"-25" long. Do you thin it would be doable to extend that fence over the extension? I mean if you have a 3/4" fence, the extension is no more in-line with the fence. To rectify, one could simply add a small ~2" long mini fence to the extension. You think it's possible?
...one could simply add a small ~2" long mini fence to the extension.
Yes, one could engineer a gap-filler to align the face of the extension bar with the face of the 3/4" sacrif. wood.
Two design drivers are present:
1. The extension's square-nut channel is on the back side, not the front like the main fence
2. The gap is larger than 3/4" by the thickness of the extrusion plus a bit more; something close to an additional 3/32"
A three-piece design similar to the flip-stop seems viable. Even simpler would be cutting an extension-bar sized dado in a large block sized so you could slide the gap-filler over the extension bar wherever you wish.
Mario Turcot
Member
- Joined
- Nov 26, 2017
- Messages
- 1,247

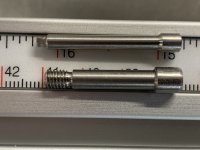
I continue to be pleased with their customer support. The miter gage arrived on schedule, assembly was easy, and I’m very please with both the design and the execution. They provide 4 small hex wrenches for assembly and if future adjustments are needed. There’s a tiny 3/32” hex wrench extender which is not necessary, but aids in tightening and loosening 2 set screws. They sent a part that appeared to be almost identical to the extension but actually must be a part from something else they manufacture. I called them, they answered on the first ring, sincerely apologized, and two days later the correct hex extension arrive via UPS. The correct part is the smaller diameter part in the photo.
Attachments
Finally installed my Jessem gauge. Initial test cuts confirmed it is a robust gauge. Some observations:
1. They included the wrong part as someone reported earlier. It took two attempts before they got it right (they shipped the same incorrect part in the first try). But the customer service responses were quick.
2. To get rid of the little play on the stop, adjust the hinge nut slightly.
3. The extension stop should be longer to cater for a 3/4" fence. When I replace the fence, I will use 1/2" material instead of the 3/4" stock recommended in the manual.
4. Some sections of the manual can be improved for clarity.
The real test is in the actual use of the tool for months before a firm opinion on it can be made.
Attachments
Mario Turcot
Member
- Joined
- Nov 26, 2017
- Messages
- 1,247
I agree 18mm sub fence make it a bit too bulky. I haven't use the extension stop yet, so I didn't notice how far it was sticking out. Thanks for the pictures ")
Max Fracas
Member
[member=66597]Mario Turcot[/member] [member=57948]ChuckM[/member]
I’ve been looking at this miter gauge lately and wondered if you have any additional thoughts on it after a few months of use.
I’ve been looking at this miter gauge lately and wondered if you have any additional thoughts on it after a few months of use.
Mario Turcot
Member
- Joined
- Nov 26, 2017
- Messages
- 1,247
Max Fracas said:I’ve been looking at this miter gauge lately and wondered if you have any additional thoughts on it after a few months of use.
The miter gauge is rock solid & I love it. I had the incra one that is now dedicated to the band saw.
Like Chuck mentionned, the only thing about the Jessem mitre gauge is the stop at the end of the extension. When you use 18mm (3/4") material for the sacreificial fence the stop protrude like 1/4". Not really an issue but having it a bit longer would have been better IMO.
Mario Turcot
Member
- Joined
- Nov 26, 2017
- Messages
- 1,247
[member=57948]ChuckM[/member] & others... I thought you might be interested into that little accessory.
https://www.pinterest.ca/pin/551479916872537430/

It let you pull back the miter gauge off the table saw to crosscut larger boards that normally won't fit.
https://www.pinterest.ca/pin/551479916872537430/
It let you pull back the miter gauge off the table saw to crosscut larger boards that normally won't fit.
Thanks, Mario. I've seen a couple of other ideas to increase the crosscut capacity such as this:https://tinyurl.com/yz7lvgvp
Wood magazine has published another tip using regular F-clamps, but I couldn't find it.
Wood magazine has published another tip using regular F-clamps, but I couldn't find it.
Mario Turcot
Member
- Joined
- Nov 26, 2017
- Messages
- 1,247
Thanks, I like it a lot [big grin]
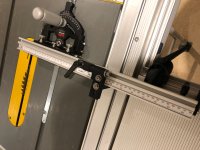
I got mine installed in my Festool CMS-VL / Dewalt DW745 table saw combo. Slides nice in the slot and I used a Festool clamp from the MFT rail to hold it to the sliding table so it all moves as one. It's a major upgrade on using the Festool angle guide on the sliding table. The Festool angle guide has so much play in the detents that it was hard to just put it on and just be square. As the gauge runs in the mitre slot it's perfectly repeatable and having the table slide with the gauge gives extra support for bigger pieces.
Maybe the only negative is that it runs so close to the blade that I'm not sure if the blade guard will fit! Maybe I can sneak it over enough and re-calibrate the tape. I think the instructions said it should be 1/32" away from the blade.
Maybe the only negative is that it runs so close to the blade that I'm not sure if the blade guard will fit! Maybe I can sneak it over enough and re-calibrate the tape. I think the instructions said it should be 1/32" away from the blade.
Attachments
Mario Turcot
Member
- Joined
- Nov 26, 2017
- Messages
- 1,247
[member=66875]simonh[/member]
Wel done [thumbs up]
You should be able to move the fence untill revealing the black part.
Wel done [thumbs up]
You should be able to move the fence untill revealing the black part.
Similar threads
- Replies
- 2
- Views
- 747
- Replies
- 7
- Views
- 2K
- Replies
- 4
- Views
- 394
- Replies
- 6
- Views
- 1K