JESSEM Table Saw Miter Gauge

Mario Turcot said:
...
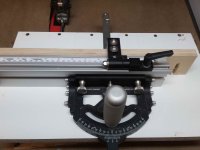
I have the Incra® Miter 1000SE Gauge and hate it. Flip stop is poorly made and the extension arm is flimsy & require a tool to move it.
I hope it’s ok to post to such an old thread.

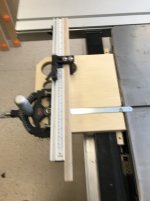
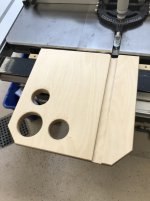
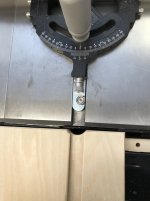
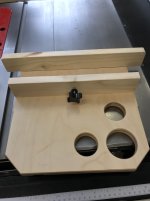
I generally like Incra products.  I find them innovative designs that are well-made. Although I have used adjustment tools with other equipment / accessories, I often have to search for where I put the hex head driver.  I replaced several of the hex socket bolts with ratcheting levers.  I would prefer 1/4 turn cam lock fasteners, but haven’t been able to locate them. Here’s a link to the photograph of what I did with Incra options that is not well publicized:
https://www.incra.com/jig_fixture-build-it_system-ratchet_knobs.html#prettyPhoto[pp_index]/2/
 
[member=9212]Cincinnati[/member] I agree with you, they are innovative and well made. Sometimes with poor material, unfortunately. Same for Kreg tools, it make sense to use plastic parts, Kreg like to abuse IMO.

There is several parts of the Incra 1000SE I dislike. This make it an unenjoyable tool to use, for me anyways.

I have the Incra IBox and love it  [big grin] The Incra 1000SE is now setup for the bandsaw and it's [cool] because I don't need the extension capability on that tool.
 
ChuckM said:
Thanks, Mario. I've seen a couple of other ideas to increase the crosscut capacity such as this:https://tinyurl.com/yz7lvgvp

That extension a good idea.

First words on that link are "Doesn’t it always just seem like when you go to cross cut a wide panel that your tablesaw is just an inch or two too short to make the job safe?"

Absolutely true. 
 
[member=65451]Steve1[/member]

Here my version #1 Light and easy to store. Two ways to lock it in place.

Sorry for the bad focus photo, hands was frozen and I start to shake like a little girl  [wink] The jig give me a 10" increase depth.
[attachimg=1]

The purpose of the holes is to let me see through where the TS switch is. A lot of tear out due to a bad sequence build  embarassed]
[attachimg=2]

Notch to accomodate the miter gauge safety. That way I can put on or remove the miter gauge even when the jig is already installed.
[attachimg=3]

The secret machanism that hold the jig in place. A T-nut sprung from inside, to make the connection with the TS fence bar.
[attachimg=4]

I plan to use it a few months and see if a larger jig would help. I thought of giving it an extra 5-6" on the left side, up to the sliding table. This would give me full support, see picture 1 for the gap. The miter gauge fence happen to be a half inch shy of the sliding table, with that extra 5 or 6" the miter gauge end would be leveled with the table.
 

Attachments

  • MG-Pulledout.jpg
    MG-Pulledout.jpg
    101.1 KB · Views: 1,297
  • MG-Holes.jpg
    MG-Holes.jpg
    119.2 KB · Views: 1,246
  • MG-Notch.jpg
    MG-Notch.jpg
    141.8 KB · Views: 1,297
  • MG-Locking.jpg
    MG-Locking.jpg
    101.7 KB · Views: 1,230
Mario,

That's an interesting take on the clamping system using a knob instead of a clamp on each side as given in the original tip.

In your first photo, the mitre gauge bar is only an inch or so into the slot, does that give enough registration to ensure the mitre fence is square to the blade?

Based on your prototype, what's now the total capacity from the mitre fence to the blade?
 
See this is something I totally ignored  [embarassed]

There is no play, just a tiny resistance compare to the TS slot. Accuracy has not been tested yet. I will put my brain to the task later today  [wink]

Total capacity is ~21.5" of course it's directly depending of how high the blade is. 21.5" was measured for a 15mm thickness
 
gary_va said:
ChuckM said:
...the sacrificial fence on the mitre gauge was installed on the end of the gauge...

This intrigued me so I took a look. Turns out the wood end-piece is not sunk into the blade. It's odd shape suggests it served some other purpose and they just leave it installed.

View attachment 1

Great video nonetheless, 'How It's Made' grabs like 315 hide glue and they're extremely addictive!

FYI - in Youtube videos, "spacebar" and/or "K" on your keyboard will Pause and "" (don't press shift) step forward and backward frame by frame...very handy for analysis and screen captures.

If for no other reason that I was intrigued and it didn't take long to model and CNC a few push fit pieces on the back of a block of Delrin I had around.


Attachments

  • IMG_1878 (2).jpg
    IMG_1878 (2).jpg
    609.5 KB · Views: 400
Thanks for sharing. That seems to be a simpler way than adding a sacrificial fence to the gauge. Once my fence gets chewed up, I will adopt your method. Do you have a diagram you can share of the dimension of the block so we can cut ours out of wood (on the router table or table saw)?
 
Here's a sketch and the dimensions.  I got the dimensions directly from the Jessem 3d PDF model. I think it has been designed in imperial as the block size translates perfectly into inches and things like the wall thickness of the profile is 0.1". Anyway, all my numbers on the diagram are metric.  The main thing seems to be to make it a fairly tight fit. I was going to add a small grub screw in the back that would hold it into the end of the fence but I'll see how it goes after a bit more use.
 

Attachments

  • jessem2.PNG
    jessem2.PNG
    55.7 KB · Views: 341
  • jessem.PNG
    jessem.PNG
    93.5 KB · Views: 348
Many thanks!

Interesting that Jessem does not create a revenue stream out of it by making and selling the zero-clearance blocks as consumables.
 
ChuckM said:
Many thanks!

Interesting that Jessem does not create a revenue stream out of it by making and selling the zero-clearance blocks as consumables.

It certainly looks cooler than putting a piece of wood over the front of a beautifully fence!  If you regularly cut tall pieces of wood it is probably worth making the block a little taller so the blade doesn't cut nearly all the way through weakening it.

I'd probably just use a block of wood in future but didn't have anything around thick enough and ready to mill so used the plastic off-cut from another project. You could probably make it with a saw and chisel. The only critical bit is making the front face align perfectly with the fence which is maybe why they don't make them and a sacrificial fence is the easier option.
 
ben_r_ said:
Looks like a piece that could be easily 3D printed.
What I like about the end caps is that they do not introduce any possible impact to the fence as a sacrificial wooden fence may (e.g.due to humidity change).
 
Thanks, Mario. I have yet to make some blocks for the Jessem mitre gauge that simonh came up with! [drooling]
 
Back
Top