smorgasbord
Member
Spencer Lewis has yet another great video on miter saw usage:
He's almost always focused on trim work, since that's his day job, but he delves into accuracy often. On his DeWalt 780 he observed that the center of miter angle rotation is where the front of the factory fence meets the right side of the blade kerf. As a result, he always sets that saw up to cut to the right so that his measuring fence/stop blocks are correct no matter whether he's doing 90º cuts or 45º miters, or compound cuts for crown.
I'm not at my shop, but my recollection on my Bosch 12" slider is that the center of rotation is in the middle of the kerf. Here's a post I made on a cube-style ZCI for the back fence:
https://www.festoolownersgroup.com/...stalled-colliflower-cube/msg707477/#msg707477
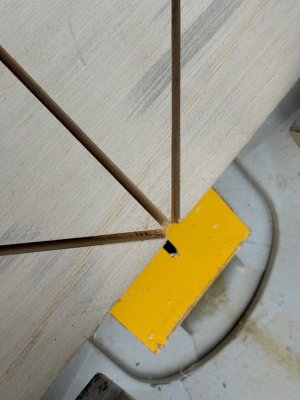
Here's a close-up of the last photo in that post:
[attachimg=1]
It looks to me that the left edge of the kerf in my insert is pristine after two angled cuts, while the right edge may be widened (notice how the angled cut line doesn't extend straight to the face).
Due to trigonometry, cutting angles will always result in a wider kerf, the question is where is the center pivot point? If it's not at the edge of the 90º blade kerf from which you're measuring and if uber-accuracy is important, you'll have to adjust based on the miter angle. I don't recall measuring various angled pieces with calipers, but I do recall thinking that the left edge was close enough to be useful as my zero point.
I'm wondering what the Kapex does?
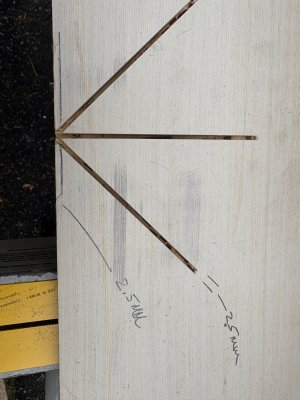
Looking at the photos on Colliflower's web site for their Cube product:
[attachimg=2]
It's hard for me to tell. Given that all the miter saws I know have the arbor nut on the left, placing the pivot location at the right of the blade would yield invariance despite different blade kerf thicknesses (eg thin kerf vs regular kerf), so there's some advantage to that - except most people are right-handed and so cutting to the left is the normal/default layout.
Anyway, if someone with a Kapex and an OCD accuracy bent for machine set-up like me (and Mr. Lewis) can check, it would be interesting to see. I also wonder if there's not just variation by manufacturer or model, but also in machine calibration/set-up and if different instances of the same model are different.
He's almost always focused on trim work, since that's his day job, but he delves into accuracy often. On his DeWalt 780 he observed that the center of miter angle rotation is where the front of the factory fence meets the right side of the blade kerf. As a result, he always sets that saw up to cut to the right so that his measuring fence/stop blocks are correct no matter whether he's doing 90º cuts or 45º miters, or compound cuts for crown.
I'm not at my shop, but my recollection on my Bosch 12" slider is that the center of rotation is in the middle of the kerf. Here's a post I made on a cube-style ZCI for the back fence:
https://www.festoolownersgroup.com/...stalled-colliflower-cube/msg707477/#msg707477
Here's a close-up of the last photo in that post:
[attachimg=1]
It looks to me that the left edge of the kerf in my insert is pristine after two angled cuts, while the right edge may be widened (notice how the angled cut line doesn't extend straight to the face).
Due to trigonometry, cutting angles will always result in a wider kerf, the question is where is the center pivot point? If it's not at the edge of the 90º blade kerf from which you're measuring and if uber-accuracy is important, you'll have to adjust based on the miter angle. I don't recall measuring various angled pieces with calipers, but I do recall thinking that the left edge was close enough to be useful as my zero point.
I'm wondering what the Kapex does?
Looking at the photos on Colliflower's web site for their Cube product:
[attachimg=2]
It's hard for me to tell. Given that all the miter saws I know have the arbor nut on the left, placing the pivot location at the right of the blade would yield invariance despite different blade kerf thicknesses (eg thin kerf vs regular kerf), so there's some advantage to that - except most people are right-handed and so cutting to the left is the normal/default layout.
Anyway, if someone with a Kapex and an OCD accuracy bent for machine set-up like me (and Mr. Lewis) can check, it would be interesting to see. I also wonder if there's not just variation by manufacturer or model, but also in machine calibration/set-up and if different instances of the same model are different.
Attachments

Last edited: