Kapex KS 120, cut is warped

gijssom

Member
Joined
Jun 3, 2015
Messages
5
I'm having difficulty getting a 'straight' cut on my Kapex.

I've attached pictures of the outcome, after trimming square timber, i.e. Accoya (radiata pine) wood.
The wood I used was planed square with my Felder AD741.

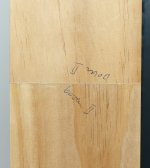
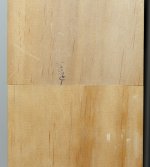
I used several (Festool) blades, 60/80 teeth and the aluminum blade. All gave the exact same issue: Cutting line on the top side is accurate, on the bottom (corners) there is a visible gap.

I'm in the process of building doors (exterior/interior), windows and moldings. Can I expect a straight cut from the Kapex?
How do I resolve this issue?

Kind regards,
Gijs

'boven' means top side, in Dutch

First picture is the top side of the two pieces;
Second picture is the side facing down;
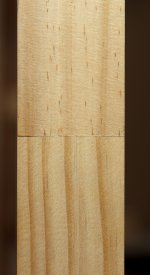
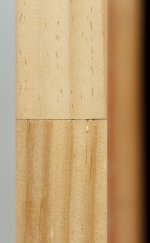
Third and fourth picture are the sides of the two pieces.

[attachimg=1][attachimg=2][attachimg=3][attachimg=4]
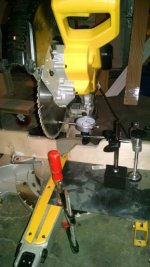
 

Attachments

  • _MG_1467_februari 24, 2016.JPG
    _MG_1467_februari 24, 2016.JPG
    3 MB · Views: 1,360
  • _MG_1468_februari 24, 2016.JPG
    _MG_1468_februari 24, 2016.JPG
    2.8 MB · Views: 1,317
  • _MG_1469_februari 24, 2016.JPG
    _MG_1469_februari 24, 2016.JPG
    1.6 MB · Views: 1,237
  • _MG_1470_februari 24, 2016.JPG
    _MG_1470_februari 24, 2016.JPG
    1.9 MB · Views: 1,250
Is the stock actually completely flat before you cut? If it's slightly cupped this might be the problem.
 
Please describe your cutting technique. Pictures alone makes it impossible to help.
 
I had a similar problem and a magnetic angle finder  Wixey was put on the side of the blade at different

locations and I found that the blade was warped. Operator error. ha ha

So, I put on a new blade and all is well and the angle finder reads zero degrees in all locations.

 
i found that any push and slide cuts without using the clamp results in an uneven cut. i checked the calibration and the saw was dead on out of the box.
 
      Hello,  Two things stand out to me in these pictures that may help you figure this out,
1.  That's a lot of tear-out for a miter saw cut!  Even though you used different blades, I'd try a new blade first.  Are you pushing/plowing the saw too fast possibly? 
2.  There's definitely a problem on the bottom side fit, it's also not consistent.  By that I mean they're both not square but by varying degrees on each end.  To me it seems this could only be created by a warped blade or board movement, clamping the board down should answer the question.  Also ask a friend to make a few cuts, if they're messed up too it would eliminate operator error.

Good luck!
CB 
 
My guess is dull blade.  There is a lot of chip out.  Even with four teeth missing on my 8-1/2" slider (DON"T even ask [huh]), I don't get any chipout or warped cuts. Not clamping could also enter into the equation.  But I'm no Xpurt.
Tinker
 
I've seen blade flutter present kinda like that in the past.  The blade heats up as it cuts and the edge gets wavy.  It's one of the major reasons I run standard kerf tooling vs thin kerf.  The fact you used 3 different blades and that the material is soft Radiata Pine makes me think that this isn't the real problem.  If it were a dull blade the fact that you switched through 3 different blades would have made that apparent.

To check for a bent blade or a bent arbor set up a dial indicator like in the picture. Load and zero the dial and then spin the blade around by hand.  You're looking for the spot where you get the highest reading on the dial.  Once you identify that spot draw a pencil mark on the blade to reference it, loosen the blade and spin it without moving the arbor so the mark is on  opposite side from where you took you reading and tighten it down.  Spin the blade by hand again.  If the highest reading is on the opposite side from where you took your reading you have a problem with the arbor.  If it is in the same spot you have a bent blade.  You have to do these steps first or any other measurements you take will mean nothing.  A digital pitch gauge might be able to tell you this but the dial indicator tells the story for sure.

To check if the saw head is parallel to the rails or if the head is riding on the rails lock the head in the down position but still slides.  Set up, load, and zero the dial indicator as far out on the rim as you can without hitting expansion slots.  Spin the blade looking for the highest reading on the indicator and make a mark at that spot.  Spin the blade so that mark is pointing down.  Move the dial indicator out so that it is roughly centered on the length of travel of the head when it slides. Raise the dial indicator so that it is just under the nut.  Slide the head in and out.  If the variation of the reading you get off the indicator goes from high to low or low to high in all one direction the saw head is not parallel to the rails.  If it goes up as the saw head goes up as you slide it forward, hits its highest spot at he middle of the head travel and then goes back down as you reach the fullest extension of the saw you might have bent rails or some other problem affecting the way the saw tracks.

If you are concerned with stock movement being the cause of the problem raise your saw wings or work supports up a bit at the furthest point away from the blade. The extra height will give you a little more leverage to push the material down to the saw table so it doesn't move during the cut.
 

Attachments

  • run out cancel 717.jpg
    run out cancel 717.jpg
    44.4 KB · Views: 534
@ justinh An excellent tutorial.
I hope you don't mind that have saved to my permanent records for future use if needed.
I also do not favor using thin kerf blades.  That dates back to my prehistoric days when I had my masonry biz.  cutting a lot of nail and cement impregnated lumber (reused and reused and reused for scaffolding and concrete forms)I chipped and/or broke many teeth off of my carbide blades.  I used a blade until it started warping before I would toss it.  The thin kerf blades would warp with only one or two teeth gone.  Those thicker blades lasted until sometimes more than half the teeth were gone.
Tinker
 
Tinker said:
@ justinh An excellent tutorial.
I hope you don't mind that have saved to my permanent records for future use if needed.
I also do not favor using thin kerf blades.  That dates back to my prehistoric days when I had my masonry biz.  cutting a lot of nail and cement impregnated lumber (reused and reused and reused for scaffolding and concrete forms)I chipped and/or broke many teeth off of my carbide blades.  I used a blade until it started warping before I would toss it.  The thin kerf blades would warp with only one or two teeth gone.  Those thicker blades lasted until sometimes more than half the teeth were gone.
Tinker

You're welcome to it. Hope it helps you out.  Before you get rolling with the dial pull the blade and check the arbor flange for burrs, nicks, sawdust built up etc.  Pull the flange off and clean behind it as well.  Do this everytime you change a blade.

In the pic I'm not checking for a problem.  I'm canceling out the arbor runout to the blade runout.  I've got it down to between .001 and .002 on all 4 of my saws.  If you own a miter saw having a dial indicator, a decent set of calipers, a machinists straight edge, and a couple sets of feeler gauges isn't really optional.  With a little practise and patience it's pretty amazing how tight you can set up any professional grade saw.

Standard kerf, high quality saw blades are a must.  Putting a premium blade on a saw feels like you are using a different tool. 
 
Thank you all for your input!
Justinh thank you for your excellent tutorial!

I've replaced both Arbor flanges, and the problem has dimineshed a lot.

I will try to check my blade and Arbor with a dial indicator.

Kind regards,
Gijs
 
Back
Top