Kapex Mounting for miter station

tomktest

Member
Joined
Oct 16, 2021
Messages
106
Hi all,

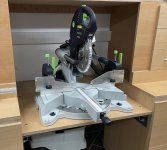
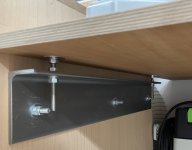
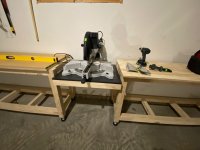
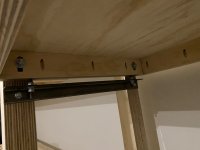
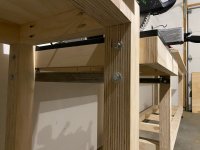
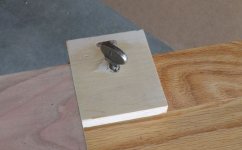
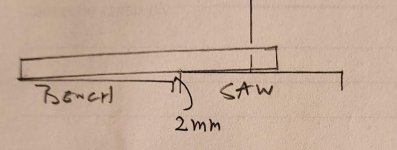
Does anyone have advice on how to attach the Kapex to a miter station to allow for micro-adjustability? I was orignally planning on having the saw rest on 4 nuts on the underside of the mounting locations however the mounting holes on the saw are tiny. I can get more elaborate and make the table adjustable if necessary. I don't think I will need to make adjustments often, but building it into the design would be nice for occasions where I need to move the miter station and then set it back up.

Thanks!
 
I build a version of the Jay Bates miter workstation, but used this method for the mitersaw table.  The platform spans two cabinets, but instead of being attached to the cabinets, it is attached to a section of angle aluminum using M8 carriage bolts and adjustment nuts.

[attachimg=1]

[attachimg=2]

My first mitersaw was the DeWalt DWS780, and later the Kapex KS120.  This method allowed me to easily adjust the height of the platform for each saw.
 

Attachments

  • Kapex-3.jpg
    Kapex-3.jpg
    215.9 KB · Views: 1,140
  • Kapex-4.jpg
    Kapex-4.jpg
    136.9 KB · Views: 947
This is really a great solution. I hadn’t thought about using angle iron. Nice bench btw!
 
I did the same as TomK with a twist. My measurement system is made from the long Incra fence system and sometimes I want to use a sub fence on the saw and other times no sub fence so I needed the saw to move easily between both modes quickly and accurately to line up with the fixed bench mounted fences. I was lucky enough to have two linear rails and a lead screw left over from another job so it got mounted on those which allows it to be moved in and out and locked at either position. I also mounted the fences on steel pins so they can be removed if I want the bench space which comes in handy sometimes without having to re-calibrate the fences.
 
I'm still working on the build but I did end up going with the angle iron approach. I used hanger bolts which have lag threads on one end and machine threads on the other.  In addition, I have some bolts through the side locking the table once the micro-adjustments are dialed in.

View attachment 1

View attachment 2

View attachment 3
 

Attachments

  • 1.jpeg
    1.jpeg
    213.4 KB · Views: 405
  • 2.jpeg
    2.jpeg
    173.7 KB · Views: 183
  • 3.jpeg
    3.jpeg
    256.5 KB · Views: 181
TomK_2 said:
I'm still working on the build but I did end up going with the angle iron approach. I used hanger bolts which have lag threads on one end and machine threads on the other.  In addition, I have some bolts through the side locking the table once the micro-adjustments are dialed in.

Looks great!
 
personally I dont stress on having the in/out feed table the exact same level as the Kapexs table, same with the fences. I prefer to have it just a tad lower and the fences set to where  the fences wont interfere with the material, but rather set back just far enough for the stops to be set to give me repeatability. After all its the Kapexs table with their hold down clamps that determine where the cut is. Some people dont even use fences other then the ones on the kapex and use a channel to set the stops for repeat cuts
 
jobsworth said:
Snip. Some people dont even use fences other then the ones on the kapex and use a channel to set the stops for repeat cuts

Count me in. I can square one end of a 8 feet long board, e.g, even if it's so slightly curved, something you can't do on a fixed fence (if also 8' long) lined straight up with the Kapex fence.

[attachimg=1]

[attachimg=2]
 

Attachments

  • kapex fence setup.JPG
    kapex fence setup.JPG
    30.3 KB · Views: 693
  • kapex fence setup2.JPG
    kapex fence setup2.JPG
    59.4 KB · Views: 687
jobsworth said:
personally I dont stress on having the in/out feed table the exact same level as the Kapexs table, same with the fences. I prefer to have it just a tad lower and the fences set to where  the fences wont interfere with the material, but rather set back just far enough for the stops to be set to give me repeatability. After all its the Kapexs table with their hold down clamps that determine where the cut is. Some people dont even use fences other then the ones on the kapex and use a channel to set the stops for repeat cuts

Agree. Long level support and long straight fence are only helpful when the stock is perfectly straight and flat. If the stock is curved the fence becomes a problem.
 
I didn't think to comment on this in my previous post, but my Kapex bed and fence are not flush with the workbench.  It is about 2mm proud in each plane.
 
MikeGE said:
I didn't think to comment on this in my previous post, but my Kapex bed and fence are not flush with the workbench.  It is about 2mm proud in each plane.

For a long, heavy board, wouldn't that kind of setup cause the cut on the end to be out of plumb? The same would happen if the bench was proud of the saw's turntable.

[attachimg=1]
 

Attachments

  • out of sq.JPG
    out of sq.JPG
    35.8 KB · Views: 671
ChuckS said:
For a long, heavy board, wouldn't that kind of setup cause the cut on the end to be out of plumb? The same would happen if the bench was proud of the saw's turntable.

Most of the time the boards float above the workstation surface with no problem.  When I was cutting some long (over two meters) beech slabs, I used small wedges left over from a door installation to prop up the distant end of the slab.
 
I quit trying to make the stock conform to my staging area when all I really care about is the short section that fits on the saw.
I use a scissor type lab platform to support the stock so that it’s flat on the saw platform.

[attachimg=1]
 

Attachments

  • IMG_0411.jpeg
    IMG_0411.jpeg
    63.2 KB · Views: 655
I just found this thread and am trying your leveling technique. I'll add pictures once I'm complete.

RR

MikeGE said:
I build a version of the Jay Bates miter workstation, but used this method for the mitersaw table.  The platform spans two cabinets, but instead of being attached to the cabinets, it is attached to a section of angle aluminum using M8 carriage bolts and adjustment nuts.

[attachimg=1]

[attachimg=2]

My first mitersaw was the DeWalt DWS780, and later the Kapex KS120.  This method allowed me to easily adjust the height of the platform for each saw.
 
Back
Top