ear3
Member
[member=6193]Rob Z[/member] The frame saw and shooting plane are actually out of the box solutions, so I'll just give the references here:
The Roubo Frame Saw is the version produced by Bad Axe, based upon the Tom Fidgen design:
http://www.badaxetoolworks.com/kpfs.php
They have options for just giving you the hardware, or a fully assembled saw, as well as throwing in a kerfing plane. I went with the fully assembled saw. They offer an excellent wood choice -- two pieces of quarter-sawn wood sandwiched around a thinner piece of walnut. I did not get the kerfing plane, as I do that on my table saw.
I did some tests and initial impressions after I first got the saw here:
http://festoolownersgroup.com/hand-tools/roubo-frame-saw/
Sometimes I get no drift, sometimes I still do, though I've learned how to control it and, if necessary, switch sides when it happens to bring the saw back. I can now consistently limit any waste to the size of the kerf.
The Renaissance Woodworker gives a good demonstration of the saw in action:
It has proven to be the perfect solution for me, since I don't really have space for a resaw capable bandsaw (unless I were to box up my lathe or drill press). The process goes quicker than you might think, though it does give the upper body a real workout. And I'm not resawing everyday, but rather using it only when I want to bookmatch or do other panel work. I think the widest board I've resawn so far is 14".
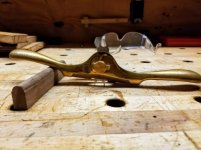
The shooting board is just the out of the box Lee Valley one:
http://www.leevalley.com/us/wood/page.aspx?p=76855&cat=1,230,41182
I've built a couple of shooting boards for myself, but I discovered that because of the way I end up using the shooting plane, which is for fitting and working on small parts, a fixed 90 or fixed 45 degree board had limited utility. I much prefer the broader range of capabilities offered by the miter gauge. I'm not a hand tool fetishist and don't plan on becoming one (not that there's anything wrong with that), and my default for square and plumb cuts is still the Kapex, tracksaw and table saw, but I've found in my woodworking there's a real place for the shooting plane to provide the finishing touches or to do detailed work that would be dangerous and/or wasteful to do with power tools.
The Roubo Frame Saw is the version produced by Bad Axe, based upon the Tom Fidgen design:
http://www.badaxetoolworks.com/kpfs.php
They have options for just giving you the hardware, or a fully assembled saw, as well as throwing in a kerfing plane. I went with the fully assembled saw. They offer an excellent wood choice -- two pieces of quarter-sawn wood sandwiched around a thinner piece of walnut. I did not get the kerfing plane, as I do that on my table saw.
I did some tests and initial impressions after I first got the saw here:
http://festoolownersgroup.com/hand-tools/roubo-frame-saw/
Sometimes I get no drift, sometimes I still do, though I've learned how to control it and, if necessary, switch sides when it happens to bring the saw back. I can now consistently limit any waste to the size of the kerf.
The Renaissance Woodworker gives a good demonstration of the saw in action:
It has proven to be the perfect solution for me, since I don't really have space for a resaw capable bandsaw (unless I were to box up my lathe or drill press). The process goes quicker than you might think, though it does give the upper body a real workout. And I'm not resawing everyday, but rather using it only when I want to bookmatch or do other panel work. I think the widest board I've resawn so far is 14".
The shooting board is just the out of the box Lee Valley one:
http://www.leevalley.com/us/wood/page.aspx?p=76855&cat=1,230,41182
I've built a couple of shooting boards for myself, but I discovered that because of the way I end up using the shooting plane, which is for fitting and working on small parts, a fixed 90 or fixed 45 degree board had limited utility. I much prefer the broader range of capabilities offered by the miter gauge. I'm not a hand tool fetishist and don't plan on becoming one (not that there's anything wrong with that), and my default for square and plumb cuts is still the Kapex, tracksaw and table saw, but I've found in my woodworking there's a real place for the shooting plane to provide the finishing touches or to do detailed work that would be dangerous and/or wasteful to do with power tools.
")