You are using an out of date browser. It may not display this or other websites correctly.
You should upgrade or use an alternative browser.
You should upgrade or use an alternative browser.
Latest Rip-Goodie... can you guess what it's for?
- Thread starter rmwarren
- Start date
rmwarren
Member
- Joined
- Jul 11, 2010
- Messages
- 3,063
epicxt said:Excellent. Order has been placed!
Thanks, they are in the mail.
Been following your marine refitting, looks like a fun (at times?) project. That last stateroom is about the size of my workshop, it can be quite a contortionist act to work with sheet goods.
Let me know what you think of the stops.
RMW
I've had a chance to use the Rip Stops now and I've got to say I love'em. Up until now I'd been clamping a piece under the rail and it was pretty unwieldy. This solution is speeding up the milling of true 5/4 material today. I can quickly switch from straight lining the rough board with a long rail to ripping to my desired widths without having to move material off the mft in a super confined space. Thanks Richard!
The only bummer was that the package had been opened in transit (thanks usps) and the t-nuts for the incra track were gone. Luckily I've got other rip goodies that I could borrow pats from.")

The only bummer was that the package had been opened in transit (thanks usps) and the t-nuts for the incra track were gone. Luckily I've got other rip goodies that I could borrow pats from.
rmwarren
Member
- Joined
- Jul 11, 2010
- Messages
- 3,063
Thanks for the feedback, I am glad you like them. Sorry for the problem with USPS, was the box actually opened and resealed?
I will drop some extra hardware in the mail Monday AM, thumb screws and t-nuts.
Just an FYI, I upgraded the web store software (woocommerce) late last week and the shopping cart stopped working. I am migrating over to a new ecommerce platform but it may take a few days to get everything back up. In meantime I am taking orders via email and sending out PayPal invoices. There is a notice to this effect on the site, and you can still browse, view videos and download product info.
Thanks,
RMW
Wow, thanks Richard! The package was open on one end. Looked like it had taken a knock in shipping or something. Anyway, important pieces were there along with the thumbscrews but the ziplock Baggie had broken on a seam and the nuts were missing. Absolutely not your fault and I really appreciate the above and beyond customer service.
Cheers, looking forward to using them again tomorrow.
Cheers, looking forward to using them again tomorrow.
rmwarren
Member
- Joined
- Jul 11, 2010
- Messages
- 3,063
No problem, it is what I would hope for if it happened to me. And I have a suspicious feeling the closure tape on those flat rate boxes is not to be trusted, I am going to start taping them all before they go out.
It's cool to see you using the stops with the MFT in that small space, my everyday shop is about the size of one of those staterooms so it is a familiar situation. Sometimes I have to get my cutting set up and then need to make the cut before I can get back out the door. More than a few times I have had to crawl out under something I was cutting.
Thanks again.
RMW
Hah! You just summed up my life the last few weeks!Richard/RMW said:More than a few times I have had to crawl out under something I was cutting.
RMW
rmwarren
Member
- Joined
- Jul 11, 2010
- Messages
- 3,063
Just an FYI, I finally got www.ripdogs.com back online with a new host. There is access to the demos, PDF's, etc.
RMW
RMW
promark747
Member
- Joined
- Jan 9, 2010
- Messages
- 501
Richard,
I'm trying to conceptualize what advantage the Rip Stops have, if any, over the Rip Guides. Could you please compare? I have the Rip Dogs and Rip Guides (both great products), but I don't see a purpose for these that couldn't be accomplished the same or better with the Rip Guides. The only thing I can think of is if you wanted to use a very long Incra track, the Rip Stops wouldn't be as cumbersome as hanging a long track from the Rip Guides.
I'm trying to conceptualize what advantage the Rip Stops have, if any, over the Rip Guides. Could you please compare? I have the Rip Dogs and Rip Guides (both great products), but I don't see a purpose for these that couldn't be accomplished the same or better with the Rip Guides. The only thing I can think of is if you wanted to use a very long Incra track, the Rip Stops wouldn't be as cumbersome as hanging a long track from the Rip Guides.
Slappy
Member
- Joined
- Aug 21, 2013
- Messages
- 564
I learned the hard way when I was selling on FleaBay that the free USPS boxes need tape on all edges as wellRichard/RMW said:I have a suspicious feeling the closure tape on those flat rate boxes is not to be trusted, I am going to start taping them all before they go out.
RMW
the amount of the cost of the extra tape needed pales in comparison to having the USPS boxes split open & having to resend lost items to keep a customer happy [cool]
I guess I'm gonna have to break down & send more $$ to you for these must have items [tongue]
Slappy
Member
- Joined
- Aug 21, 2013
- Messages
- 564
Wow,
Watched your Video ,
& I realized one could set the 1st rip-stop to a measurement & then use the 2nd butted up against the 1st while reversed to get a reference point then lock the 2nd down so that both are exactly the same lenght & then are Guaranteed a perfectly parallel & square cut to the other side of the board .
amazingly fast & easy way to do 'Perfect' Rip Cuts [eek] [blink] [scared] [tongue]
rmwarren
Member
- Joined
- Jul 11, 2010
- Messages
- 3,063
promark747 said:Richard,
I'm trying to conceptualize what advantage the Rip Stops have, if any, over the Rip Guides. Could you please compare? I have the Rip Dogs and Rip Guides (both great products), but I don't see a purpose for these that couldn't be accomplished the same or better with the Rip Guides. The only thing I can think of is if you wanted to use a very long Incra track, the Rip Stops wouldn't be as cumbersome as hanging a long track from the Rip Guides.
They do basically the same thing, largely comes down to preference. Sometimes it is easier to not have anything attached to the rail. The photo epicxt posted with the long rails is one example.
RMW
rmwarren
Member
- Joined
- Jul 11, 2010
- Messages
- 3,063
Slappy said:Wow,
Watched your Video ,
& I realized one could set the 1st rip-stop to a measurement & then use the 2nd butted up against the 1st while reversed to get a reference point then lock the 2nd down so that both are exactly the same lenght & then are Guaranteed a perfectly parallel & square cut to the other side of the board .
amazingly fast & easy way to do 'Perfect' Rip Cuts [eek] [blink] [scared] [tongue]
Slappy,
Great point, I sorta knew that but had not thought it thru. [doh]
In my original test, after they were zero-ed in, I adjusted both stops to 10mm by eye, end result was within .2mm. The little protrusion in the channel for the incra track almost touches the scale, reducing any parallax issues to nil.
RMW
Richard/RMW said:promark747 said:Richard,
I'm trying to conceptualize what advantage the Rip Stops have, if any, over the Rip Guides. Could you please compare? I have the Rip Dogs and Rip Guides (both great products), but I don't see a purpose for these that couldn't be accomplished the same or better with the Rip Guides. The only thing I can think of is if you wanted to use a very long Incra track, the Rip Stops wouldn't be as cumbersome as hanging a long track from the Rip Guides.
They do basically the same thing, largely comes down to preference. Sometimes it is easier to not have anything attached to the rail. The photo epicxt posted with the long rails is one example.
RMW
Just curious. . . Will the Rip Stops work with on only the Rip Dogs or will other dogs for the MFT table work in the same way in combination with the Rip Stops. It seems the Rip Stops are easier to use than the Rip Guides.
rmwarren
Member
- Joined
- Jul 11, 2010
- Messages
- 3,063
grbmds said:Richard/RMW said:promark747 said:Richard,
I'm trying to conceptualize what advantage the Rip Stops have, if any, over the Rip Guides. Could you please compare? I have the Rip Dogs and Rip Guides (both great products), but I don't see a purpose for these that couldn't be accomplished the same or better with the Rip Guides. The only thing I can think of is if you wanted to use a very long Incra track, the Rip Stops wouldn't be as cumbersome as hanging a long track from the Rip Guides.
They do basically the same thing, largely comes down to preference. Sometimes it is easier to not have anything attached to the rail. The photo epicxt posted with the long rails is one example.
RMW
Just curious. . . Will the Rip Stops work with on only the Rip Dogs or will other dogs for the MFT table work in the same way in combination with the Rip Stops. It seems the Rip Stops are easier to use than the Rip Guides.
grbmds:
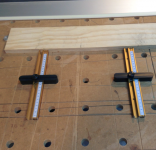
The stops need to be used with either the Rip Dogs or the stock MFT guide rails hardware to secure the rail to the MFT. The rail needs to be aligned parallel the the MFT holes, then the stops will register against whatever material you are cutting. The only reason to use a typical bench dog is to prevent the material being cut from moving forward while cutting. These photos show the Rip Dogs securing the guide rail but it could just as easily be the stock MFT hardware:
[attachthumb=#]
[attachthumb=#]
You can also use longer pieces of T-Track, the ones shown are about 10" which limits the cutting width to about 8". If you used 18" long track and moved the stops to the left by 2 rows of hole, the cutting capacity is now just under 16". Basically every row you move the stop to the left increases the cutting capacity by 96mm, when using longer tracks.
RMW
Attachments

Richard,
Thanks for the info. I was mostly interested in using the Rip Stops for ripping narrow strips but as long as I was doing the setup it might make sense to make the track longer for more flexibility with wider cuts. For some reason, the Stops struck me as easier to use than the original Rip Guides, but that might be just me.
So, I could buy the basic Rip Dog set and the Rip Stops and have what I need? (And, of course, I would need the track also.)
rmwarren
Member
- Joined
- Jul 11, 2010
- Messages
- 3,063
grbmds said:For some reason, the Stops struck me as easier to use than the original Rip Guides, but that might be just me.
I prefer them myself over the guides for narrow stock. The main difference is you can use the guides or stops with a rail fixed the the MFT, but only the guides work with a rail on some other cutting surface.
grbmds said:So, I could buy the basic Rip Dog set and the Rip Stops and have what I need? (And, of course, I would need the track also.)
That is accurate.
Thanks,
RMW
Similar threads
- Replies
- 6
- Views
- 281K
- Replies
- 12
- Views
- 5K
- Replies
- 5
- Views
- 5K
- Replies
- 42
- Views
- 52K
S
- Replies
- 3
- Views
- 3K