Leaks, Water Damage, and Mold

Yardbird said:
I see that furniture mat and blanket in the bathtub.

There is a site by a professional tiler called "Floor Elf"- I think he is out of Fort Collins, Colorado.  One of his tips was to always put a furniture mat in the bathtub.  That way you can tell the owner it is to protect the tub, but is really in case you just want to take a nap in the middle of the day.  Your tiler went one better-he even has the blanket.

[big grin] [big grin] [big grin]

The General put the mat in there; he told me that he was tired of his subs ruining brand new tubs dropping screws and stepping on them.  The tiler would have had to have put a timer on his saw to have taken a nap in there for as much as I heard the saw running when he was here.  [wink]

[attachimg=1]
 

Attachments

  • 20220921_133146.jpg
    20220921_133146.jpg
    122 KB · Views: 391
That looks fine…however if I were doing the job, I’d just roll out some Kerdi to cover the entire wall instead of using those small individual square patches. That way it overlaps the Kerdi at the bottom of the tub and you have a continuous “rain curtain” that prevents moisture from traveling to where it’s not supposed to be.
 
mrFinpgh said:
Sparktrician said:
No liquid waterproofing is used at all, but there is a need to use Kerdiband (membrane) with thinset to cover joints and screws to ensure a full waterproof experience before applying another layer of thinset to adhere the tile after the first layer dries.

Does every screw get taped?  I was thinking they would have some sort of fluid/caulk for covering those up, kind of like liquid flash/fast flash?

Still, I think I had to tape the joints on the hardi, so I think it's a net savings in terms of labor to use Kerdiboard.

All screws and seams get taped and the thinset gets left to dry before starting the tile job.  [smile]
 
squall_line said:
Here's the Kerdi installation that was done in my bathroom recently (not by me, by a tile guy).  I claim no knowledge of the proper use of the system, but this doesn't appear to be done incorrectly to my eyes, either.

The one thing I would do differently is in the first photo.  I prefer to back-cut (in essence, rabbet) the bottom slab of Kerdiboard so that it covers the lip of the tub, but is held up above the horizontal top of the tub by 1/4".  When I apply the bottom slab, I put a healthy bead of Kerdi-fix in the back-cut (rabbeted) area to seal the Kerdiboard to he lip of the tub.  When the tile job is complete, that 1/4" gap is sealed once again by Kerdi-fix to join the tile to the top of the tub, but flexibly to compensate for expansion and contraction due to heat and humidity.  [smile]
 
squall_line said:
mrFinpgh said:
Sparktrician said:
No liquid waterproofing is used at all, but there is a need to use Kerdiband (membrane) with thinset to cover joints and screws to ensure a full waterproof experience before applying another layer of thinset to adhere the tile after the first layer dries.

Does every screw get taped?  I was thinking they would have some sort of fluid/caulk for covering those up, kind of like liquid flash/fast flash?

Still, I think I had to tape the joints on the hardi, so I think it's a net savings in terms of labor to use Kerdiboard.

Here's the Kerdi installation that was done in my bathroom recently (not by me, by a tile guy).  I claim no knowledge of the proper use of the system, but this doesn't appear to be done incorrectly to my eyes, either.

Few years ago I remodeled our master bath. It just has a shower stall. I used cement board and the rolled Schluter-Kerdi membrane that is thin set onto the cement board. To me looks like they did a great job on your bath.

Ha - my house is about 40 years old and the original tile was just put on regular drywall.
 
Appears all of this is handle, just want to show you what can happen if a showert is not prepped properly.

I was in Denver doing this master bath and bedroom when my SIL called, wanted her master bath redone.
https://flic.kr/s/aHskYNxce1

When I got back home I told my SIL cost and timeline for me to do the work. She told to much and to long.

First clue she had a problem was the water leaking into the kitchen....

This is what the walls behind her tile looked like after a few showers. Yep, that is plywood in the shower with no warterproofing what so ever. I did not get to this for over a month after the last shower in the space, the plywood was still soaked when I took it apart.

[attachimg=1]

[attachimg=2]

Kerdi board, installed and taped.

[attachimg=3]

[attachimg=4]

Tile installed, waiting on the granite caps.

[attachimg=5]

[attachimg=6]

Schluter Systems is my go to.

Tom


Attachments

  • IMG_2122.jpeg
    IMG_2122.jpeg
    339.6 KB · Views: 350
  • IMG_2122.jpeg
    IMG_2122.jpeg
    339.6 KB · Views: 350
  • IMG_2154.jpeg
    IMG_2154.jpeg
    233 KB · Views: 347
  • IMG_2156.jpeg
    IMG_2156.jpeg
    243.1 KB · Views: 339
  • IMG_2207.jpeg
    IMG_2207.jpeg
    278.3 KB · Views: 331
  • IMG_2208.jpeg
    IMG_2208.jpeg
    200 KB · Views: 336
tjbnwi said:
Appears all of this is handle, just want to show you what can happen if a showert is not prepped properly.

To amplify on Tom's message, waterproofing is mandatory in the build-out.  No exceptions.  The photos below are from the bathroom in my own home after I opened the wall up.  This is the result of putting tile directly on drywall using just the absolute minimum of mastic with NO waterproofing and NO thinset base.  We are NOT amused!  [mad] 
 

Attachments

  • 20191209_102600_FOG.jpg
    20191209_102600_FOG.jpg
    1.4 MB · Views: 169
  • 20191209_101949_FOG.jpg
    20191209_101949_FOG.jpg
    938.2 KB · Views: 166
  • 20191209_101459_FOG.jpg
    20191209_101459_FOG.jpg
    937.8 KB · Views: 152
Sparktrician said:
To amplify on Tom's message, waterproofing is mandatory in the build-out.  No exceptions.  The photos below are from the bathroom in my own home after I opened the wall up.  This is the result of putting tile directly on drywall using just the absolute minimum of mastic with NO waterproofing and NO thinset base.  We are NOT amused!  [mad]

[eek]

That is rough.  Almost seems like they'd have to try to do such an incorrect job.
 
Picking up on this thread a bit more.  We're starting to put everything back together now that it's all had a lot of time to dry out and the concrete should be cured enough to tile.

It's been years since I had to do any drywall or plastering, so this took a bit longer than I would expect.  These small patches where there's an obstruction every 10 inches or so are a hassle. 

[attachimg=1]

[attachimg=2]

This weekend, the plan is to pull the (temporarily set) toilet and replace the tile that had to be removed as part of the plumbing work. 
The concrete they poured is neither flat nor co-planar with the existing substrate.  So first order of business will be putting down some feather finish to try to get to a flat substrate that is about the same height as the current substrate. While that's drying we'll do any cuts we need to make and triple check layout. It shouldn't take long, since it's such a small area. I'd guess we'll spend 3x as long on the substrate prep than we will on the tiling.

[attachimg=3]

One thing I'm unsure of though:  we have a skirted toilet (Toto Aquia), so it doesn't get fastened the way a typical toilet does using closet bolts.  Instead, there are plastic anchor blocks that get screwed to the ground, and then those get drilled into from the side to actually connect everything together.  When they temporarily set the toilet, they drilled into the concrete to anchor those blocks.  However, we will need to remove the anchor blocks in order to tile up to the flange.  So, when the toilet gets reinstalled, new holes will have to be drilled (we'll also replace the anchor blocks with new ones. The old ones can only be re-drilled so many times before they get too loose).  Is there an ideal material to fill the existing holes prior to tiling over them?  Something that will set up quickly and cure hard enough in 3 or 4 days time? 

By midweek, the plan is to have the toilet and sink back in place and a fully functioning bathroom.  Then I'll shift my focus to the kitchen ceiling starting next weekend.  My current plan is to use mineral wool insulation to muffle the waterfall-like sound of the toilet. There's about 6" of space from the wooden structure supporting the concrete to the edge of the joist. I haven't decided if I'll try to put 6" of insulation in there, or just stick with a more reasonable 3".

[attachimg=4]

The joists themselves will need to be shimmed out a little bit and then I'll be putting up a double layer of 5/8 drywall to bring the ceiling flush with the surrounding. With all of that, my hope is that the kitchen will no longer have all the sounds of the bathroom.
 

Attachments

  • PXL_20220829_195344986.jpg
    PXL_20220829_195344986.jpg
    316.4 KB · Views: 260
  • PXL_20221005_200722329 (1).jpg
    PXL_20221005_200722329 (1).jpg
    309.7 KB · Views: 250
  • PXL_20220830_214049452.jpg
    PXL_20220830_214049452.jpg
    437.8 KB · Views: 256
  • PXL_20220829_195105594.jpg
    PXL_20220829_195105594.jpg
    288.3 KB · Views: 260
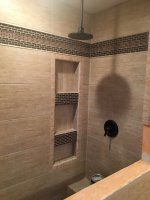
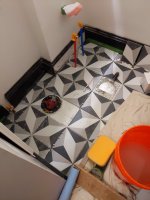
Well, continuing the saga we tried to start tiling this weekend. 
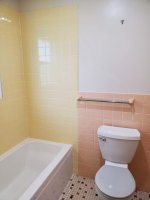
[attachimg=1]

I mentioned in my other thread (on my Fein Turbo II deciding to not run all of the sudden) that there were some setbacks.

  • The big plug in drill I use for mixing thinset/plaster/grout went up in smoke halfway through mixing up a few gallons of thinset.
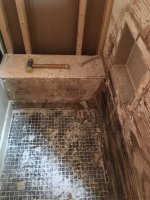
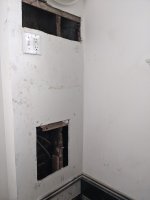
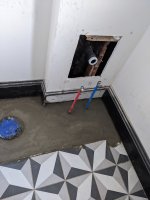
  • The concrete floor that the plumbers poured after doing their repairs is rather wavy in a number of directions, with a bit of an upward tilt towards the flange

So we were set back by a day or so but fortunately I've got enough overtime clocked to take Mondays off if I need to. :-)  I was able to get a new drill for mixing - I went with a HF Low RPM/High Torque spade drill/mixer. As of now, I can't see myself needing to mix more than 50 gallons of stuff within the next decade, and I'm going to likely buy a new dust extractor to bridge things while I work on examining/repairing my Fein Turbo, so I figure I'll put the money where I need it.

The drill works great - it can go as slow as I can possibly tolerate and no problems mixing up some thinset exactly according to the prescribed ratios. I used to mix thinset more or less by feel, and while nothing has ever failed on me, I wanted to be extra conscientious now that I'm more sensitive to the importance of following the recipe.

In hindsight, I wish I had allocated a full day just for getting the substrate flat and in plane with the existing tile floor.  While I did do a couple rounds of feather finish to fill in the hollows, the concrete itself seems to have an overall slightly downward angle to it, which made getting things even approximately flush was a lot more work than any other tiling I've undertaken. Here's what I did:

1. sponge the substrate to moisten it
2. burn in some thinset
3. with a 3/8*1/4 square notch trowel, rake thinset in one direction
4. backbutter the tile
5. press it down and wiggle it to collapse the trowel lines

The problem is, almost every tile was low relative to the ones already placed.  I know those were done w/ the same trowel because it's the only square notch trowel I have.  [laughing]  So my solution was to pull the tile up and ice it like a cake, putting on a generous extra helping of thinset. Then I'd push this back down and check for flush w/ the adjacent tile and put a straightedge across to check for parallel. In some cases, I would get generous squeeze out, which I took as a sign that I had 100% coverage on those edges (as long as it squeezed out along the whole edge). Some were perhaps a little hit/miss. All of them were very hard to pull up - the suction from the thinset was significant.

The thing about this approach that has me nervous is, I know Versabond Thinset specs a max thickness of 1/4". I'd guess I was pushing that limit and probably a little more in some places.  I also have a bit of concern that the generous layers of extra thinset might not be actually providing 100% support underneath - in other words, perhaps there are spots where the Tile-Thinset-Substrate connection didn't make it all the way down.  It seems like it wouldn't be the case, but I'm keenly aware of what can happen to a tile with poor support underneath it.

The other thing that happened is that somehow the layout got off - I chalk this up to the fact that I'm trying to get new tiles woven in to existing stuff and a couple of the cuts we made (we pre-cut everything, or tried..) seemed to end up working very differently with a layer of thinset underneath them. What I tried to do in this case is just adjust the layout so the critical areas will look good and be aligned. That meant shifting a few grout lines to be smaller than the surrounding ones, but those should all end up covered by the sink and be very low visibility (the ones in front of the pex). It is a bummer to do that - I hate seeing reminders of my bad work/compromises, but we are on a very tight timeline to get the bathroom put back together so we can get out of this AirBnB. As it is, we had to extend our stay to deal with our previous setbacks.

All that backbuttering meant my thinset went off before I could get all the tiles in (yes.. 20 some tiles in 4 hours..). So tomorrow after work I'll have to come back and finish it off. I just hope nothing else goes sideways on me and I can get those 4 remaining tiles down in less than a couple hours.  [huh]


Attachments

  • PXL_20221025_005020812.jpg
    PXL_20221025_005020812.jpg
    408 KB · Views: 180
Back
Top